Pages

Wednesday, March 30, 2011

First jacket block

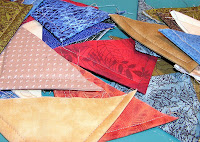
    This is the initial palette of fabrics I am using for the drunkard's path jacket.  I ordered more batiks from  Patchwork Gracie  with my prize certificate.  I have  to rave a little bit about their service...just fabulous.  Tammie shipped immediately and then sent me an email to let me know that she is refunding part of the shipping because she was able to use a flat pack envelope.  That has never happened before to me.  Customer attention   deserves recognition.   You might consider dropping by their site and checking it out. 

Today is cool and rainy...again and more on the way.  So I decided to try something fun for the afternoon.....
 Here's my first block for the jacket class.  I used a block from EQ7 and altered it a bit to make a paper piecing pattern.   I played around in EQ and drafted off a couple of more blocks to try.    I don't want them all the same.  I will include a few "plain" drunkard's path blocks, too.  
  Now before anyone who knows me, gets  excited about the curved seam.....I confess.   I used my usual technique  of top stitching the curves down.  Look close you can see the stitches.  The batiks press under so well and create a sharp edge--it is just so easy to stitch from the front with a tiny blanket stitch.
  In the class, the glue stick method is used.  Remember ----me and a glue stick do not play well together.  I end up glued to the fabric instead of the fabric to the pattern.   Not a pretty sight to see, or hear about.


I finished the free motion quilting on Justin's quilt and I am ready to add the points and the facing.  Hopefully, it works like I planned/hoped/expect it to and I will have some photos to show how I finished it off. 
Happy stitching.

Monday, March 28, 2011

Catching up...

    I lost a few days last week....so much going on.  Our trip to Charlotte was great, and the furniture was delivered safely.  Two treats for me, at least.....a quick trip to Mary Jo's, quilter's  paradise here in the Carolinas, and lunch at Big Ben!   It's a quaint British Pub in a warehouse and we really enjoyed the Scottish Meat Pies and the desserts.  Yum, yum. 
Projects that are on going:   I am down to the last with the quilting on the big quilt for Justin.  One more session and I should have it done.  Then to get the points attached. 

    The Drunkard's Path Jacket-----I forgot I had signed up for this class at Learning Fiber Arts group.  But there are several good techniques involved and I really want to do it, even if I hate doing circles and curves.  So far all I have managed to get done is the drafting of the block and making the freezer paper templates.  And of course picking out the fabrics.....and to top it all off, this morning I got an email from Michele at Quilting Gallery that I won a $25 gift certificate for fabric from Patchwork Gracie.  Yahoo....I can order some batiks for the jacket.

    The blended floral quilt is still hanging around on the design wall.  I don't know when I will get back to it.  I still need about 20 more blocks for it.  Maybe next week?

 Then this week's journal quilt.  This is a quickie, inspired by a scrap of toile fabric.  I love the colors in it, the blues and tans.   I just did a hunt thru the  scraps to find fabrics that  were subtle and matched the toile print.  No rocket science here, and I actually like this one alot.  Must be the color combination.

  Got to run show the house....happy stitching.


Tuesday, March 22, 2011

Just a little free motion quilting

  I managed to get a little chunk of time ---a couple of hours---to begin quilting on the graduation quilt----I really have to come up with a name for it.   I debated on just using straight lines because it is so big, but I love doing free motion and especially quilting swirls.  Three guesses on what I ended up doing.....and the first 2 don't even count.


  You can see it is not densely quilted.  It is just a meandering type swirl that flows from one  block to the next.  Just curl one way and then the other way.  Swirl to the right and then back around on it self.  Throw in a little one and then a bigger curl.  Or get in a corner?  Just do a "hop" to a new area with a arc and  take off in a new direction. 

 A few practical tips on this type of pattern:    I don't mark my quilting lines.....I am just too impatient for that.  I have put in hours of practice and finally figured out how to make this pattern work for me.  I don't begin  stitching exactly in the center of the quilt, more to one side near the center.   ( Most people will eye the exact center first, so if my stitch is off they won't see that first!)   Notice that the swirl comes back to near where  it began.  So if my open area to stitch is to the right, the swirl should curl to the left and then come back to the right---near to where I began.  And so the opposite is true, if the open area is to the left, begin the swirl to the right and come back.  If I need to change directions, create a point and  move in the direction you want to go.  Create a figure eight with the large swirls.   I tend to stitch the swirls to the right because I am right-handed, I think.  I have to remind myself to change directions sometimes.  I filled 9 bobbins before I began because I hate to stop to fill bobbins in the middle of a project.  And as usual I am using Isacord thread and hiding the tails as I go.


Note the straight line through this portion.  It is the wash away basting thread that I did as a basting stitch before I began the overall quilting.  You can see I just stitched over it....hoping it washes away as promised. 

   Quilting gloves, music, and a steady movement and away I go.   I love seeing the quilt develop as I stitch.  For me, the act of quilting brings the quilt to life by introducing movement with the stitching.  When I am at the machine, it frees my mind and  lets my spirit roam free.  Worries and pain are banished.  A day or an hour stitching, is a great day.   Happy stitching.

Sunday, March 20, 2011

Details

Over at Quilter in the Gap  there is an interesting survey posted about blogs.  One of her questions was about what you like to see on blogs.  The biggest thing I like is details.....inspiration, creative process, share problems and fixes, things that work and what doesn't.  Seeing a finished quilt is wonderful and fun, but I am very interested in the process--the journey to get to the end.  That's really why I began to blog.  I am very analytical---my clinical training, I guess---and  how I get to the end is as important to me as the finished result.  Plus, I never want to stop learning ---I might miss something special.  I know I keep doing variations of  watercolors---that is my niche---by working in value, and  I have enjoyed the journey to get here.  And there are lots more avenues in value to explore.  So, on  to a journal project I worked on last night.
The process:
  I played around with a photo I found on line and managed to get a muted effect like a painting. Picasa is a great free program, and you can get some neat effects.   I printed a small version of  it out  onto a scrap of Printed Treasures.  I save all the extra pieces of PT  and this piece was just about 3 inches by 4 inches.  To get good placement when I printed,  I first printed (in B&W)  on paper and then taped the scrap of PT on top of the image.  Then I ran it thru the printer again!
  Then I went thru a box or two of scraps, looking for value that would blend or match the colors in the photo. 
Here is a close up of the photo and the fabrics I chose to surround it with.  I decided to just use straight lines when attaching the extra fabrics.  The book on blending with photos teaches the technique of extending the curves and lines of the photo onto the quilt.  The values and colors  of the extra fabrics are very close.   But since this is so small and I was just using small bit and scraps, I decided to just try to fool the eye with value---straight lines or not.  A couple of pieces of fabric were just perfect, and others close.  I fused a clump of tree (from a printed scenic fabric) on the right to extend the photo out.    This section measured about 6 " by   6"....too small, need more fabric.
  I couldn't find a perfect fabric to extend the sky,  so a ended up with a scrap of my dyed fabric from last summer.  And just a couple of angles strips on the bottom and it begins to look like a landscape.

  Final :   I did find a piece I liked to create a border, or half of it anyway.  It's on the right and bottom...the colors are good for this.  It reminded me of barn siding.  Still not large enough,  need more fabric to finish this off. 
  The last border piece is a "brush stroke" type neutral....I was getting tired of hunting thru scraps.  A narrow side piece and a wider top.   I  am  going to ignore the wonky edges because I was watching Larry, the cable guy on TV and laughing so hard.  What's a crooked edge when you having a good belly laugh. 
  If you haven't checked out all the journal quilts on Flickr--click here.  There are all types of techniques and ideas used.  Great talent and inspiration in this album.
Happy stitching.


Saturday, March 19, 2011

Hail storm!

   Just when I got into the sewing room about 4 pm today.....the skies opened up and it all came down.  Hail and more hail hitting the back windows so hard I thought they would break.  The pounding went on and on.  This is looking out the front door....the yard is covered in about 10 minutes. 


When the hail let up, I went onto the back covered porch....the chair cushion was full of hail.  This was scary.  Guess we will need to get the roof inspected after this one. 

  So needless to say, no stitching today.  I pulled out a couple of things to play around with tonight that I can use for a journal quilt, since I missed last week completely.  Maybe, I should call one of them--hail storm ;)
Enjoy the rest of the weekend, and I pray for sunny skies for all.  Happy stitching.

Friday, March 18, 2011

Catching up

     It's Friday already and I am way behind.  No journal quilt this week even.  The weather has been beautiful for a few days and we had a few plants to get in the garden.  Ilse gave us several camellia seedlings, larkspurs, and a magnolia tree--about 4 foot tall.  I still need to spread some mulch, too.   Then there were all the "family" things that needed attention....like getting Justin's announcements ordered,  Dan's move, and such.  Looks like we will be storing some furniture for a while, especially Mom's dining table.  None of us want to part with it, and yet we don't have room for it now.  Too many family memories associated with that table to let it go.
   I spent several evenings working on the prairie points for the big quilt.   I had planned to attach the unfinished points to the outer border and then face it when finished with the quilting.  I could not make the math work out for the size of triangles to cut....so I looked for a plan B.  I finally admitted  I would have to use finished points  that I could space as needed.   That meant cutting small batting triangles to fit the folded and stitched triangles I had  plus some more. 
   Then to begin the quilting.... because this one is so large, I decided to stablize it beyond the pinning.   I  stitched  it with wash away basting thread up and across the center.   Then bunched it up for free motion quilting using an all over swirl.  Bit by bit, I will get this done.
Happy stitching.


Friday, March 11, 2011

Watercolor journal quilt

Watercolor--what a surprise!  Since my journal quilts are a collection of different techniques, one of these had to be included.  This was an unfinished piece that I used in classes to show blending and how to reverse the color wash effect.  I always thought of it as "coming and going".    I like the way the middle portion just flows across the piece, and then takes off in different directions. 
   This piece was already fused and just needed the rows sewn.  It is larger than the rest of the journals.  This one is 15" by 21"---small wall hanging or place mat, maybe?   I had to really piece a lot of left over binding strips together to get enough to finish this off.    The good news:  My bag of  scrap bindings is almost empty.... only short pieces left.     So "watercolor" this one done.

  Got any journal quilt ideas?  I have a few more technique ideas to try----circles (which I usually avoid), using photographs, collage fused, just strings and strips, painted or stamped---and I'm open to more.
Please share your ideas with me, as they may give me a light bulb moment....happy stitching.

Thursday, March 10, 2011

The last BIG quilt

It is just getting to much to tackle when the quilt is bigger than my work space, floor, or design wall.  So this one has got to be the last BIG quilt I do.  Of course, my daughter reminded me that I've said that before.  And this one is for Justin.  This is about half of it before borders--right now it is 88" square! 
  I didn't do the stretched star points after all.  It wasted so much fabric,  and I was very happy with this traditional look.  I like the subtle blend of the stars rather then having them stand out too much.  Justin is a very laid back guy who loves the outdoors and hunting. So the earth tone colors --with a couple of zingers--should suit him well.   I'm ready to add the dark green border and the points.....but how will I ever get this hunk of fabric quilted????    Think I'll ponder that next week.
   Looks like life is getting ready to change again.....for months we have prayed for my brother to get a job, and/or to sell his house.  Whoa....this weekend we showed the house and it sold right off, and today he got a job and an offer for another! 
I stand in awe.  I am glad and sad.  It is all great, it just means Remy will be  far away.   It only proves the Lord's provenance in our lives. 
    Happy stitching, 

Monday, March 7, 2011

Graduation quilt

This is going to be a variation of a quilt I made several years ago.   It is more of a technique rather than a pattern.....the stars form by using sashing.   I rarely use a sashing  between blocks in my quilts.  I much more enjoy all over patterns or overall designs.  There are great instructions on this block/technique at quilterscashe.com ---so I'm not going to even try to duplicate it.  The block is Morning Star.    Basically, the cornerstone in the sashing forms the center of the star, and by adding flip and sew corners to the sashing strips, you create a star. 

 For Justin's version I am using a large block....a very large block of 18 inches.  Instead of a single square framed by the star sashing, this one will have a nine patch of 6 inch squares with a 4 inch sashing.
    The original photo that he gave me to work from was a quilt of just large squares with a prairie point edge.  I planned it out in EQ7 but was having a hard time getting started on it.   I think I found it boring and just wanted to add some kind of design to it. 
   Here's the EQ7  layout for this variation with only 9 stars.  I set up a swatch card for the stars and planned the layout of the sashing too. Because the stars are not all the same color,  I needed a guide to follow as I add the points to the sashing strips.  I have the 9 patch sections done and 2 stars completed so far.  I should have it together in a couple of days.   I think I have it figured out how to finish it off like he wants with the zig-zag points loose!  More on that later.
Happy stitching.   Yea!  Preview is now working on blogger!

Thursday, March 3, 2011

Creative break

Not a great deal of stitching got done this week....as it is tax time.  I have been in a brain fog of numbers and forms for most of the week.  I managed to get started on Justin's graduation quilt yesterday afternoon and have all the large squares...145 of them cut  for the 9 patch sections.
   Today though I really needed a creative break.  You know, something fun and spontaneous, almost mindless.  Sounded like a Rx for a journal quilt project.   Ingredients used:   solid black  for the background, and leftover bits and pieces of fused fabrics from prior projects, and 3  butterflies from a panel print. 
  Result.....just a hint of Spring!  I positioned the butterflies first and fused them in place.  Then I began creating "blooms"  of color for them by cutting and snipping the fused scraps.  Some green leaves and a few odd pieces were cut to just fill in the areas.  I tried to leave narrow spaces between each piece so that the black would cause all the colors to pop.  I layered the finished top onto batting and backing and stitched/quilted each piece.  Free motion stitching along or near the edge....just enough to hold it all down, and not intended to be perfect for sure.  This mosaic technique  just had to be included in my journal challenges.....a great stress reliever.
Happy stitching,