Another practice piece on the feathers....I'm getting the hang of it. This is done with Quilter's Dream cotton batting, so it is flatter and not as puffy. I still love the effect. Now for the details.
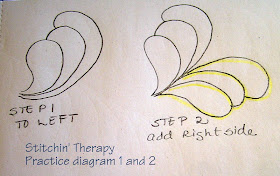
Here's a step by step diagram to get you started with the endless feathers practice.

Step 1: Begins with a tear drop shape. Attach a plume, and stitch back up just a little over the last stitches. Then do a bump back plume returning to where you began. I know the stitching over stitches is not easy, but honestly it does get easier with practice.
Step 2: Here you repeat step 1, only on the other side. In my example I began step 1 going left, and step 2 goes to the right. A nice "v" shape is formed in the center.
Step 3: Add 2 more plumes to the right---extending the length to achieve a nice curve--returning to the center. Then go back to the left side adding an attached plume and then a bump-back plume returning to the center. Do another set on the left and vary the size of the plumes. Note---you can get the "spine or stem" begin to develop in the center.
Adding more plumes to the left develops a slight curve to the right side over all. You are creating a turn in direction. This is the part that took me forever to figure out......longer and deeper plumes to one side develops the curve. Adding shorter and fuller plumes to the opposite side fills in and follows the curve.
One big, full continuous feather! I started at the arrow and just kept working along curving one way and then the other. Turning the corner...look at those long plumes....they did the work. Now I need a quilt with some open spaces to fill.
Like I said before, I think we each have a "quilting signature". A style that works for me may not work for you. What others do easily, I struggle with. Only through the practice and quilting can we discover our signature. My intent here was to share my journey in learning this motif. I am hoping you will try it, too.
This weekend is the start of the new weekly Show and Tell at the Quilting Gallery. This week's theme is Favorite Quilts of 2012. Guess you can figure out which one I entered....Wonders of Color. Check it out for some inspiration.
Happy stitching.


Thank you for sharing so clearly how you quilt these; I'll certainly be adding these to my repertoire!
ReplyDeleteOoo, you make it look so easy!
ReplyDeleteI will have to try that method of a few plumes on each side as you work up the spine. Thank you for sharing.
ReplyDeleteTerrific tutorial! I hadn't realized you make spineless feathers when I commented a few days ago. I'll have to practice your style some more. :)
ReplyDeleteGreat explanation and drawings - I think this will help a lot of folks lose their fear of feather quilting. Your practice piece looks wonderful!
ReplyDeleteI've tried these before and always get carried away and mess up , love your way of doing this .
ReplyDeleteBy the way I voted for your quilt on Quilting Gallery, sure hope you win !! You deserve it.
Excellent instructions, Debbie. You do the feathers so well and explain them so clearly. I am going to practice these for sure! Thanks for the effort to share what you know.
ReplyDeleteWow! Someday I hope to put this to use... you make it seem easy.
ReplyDeleteBeautiful! Definitely has me in the mood to try it.
ReplyDeleteWow, what beautiful plumes you have! Yumm. Great tutorial Debbie. Super great.
ReplyDeleteDid this get shared on the Facebook group for the 2012 FMQ Challenge?
SewCalGal
www.sewcalgal.blogspot.com
I'm glad you mentioned these feathers. I want to try them sometime. Do you ever mark the stem, or do the feathers just evolve?
ReplyDelete