Pages

Wednesday, November 27, 2013

Finally, the Faux Braid

   This series of posts has been a journey for me.....reviewing some past quilts and braid techniques, and hunting up info to share, and trying to some order into all of it.
Insight:  Developing a class or series like this is not easy....it is work!  So hug a teacher, they deserve it.

Quarter Log Cabin  block
   The Faux Braid is a new favorite now.....I think I could put one together blindfolded.  It works up fast and easy.  So what is it?  Simply the quarter log cabin block....with the variation of how the colors or values are placed.
   Generally or traditionally,  the quarter log cabin block  might look like the photo on the right.  Each round that is added to the starting square is the same fabric/color.
 
  
  This photo shows the change in placement for the Faux Braid using the quarter log cabin block.  Each round contains a light strip and a dark strip.  This arrangement creates a block that is half light and half dark.  Then when set together the blocks create a braid effect.


  By rotating the block for the layout, the diagonal bands are formed.  Note.....very little matching to worry with!  
   I call this one the soft version.  The fabrics are low contrast...a very soothing and restful effect for our troubled world.   A nice border and a little applique would finish it off nicely.


         And for the flip side.......a version done in leftover batik strips.  Same pattern, just different fabrics for a different and stronger voice.  This one reminds me of the blue Ridge Mountains that are nearby.

  The original tutorial is from Sharon at Vroomansquilts.    Be sure to say hello when you check it out.

  Based on her tutorial I put together a simple sheet with the construction details.  Click here for the printable PDF for the Faux Braid.  


    I had planned to take a side by side photo  for comparison on the deck today, but nature intervened.  It is 37 degrees, and raining here, so I resorted to the front porch again.   I just wanted the contrast of the 2 versions....one soft and the other stronger.  Whatever fabrics you prefer, the Faux Braid will be striking!


  Thanks to all for taking the time to read and comment on this series of posts.  I hope a few of you will try this fun technique, get over your fear, and figure out which one you prefer.    Send me a photo if you dare!
 
   If I am quiet for a few days....don't worry.  I have a lot of stuff to clean up in the sewing room, and  a couple to quilts to work on.  Wishing all a Happy Thanksgiving.  I am thankful this is done..... ;)

Happy stitching.


Friday, November 22, 2013

Create a star instead.....

   I went to continue working on the Faux Braid sheet....and I have misplaced it.  I am sure it is still somewhere in this computer, but where, oh where, did this gal save it?  Never fear, I decided not to panic but throw in this little idea I creatively borrowed (that is stole in real language) from a pin seen from  Etsy.
  This is just a quick sample, making it up as I went, so pardon the lack of precise measurements.


  •    Start with a plain square.  I used 3" in this sample.  Next time I would recommend a 3 1/2" square.
  •   Add a 2" by 3 1/2" strip to one side.  
  •   Add strip number 2---2" by 4".


  •   Repeat until you have added 3 rounds to the 2 adjoining sides.  
  •   Trim the band unit  like you would for a braid quilt.  I aligned the ruler line so that it goes thru the center points of the square and braid rounds and the cutting edge exactly on the edge of the square.  
  •    For the large triangles:  Cut a 5 1/2" square ( or a 6" square if you like to have fudge room to trim).  Cut on the diagonal to get 2 triangles.    Sew a triangle to each side of the band.
  •   Square up the sides if needed and square the unit to 7".  Note--- here is where I did my fudging by trimming the inner corner of the prints.    

  Now repeat the whole process until you get 4 blocks.

  Here's the beginning of your braided star.   Click here to see the inspiration quilt.
   If not a large quilt.....how about a Christmas table runner, or set on point for a wall hanging?

  Thanks to Nicki for suggesting I link these posts in the tutorials section for future reference.  I am always forgetting where I explained something and thought this was a great idea....I am working on it now.

  So the finale is the Faux Braid....I promise to get it up next week, even if I have to start from scratch!

Happy stitching.  

Tuesday, November 19, 2013

Continue the braid: Find a focus

  Picking the colors and finding the focus for the French Braid is where you start naturally, and it appears to be the stopping point for many.  Once again I will send you to check out some of the examples pinned to my Braid Quilt board.  Begin by looking for the French Braid quilts and note the color combos and the focus fabric each uses.  Lots feature blues, and I love the one using fall tones.

  When I made my French Braid, I had just begun blogging and did not take enough photos to show my progression in the fabric selection.    So I am going to jump to this year and use the French Braid table runner to illustrate how I chose the fabric I used.

If you are afraid to try the braid technique.....this table runner is just the size to start with.  I left the photo large so you should be able to enlarge it and really examine the fabrics, too.
   The large center square fabric was my inspiration and focus.  It has a range of blue tones on a darker background with some softer yellow tones.
   I found a bright blue that I used for the smaller accent squares that was a very close match.  I could have used the yellow tone or a much darker blue for the accent squares.  Either would have been good, and just given a different feel to the runner.
   I used 7 different fabrics to create the braid run.....2 very light, 2 medium lights, 1 medium, 1 medium-dark, and ended with the focus fabric.

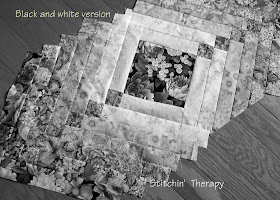
    This is the same photo in black and white.  All the color is gone and you see only the value of the fabrics.   Taking a photo of your fabric selection for any quilt is always a good idea, as it helps you see more clearly if the colors blend or contrast, or if one fabric just doesn't fit in.  I also use this technique when I do a bargello quilt.   This trick is a good one to use, especially with the braid technique.


Tips for your color scheme:
  •   Find a focus fabric, or one you want to use as your color scheme.  
  •   Now find 4-6 more fabrics based on the first fabric---select by color or contrast color.   Example---a fall fabric of golds and red tones.  Add a green print or two, and maybe use a golden brown as the accent square on the light fabrics and a lighter yellow with the darker fabrics.
  •   Be sure to have a change in value in the chosen fabrics....working from light to darker or visa-versa.
  •   Take a photo of the fabrics.  Line them up next to each other and see what happens.  Convert the photo to black and white.  Eliminate anything that doesn't fit and try again.  

   I pulled together a couple of examples to show.  I began with the dark purple print, found a fabric that had the same colors for number 2.  Then I went lighter in the purple, and next moved to a purple and yellow print.  Finally I found 3 lighter prints in the yellowish tones.  I would use a dark purple accent with these!  :)


  From leftover batiks strips.....I pulled 9 together that just might work!  But then, I find most batiks work well together.  So if you use batiks, be sure to get one or two very dark ones in there for dramatic effect.  
   So all of this is really a repeat of the selection process I use in general.  How you find a few good pointers in it.


  A few construction tips:

  •   To figure or at least estimate your length for the braid, it takes a little math.  Remember your strips will end up on point, so a 2 1/2" strip will really measure just over 2 3/4" when sewn into the braid length.  So I would roughly calculate by deciding on the length and divide by 3 to determine the number of strips I would need. So for a 60" braid length, I would plan on 20 strips (and probably throw one or two more in for good measure ).   It pays to be a little flexible with this technique! 
  •   If you have 7 fabrics chosen, you will need 3 cuts of each.  The repeating of the color run is what makes the design exciting. so plan on it.
  •  Accent square......chose your fabric for this square to contrast with some or all of the fabrics.  
  •  Accent square.....The accent square is added to just one of each of the strips for each "round" of the braid.  I first cut 1/2 of the needed segments.  Then I added a strip of the accent square fabric to a section of each fabric.  From this unit I cut the remaining segments---this unit became the second strip of each round.  It just saves a little bit of time and effort. 
  • Spray starch is your friend.....starch the braid runs before you trim them.

   Once you have the fabrics selected.....go for it. Cut those strips and stitch away.  I think you will be wonderfully surprised at what you can create.

  I will be baking for a couple of days, and preparing the final information on the Faux Braid.  Let me know if you have more questions.  Happy stitching.

Friday, November 15, 2013

The Oo-la-la Braid

  That's the extent of my knowledge of French.  So let's talk French Braid as in quilt.

   The  distinction between the Friendship Braid (on the left) and the French Braid  (on the right) is the accent square used in the French Braid.   The actual construction is the same in both.  The French Braid has the accent square that travels the length of the braid, and this is what carries the eye along the design.
  In both quilts I used separator strips between the bands of braid.  So I have the bias of the braid stabilized by the straight strip.


Another comparison photo....the two on the left are both done using the Friendship Braid technique, only the smaller one in the center has no separator strip.
  Tip:  When sewing bias to bias edge, pin a lot!    Be willing to do some easing if there is too much stretch going on.
   Tip:  Spray starch the bias.  This will help....just be sure to press and not iron in multiple directions.
  
 Tip:  I found that sewing with the bias braid band on top of the straight of grain separator strip worked best.  I was able to ease some fullness in.  Generally, instructions in books and such will tell you to put the bias on the bottom.  I found that only warped edges on this.

  The second thing to notice in the above photo is the width of the braid bands.  I used 2" strips in the Friendship Braids, and the bands were trimmed straight at about 5 inches.   I used  2 1/2" strips in the French Braid and the braid bands were trimmed to 9  inches.   How can that be?  It's a math thing.....that 1/2" gets multiplied when put on point and makes a big difference.
  For full detailed instructions of French Braids I highly recommend French Braid Quilts by Jane Miller.      Good photos, great inspiration, and cutting and sewing instruction.
 
   What I felt was lacking was how to select fabrics for a successful braid....how to achieve that blended look, etc.  So that is where I want to pass on my knowledge and things I figured out in this technique.  I am trying to consolidate a lot of info scattered throughout my older posts on fabric selection and creating  that blend, so bear with me.
    The "season" is quickly approaching.....and time gets eaten up with so many things.  I serve on the meal team at church and I have never seen so many requests and needs for meals.  This week I have been in the kitchen more than the sewing room.  And thanks for the great comments about this series of posts.  Happy stitching.

Tuesday, November 12, 2013

Are you brave enough for the braid?

 For the novice or those who live in fear of bias edges:
    Once you have your fabric selected, do some cutting.  I generally cut segments about 6" to 7".......the length you need to start with will really depend on your strip width.  Yes, you will have some tails---and waste---when you trim, but during the sewing process you don't have to contend with the bias.  Note----all the seams are straight easy to sew seams!

  In the photo--top right corner---a square starts you off.  Add a strip to on side.  Then add the second strip to the opposite side.  Repeat...and repeat.

  When the band is the length you want, you need to square it up.  You will need to cut thru the center of the square to get the base.  I chalked the cutting lines in on this sample.

   Tip:  I lined up the point of the square with a line on the ruler.  The points of each segment should fall on that same line.

  You will also find a variation of this that uses an offset center point......the final look is just a bit different because one side of the band has longer strips.  You decide which way you want to go.

  Tip:  I do not cut and trim off the sides until I am ready to either join them together or add the separating strip to the bands.  The less time the bias is "free to grow", the less stretch  I have to worry about.  

   In this photo, you can see the bands are sewn but the sides are not cut yet.  The bands were placed on the design wall until I was happy with the arrangement and had the separator strips prepared.   Once the bands are sewn and cut.....you have bias edges!  Just plan ahead how you will work with them.
 In an email from Lynn at What a Hoot, she shared her tip:

I have spacers between my braids,  so there is a bias against a straight edge on each seam. If I were sewing braid directly to braid, I would definitely press them first with some *serious* starching to help control the double bias seam!

The Binding Tool   can be used as a template ruler for a braid quilt.  Remember to cut 2 layers for a regular and reversed strip.
For the very brave......If you are not afraid of bias, hate to waste an inch of fabric, and like to have the pieces cut exactly  to measurement, then read on.
   I ran across a quick video on Youtube that I thought was worth sharing.  From the Missouri Star Quilt comes a quick method of cutting pairs of braid segments using the Binding Tool as a template.   Since you probably have one of these, it's a free template.
  There is a new ruler on the market that is set up to cut pieces for a braid quilt, but I found it $$ and confusing.  So if I wanted a template, I would use the binding tool for sure.

Don't forget the check out the braid quilt examples on the Braid Quilt board on Pinterest.   I added a couple of new ones. I would love to share some of those quilt photos here, but don't want to run into trouble...evil grin...so I just pinned them.   I have mainly used narrow separator strips before.....but I am liking the wider separator bands I lot.

  What else can I say about braid quilts?  Hang on, there is more.  Next post will talk about French Braid Quilts and what makes them different.  Got to finish cutting strips, happy quilting!

Friday, November 8, 2013

Braids on the brain

     Braids on the brain.....braid ideas swirling around and around.  I promised a series of posts to share tips and techniques on braid quilts.  I set up a board on Pinterest for Braid quilts for inspiration and color combos.  And as a place to hold the tutorials that are available on different braid techniques.  So here we go.....
 
  A traditional braid is often called a pioneer braid, or a friendship braid.  The best tutorial for this can be found at Quiltville----of course!  Bonnie Hunter is the Scrap Queen and a braid is the perfect use for scraps. Her tutorial uses 2 1/2" strips and is presented as a border idea, as well as a quilt.  Her tutorial can be printed off from a PDF, too!
   A second choice for a tutorial I found is at Reanna Lily  Designs.   She has an interesting take on how to mix it all up when sewing the strips together.
Either of these tutorials will give you the basics on construction, so I am not going to repeat and make a mess of it.

Amish Braid Quilt
From Modabakeshop.com
   The photo is "borrowed"---I know I will get into trouble over this, oh well---- from Modabakeshop and is a great visual example of how the braid is formed.   The bands of the braid are formed by adding a strip to one side of a triangle or square, and then adding a second strip to the adjoining side.  By alternating back and forth when you add the strips, a woven appearance happens.  This example uses Amish type colors that are very striking against the purple.

  And this leads to fabric selection.....exactly what do you want to make?  A scrappy version from your over-flowing basket or bin,  a two color version in red and white,  or maybe something  using that batik jelly roll.........what do you have in the stash closet, I promise it will work in a braid quilt.

 
  This is a small table runner I did using the braid technique to frame the center block....and the strips--some were strings--were different widths.  I just kept adding to one side and then the other to finally get the length I wanted.
What made it successful was the color......all blues ranging from dark to light.  


   In my closet there is a huge stash of floral fabrics....so doing a braid with florals a few years ago was a no-brainer.  I love to blend the fabrics so that the values merge and  melt into each other.  This close up photo shows  the multitude of floral fabrics in the wall hanging I made.
   So the first step.....pick your fabrics.  Stick to a color theme, or fabric type, or mix it all up.  That is where you begin.
   Next up will be a quick look at construction....how to really begin.  So is you have any questions....let me know and I can answer it here, too.
  Happy stitching.  

Wednesday, November 6, 2013

Inspiration for a braid quilt

   Just for inspiration, I set up a new board on Pinterest.....Braid Quilts.   After a simple search,  I found a lot of different colorways, and styles.  (Note that some of them are mislabeled as French Braids when they are really traditional braids set in bands.)   If you have made a braid quilt....I would love to pin it.  Send me a link to your quilt.
   I am working up a series of posts....all on braid quilts.  I am trying to make you a bit curious....evil grin!
But please do send me your links....thanks.
Happy stitching.

Monday, November 4, 2013

Practice makes perfect! And a update

Last year I participated in the Free Motion  Quilting Challenge at SewCalGal's blog.  A year of concentrated effort and my skills greatly improved.  The challenge continued this year with a more limited schedule, and I chose not to enter in.  But.....a fellow blogger did.  And look what came in the mail a week or so ago from her.

  Janet at RogueQuilter made these two beautiful doll quilts for the Mrs. Claus project.  Love the color scheme of purple and soft yellow.   And see that beautiful quilting!  Her extra year of practice has made for some kind of perfection!  

   Not only has she got those feathers  and teardrops down pat, but the loop and curl is just beautiful that she used in one of the borders.  She is a big  encouragement and inspiration to me.   Thank you, Janet.....these are the perfect finish to a great year of doll quilts.
     I am pleased / glad / happy / over-joyed to report that the Roman Shades are completely finished.  I think my little rant last week was just the motivation to get them done.  I even used the left over pieces to make simple tier curtains for the guest bathroom.  Now, no scraps of home-dec fabric to worry with....yea!!!
    As a reward, I spent a very pleasant afternoon sewing some string blocks, without a care about the stuff still on the floor.  It felt good.  Today, I did pick things up and get some order back in there.  And I am beginning to stitch together some more of those quarter log cabin blocks for a faux braid.  A brief class  and handout is in the future......so maybe you should cut some 2 1/2" strips  :)

Don't forget to vote for your favorite at the Blogger's Quilt Festival.  Voting is open thru Nov. 7.

  UPDATE......The Viewer's Choice Award Category is open for voting too!  And yahoo....................... Big Grin......guess which quilt is included?  Potpourri is #24 and I'm asking for votes if you like it ...click  here.   Scroll almost to the bottom of the page (just before the comments) .  Vote by clicking in the corner on the heart.   

Happy stitching.

Friday, November 1, 2013

End of the month and what NewFO?

  Sometimes things just kick you in the behind.  This month was one of them for me.  Whatever I thought I would accomplish just got pushed aside, or covered up in other things. Being gone for a week just compounded my delay in progress, and those Roman Shades that were to be so easy......ugh!
   Roman Shades.....the next time I get such a bright idea, someone please remind me to re-think my plan.  I literally spent an entire afternoon attempting to get the pieces taken apart.  Sir Old Man came to my rescue, as usual, and used some of those tools in the shop to remove the splines to get things apart.  Then there was the lining that took twice as much as I had calculated.  And the cording that took 3 times what I thought......so now you have the idea.  They still are not finished and I can not see the floor of the sewing room.  When I do get these done, I am done with home-dec stuff!


 October's two finishes are a saving grace.  Pinwheel Pot Luck is going to Habitat for Humanity.  It has been hanging around for about a year....a NewFO that finally got finished.


  Potpourri was a NewFO last month and a nice finish for October.  I had intended to use this lap quilt as a class sample.  Instead, it is going to be donated for an auction to raise funds for a girl with excessive medical expenses.


November plans:
   Make another faux braid for a class sample...NewFO.
    Clean up the sewing room floor.....finish those shades.
     Take a deep breathe and find the "quilt mojo" under all the mess.

  Don't forget the Blogger's Quilt Festival that is going on.   Potpourri is entered in the Throw Quilt category.....hint.
Linking to Cat Patches for the NewFO monthly.     Happy stitching.