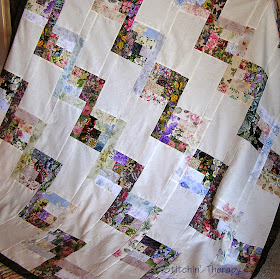
 On Friday all the rows for the English Garden pattern were joined. The center was fully assembled and the inner strip border was added.
 While I was adding the final vertical row, I found a block up side down. Out came the ripper and luckily it was an easy fix. But I made sure all the other blocks were in the correct position. Thank goodness, it was only one block.
Right now it is a good size throw, about 50 inches by 72 inches. Yet there is more to come. The watercolor border is next, what I consider to be the fun part!
The fusible interfacing strips are cut and waiting for the design fun to begin. My version is scrappy in comparison to the photo in the book, so the border will also be leftover parts and whatever else I have already cut into 2" squares.

I took the time to prep a little for some leader/enders that will be used when the sewing begins on the watercolor border. I chopped up some 2 1/2" scraps strips and short pieces into squares and filled a container with them. Eventually they will become 4 patches to be used for something.....unknown at this time.
 From the workshop:
This is progress, really it is. It's the leg sets for the bed and all the slats....sanded smooth and planed to the perfect size. The mortises have been cleaned up and everything fits smoothly. Sir Old Man has worked very hard on these, and is now almost ready to get all the pieces fumed. But we will talk about that another day.
Happy stitching.


Beautiful!! And a scrappy wash border is just going to make this glow.
ReplyDeleteThe quilt looks stunning already; I look forward to seeing it come together as the border is added.
ReplyDeleteThat bed is going to be a work of art as well as a labour of love.
"Fumed" sounds like something smelly.
ReplyDeleteLove your quilt. I love easy fixes... rare as they are.
Hugs
Lovely new quilt in the making, looking forward to seeing the finish!
ReplyDeleteYou are making great progress and I am so glad you spotted the misaligned piece before you got any further along.
ReplyDeleteGreat that you found the wrong block before it was too late....gonna be awesome!
ReplyDeleteGood work--it all came together after all! Lucky find on the misplaced block, while it was still an easy fix.
ReplyDeleteThe bed parts look so nice--I love handmade wood furniture!
This one's going to be gorgeous, of course, I can already imagine the border and the quilting.
ReplyDeleteDidn't know they still did fuming. Saw a way to do it with lye and vinegar as the neutrel solution once on I think "This Old House" with Norm. Gives the wood a diff. look and it takes the stain different too. Good luck, can't wait to see the end results! :)
ReplyDelete