Pages

Tuesday, May 31, 2011

Finishing the Batiks

 I promised a photo when I finished the batik quilt of Drunkard Path and NY Beauty blocks....the "not a jacket quilt".   So before the temperatures soar into the high 90's today, I took a few photos outside.
  I love the central light source in this and all the movement in the pattern and the colors.  This one is named "Free My Spirit"....to reflect on the discovery that I am a square motivated by spiral.   I could probably say get out of my box and most people would understand,  but I like  imagery.

  It wasn't a hard decision in planning the quilting.  It was a no brainer for .....spirals.  I practiced on paper for a bit to get the open spiral for this one.   Actually, a lot of pencil practice.  I needed the design firmly planted in my mind and hands.  I wanted a more open quilting, not as close as I often do.  Here are a couple of back views and a front view of the spiral quilting. 


 A tip to stitching the spiral pattern.... begin the curve to the left if your open area to fill in is to the right.  If the area to fill in is to the left, begin the spiral to the right.  You curve to the right, and return to left and move into the open area.    Again, practice on paper to understand the movement. 
   Confession time again.....I ended up using 3 different colors of thread on the quilting.  I used Isacord thread, and I am zipping along doing the spiral dance and oops, no more thread!  No problem,  I thought the "oyster" color matched "cloud" well enough.  And when I got to the very last corner....out of thread again.  So I finished off with a very light blue.  Just saying, it's not perfect, but it is me.  And  I will be ordering the larger spools this time. 
   I have to finish up the label and make a sleeve, and this one will be done.
   Our weather went from early May to mid-July, or so it seems.  The heat and humidity are awful right now and will be staying around for a while.  So I am retreating to the sewing room  to make more bias stems and  blocks for the String Me Along quilt.  Will I ever use up these strip scraps?
Happy stitching. 

Sunday, May 29, 2011

First blocks for String Me Along

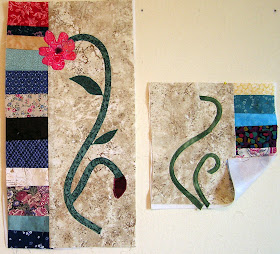
 Here are the first two block sections with different bias methods used.  The one on the left is with the folded bias tape maker---it is about 3/8" wide.  The one on the left is made using the sewn tube method and is only 1/4" wide.   I did manage to get  a small curl  on one end that I liked. 
  I used a tear away  stabilizer when stitching the bias down (that's why I folded back the edge on the left one, for you to see).  It is pinned in place, not fused.   Why use a stabilizer.....with this much twisting and turning when stitching, I wanted to make sure I did not stretch anything out of shape.
 There is a wide variety of stabilizers on the market...I just used what I had on hand.  Once all the applique is done, I will remove it before joining the sections. 

This is just a close up of the smaller tube bias.
Maybe you can tell that it is more raised than the folded bias. 

Blogger comment hasn't been working, but I have had emails about making the bias, and the look of it.  So hopefully, these  photos will help those who are afraid of trying it. 
Any other questions, please ask.
  I am off to get the tomato plants planted and then finish up quilting on the batiks....so excited because it looks great I think. 
Happy stitching.

Saturday, May 28, 2011

Making bias stems

Bias stems and I need  a lot of them!   Here's a couple of ways to create them.
First I cut a large triangle  (one half of a square) from the selected fabric. 
 Cut 1" strips along the bias edge.
While I am cutting, I also cut 1/4" slivers from a small piece of heat and bond light.  Set these aside for right now. 
  First method is using a bias tape maker.  What a neat tool, easy to use, and saves burned fingers. 
I lightly mist the fabric with spray starch before inserting the end of the fabric into the large end of the maker.  Guide the fabric thru and as it comes out folded, I pin the end  to the ironing board.  As you slide the maker to the left, use the tip of the iron to press in the folds.  Work in small sections to press.
  If you don't have a bias tape maker, you can create a pathway of pins---at least two  but 3 or 4 would be better--- to create a similar "tool".   This takes a little time to set up---you need to fold the fabric to the desired width by hand first---insert a pin into the ironing board cover and come out exactly beside the fold of the bias. 
Then the pin goes over the fabric and back into the board cover exactly by the other fold.
 It may take a couple of tries to get it right, but you should then be able to pull the folded bias thru the pin pathway and press the fabric as you pull it out the end on the right.    I hope that makes sense.

  Another option is to use bias press bars.  These are silicon strips that are heat resistant, and they come in lots of sizes.  I picked up this pack while in Virginia last year at the Fancy Gap Fabric shop for 59 cents! 
Anyway, this technique requires a bit of sewing and trimming the seam down.  Cut a bias strip ---about 1 1/2" wide.  Decide how wide you want your bias, say 1/4". 
Fold the fabric wrong sides together.  Then mark a stitching line from the fold that is just a  little bit more than that.  (Remember--You need to be able to slip the bar into the tube.)  
 Stitch and trim the seam allowance down to a scant 1/8".  Slip the bar into the tube, rolling the seam to the back.
 Begin to press the tube as you pull if off the bar.  This produces a bias stem that is a bit thicker, but still works well.

  Make the bias fusible.....remember the slivers of heat and bond from the first photo?  Now is the time to use them.  Fuse them to the back of the bias stems----just center the fusible strip to the back  and press.   This will provide enough fusible to hold the stems in place until sewn down.  On the 1/4" bias, you can use a double needle even.  Otherwise, a small straight stitch on each side works great, or get the looks of hand applique with a blind hem stitch, or button hole stitch.
  Which do I prefer.....the bias fold maker because there is less bulk and the stem is easier to fuse.   I will do a block with the sewn type bias and take a photo to compare. 
Happy stitching.

Friday, May 27, 2011

String Me Along--part 1

From my prior post on a new scrap quilt you can see the layout from EQ7 that only shows stems and leaves in the blocks.   I needed to remedy that....by sketching out a plan of some sort.  
   I used yellow pattern paper to establish the approximate size of  3 of the blocks in a vertical strip.  Then  I added a curving stem  that will be bias strips, (not sure if  I csn get the bias to curl like that)  and the general placement of leaves for the stems.  This gives me some reference for the size of the flowers I will use.  On a separate piece of paper I sketched a few flowers in various sizes to see what I want to use.     Now I have a master type pattern for the leaf size and the the flower size.   I can easily trace off the leaves and flower parts onto fusible paper for the applique. 
    Next I will be making some bias stems.....I'll show a couple of methods and how I make them fusible too.
This morning  I am packing up a small scrap quilt to send off to Joplin victims.  As A Mom has organized donations for quilts and blankets for the kids. My heart goes out to all the families.   I am so blessed.  Have a wonderful Memorial Day, y'all.


  Happy stitching. 

Wednesday, May 25, 2011

Starting a new scrap quilt

   While cleaning up the sewing room, I ran across a magazine  on scrap quilts from McCall's Quilting from 2010.   I had tagged a page with a simple but great layout for using up strips---remember I have boxes of them.  Here's the link to view  Plenty_of_Pomegranates---  that is my inspiration.  I plan on using the general layout, but not the pomegranates for the applique.      Sew ;), I am beginning a very easy project for the summer to use some more of those pesky strips that seem to multiply like bunnies! 
    One of the boxes of strips is full of pieces that are 3" to 8" long---too much to throw away with today's price of fabric, but hard to use.  So this box will be the first up.  I have been joining small bits to get a length of 15" to 18".  This strip is ready to be trimmed to 3" wide.   I need  at least 15  of these,  so lots more to put together.  And I also need 4 or 5  sections that are 8 1/2" wide.


 The quilt  is a vertical strip layout with  applique. 
You can see the photo of the magazine inspiration in the lower corner.
 I did a quick pencil sketch too, but decided I needed to play around with it in EQ7.  By doing a layout and figuring out the size I wanted for the vertical rows, I understood the over all design better. 
  I set up a vertical quilt with 5 vertical rows of 8".  I put 3 vertical blocks in the first and 4 in the second.  That created a dropped block effect in the second row---with 1/2 block at the top and 1/2 at the bottom.     I made the rows 48 " long, so with the borders added the quilt would end up about 56" by 60", a good lap size.     This layout would be very easy to size up or down by making the vertical row longer or wider, inserting more or less cross strips between the applique,  and/or changing the size of the rectangle for applique.  Wow, that is a lot of options.
   The other major change I am making is using a lighter background fabric.  The blue or black in the original is striking, but since it  is summer, lighter fits this better for me. 
   As for the applique...... I plan on using bias for the stems, using different greens, and adding blooms, birds and such.  I will be doing machine applique, but this would be a great hand work project.   And maybe a bit of applique on the border would be good, too.  Think I will wait till I get there to decide. 
   I think that covers the beginning of the plan and design.  Now to the fun part.......Happy stitching.

Monday, May 23, 2011

Journal for May

   It's been a few weeks since I did a journal quilt.  After finishing up the borders on the batiks---no photo till I get it quilted---I needed a bit of time "in my zone".  
  So this journal was just a fun one.  I have my stack of boxes with all the  scrap strips on the corner of the table, remember I am trying to use them up.  I found 3 or 4 red/rosy  strips and stitched them together.  Then fused the back and cut out a few petals at crazy angles.  Then  I found a small piece of yellow that was perfect for the center.   I finished it off with one of my favorite garden sayings and lots of  quilted swirls. 
   Now if all my weeds in the back garden would just turn into wildflowers.....then my back wouldn't hurt from bending while I pull them out. 
   I worked on the design layout for my  summer scrap project and I am almost ready to get it started.  Just a bit more detail to work out and I'll be ready to share what I am planning. 
Happy stitching.

Sunday, May 22, 2011

The Mountains, fabric and Book Fair

There is absolutely nothing like home.....am I showing my age saying that?  Oh, well, so be it.  We had a great few days in the Shenandoah---looking for a bit of relaxation and inspiration.   I think I found some, too.
First stop.....the Green Valley Book Fair.    It's a giant barn filled with over run and surplus books of all kinds.  I found the quilting section.   I was so excited, could not make up my mind, and decided I needed a lot of inspiration.  I bought  4 of them ....price $2 and  $5.  Correct that, I "stole" them....One on art quilts, one on color wash, one on scrap quilts, and another on black and white quilts.   So if you get near exit 240 off I-81....take the time to stop and shop there.   While I was looking around, I began talking to a lady with a quilt book in her hand, and got directions to a quilt shop "just up the hill from the Dutch market". When Russ found out the market had a bakery and sticky buns, he was quite agreeable.
Second stop....Patchwork Plus.  A very nice, large quilt shop, with plenty of classroom space, and lots of patterns and fabric.  I found the sale table and decided I needed a couple of yards.  Then I turned around and saw  rows and rows of batiks.  It was very hard to resist.....I have a duty to support the quilt industry, right? 
  After a visit to the Dutch market---found the sticky buns, we headed for the indoor market in Harrisonburg.....Grandma's Pantry and the Country Canner  are two places I like to shop.  I stocked up on bulk  mixes, and seasonings, and  jams and chow chow for Russ.  
  The views from the Skyline Drive are just awesome....the photos can't do them justice. 


We visited Monticello, Thomas Jefferson's home, too.  In the museum area was a fabulous display of pages (copies)  from his diaries and workbooks.  He recorded details of daily life, as well as the drawings and plans for his home and its buildings, the farms and gardens...and then all his words as statesman and writer of the Declaration of Independence.  Wow!  I took away something from seeing it all.....His sense of proportion and light.  It struck me how it applies to what I love about quilting....finding the balance in the design and layout and including a source of light for that spark.  Then I saw this quote on display attributed to Jefferson that expressed this perspective.  

He who receives an idea from me receives it without lessening me,
as he who lights his candle at mine receives light without diminishing me.

Home again and inspired, with ideas swirling in my head.  I need to get busy again.  So I'll be finishing up the border on the batik quilt and giving a preview of a new scrap quilt I am planning.
Happy stitching.

Wednesday, May 18, 2011

Fabric arrived....


  Thank you, Deana and Trey,  for my Mother's Day fabric....it arrived and is washed and rolled onto mini bolts.  The one on the right is a backing piece, and no plans--yet--for the others. 
    I cut  some pieces for the border on the batik quilt and put a few up to see how it would look.  Just from this corner section, I can see that this is a better plan.  (Thanks, Wanda, for your input on this.)   By using the medium and dark values in the mixed border, I keep the "light source" in the center of the quilt. And it will blend with the quilt and not compete with all that is going on in the center.    Size---I managed to get 6 inch wide pieces.  Yea!  I like that proportion; the border will be 2/3's the size of one block.   I hate to have  skimpy borders, and I think this one is going to work. 
 
  We are heading out of town for a few days.  We put off one trip because of weather, so rain and cooler temps it will be.  Actually, it sounds great just for a change of scenery. 

Happy stitching.

Monday, May 16, 2011

Square motivated by spiral...batiks

   It didn't take long to put the rows together on the batik blocks.  And add the small circles--or bubbles, my husband says.  I had planned to use an inset strip around all sides and then do a border, but I've changed my mind.  The more I have looked at this, the more I think it would be distracting and pull away from the secondary design. 
   And before anyone asks me....I used 5 different NY beauty blocks in this and they were not all the same size arc  or even the same as the DP blocks.  That is why some places in the circles do not match exactly.  I broke a few rules, decided it would not bother me,  and freely admit perfection does not suit me at all.  The color and movement  are more important to me. 
  
    New Plan:  A simple border that is mixed lengths  of the medium and dark values.  I am limited on the amount of fabric left on a few of them, so I will use up what I have----some longer and some shorter.    Right now the quilt is  52" by 68".  I hope to have enough fabric to use a 6  inch border around it....or at least a 5 inch one. 
Today that is my plan,  tomorrow .....it could change again.   This quilt is an expression and an experience in freely going for it.   I'm a square motivated by a spiral and this quilt shows it!
Happy stitching.

Sunday, May 15, 2011

Graduation and Pathways

It was a very long day for graduation at Clemson, but so worth it to see Justin take that walk and get his degree.  We are  very proud of him. 
    Big guy needs a big quilt....right?  
 I gave him his quilt, Pathways.  He and his Dad are tall enough to hold it up for me to finally get a full shot of it. 


Friday, May 13, 2011

Let's take a trip

Welcome to the Bloggers' Quilt Festival.   Finally, after blogger being down. 
 Hope you are enjoying all the quilts.
Take a trip with me....A Trip Around the World, maybe. 
  I like easy, easy ,easy.  Trip around the World, and variations of it,  fits the bill.   I used Eleanor Burns' pattern and fell in love with how easy this one is. 
   First up is The Road Warrior, my husband's retirement quilt.  After 35 years and a million miles, he should have been round the world at least once, so this pattern seemed perfect to make.    I used  just a few  flying geese in the corners to finish it off.
   I like his so well, I had to make one for me.  The World is a Garden done in florals, of course, and lots of quilting, too.  I made a few adaptations  to the pattern to get a blended watercolor effect.  I cut the strips narrower and used twice as many fabrics for this one.  I never tire of looking at this one.  There is just too much to see.


  Evening Serenade is a wall hanging.  The background was a practice piece using the quick quarter trip pattern from the same book. I wanted to try the technique to see if I liked it before tackling a full size quilt.  Just recently,  I "uncovered" this  in the closet  and turned it into a wall hanging with thread painted dragonfly and a frog. 


Can you stand one more?

   Shenandoah Colors is the quick quarter trip too.  It is so big, I wasn't able to get a full size photo.    I used about 22 fat quarters plus the border fabric for this---each color way for some of the sights and things we did while on vacation in the Shenandoah Valley.  The vineyards, the caverns, garden tour, and dayliliy farm, and the beautiful mountain views come to mind when I sleep under this one. 
   Same pattern and technique, and  four  different quilts and overall effect.  I like that.  Just viewing them again makes me want to put together another one. 
Anyone want to take a trip?

  Enjoy the festival, thanks for stopping by, and come back when you can visit longer.
Happy stitching,

Wednesday, May 11, 2011

What shape are you?

    This was a fun quiz to take.  It is based on the five basic shapes of circle, square, triangle, spiral, and crossed elements.  Draw a picture of each.  then select your favorite and make it #1.  The one you like least is #5.  Select your #2, #3, and #4.     Each shape has a basic meaning and where you place them also has a meaning that reveals something about you.  So make your choices before you read on.  I am only skimming the surface of the meanings here.  Don't cheat....answer first.

   Circle:  whole, complete, confident, hard to penetrate.    Square:  solid, stable, trustworthy, reliant, integrity.    Triangle:  shape about the future, visionary, hopes, and dreams, seeking something better.    Spiral:   constant change, moving,  growth: buy fabric but have a hard time using it.    Crossing elements:  relationship, union of 2 elements, you and something else. 
   Position or where you place them in order-----this could  change according to where you are in life.
  #1--Where you think you are, or how you see your world
  #2--This is what motivates you, or what you are working on.
  #3-- Where you really are, and how you make instant choices.
  #4-- How your friends and the world sees you...so you think.
  #5--Unfinished business, the old stuff, irritating things, the negative you are done with. 
 
Here I am.....square, spiral, circle, triangle, crossing elements.   I think the most amazing position was the second...spiral.  Change is motivating me, I am looking for it, trying to move out and beyond my comfort zone.  And for a square that is hard!  Want to see a little proof?


This is the top 2 sections on the DP/NY batik blocks.  Analyze this and you will see that the squares (blocks) dominate, spiral in the 3/4 sections, circles are everywhere, triangles in the NY blocks, and the crossing element is in the layout as a secondary pattern!  Now, I have absolutely no idea what this all means, but it was fun to see that my answers revealed what I am currently working on. 
   Don't forget, the Bloggers' Quilt Festival begins Friday.  There's a link on the right side and I will do a post for it. 
Happy stitching.

Tuesday, May 10, 2011

Beyond the field of right and wrong.....

  Last night at guild meeting our speaker was Marilyn Doheny,  known for the 9 degree wedge ruler.  She now is in Tryon, NC and has  a B and B/ quilting retreat center.  She showed wonderful, colorful, playful, and exotic quilts.  But she began her program with "What shape are you?".....a quiz based on shapes that reveal your personality and perception.  I will have to share that in another post, but it was very revealing!  She ended with several quotes and one literally covered me. 

         " Beyond the field of right and wrong, is another field.  I will meet you there."

   So where am I going with this?   Outside, down the hill, behind the shed, past the field (of right and wrong) to........a glorious expanse of wildflowers, just thousands of daisies covering the slope. 


My photos don't do it justice.  An early morning walk through a field of wildflowers puts it all in perspective.                                                    Insight: 
Do you ever have that voice---you know the one--in your head or your shoulder that is always correcting you, making you second guess yourself, or just the general put down? I am probably not alone in this, but sometimes I think I am.  So this is my field beyond---where I will take those negative thoughts --and leave them--that try to defeat me. 

One final photo..... along the edge of the field.  It seemed to express this thought.
   May all your weeds be wildflowers.

Happy stitching.


Friday, May 6, 2011

Mug rugs as small journal quilts

Instead of a journal quilt, here is  a collection of mug rugs as small journal quilts.    I am just finishing up a Bible study group and  I wanted to make a small gift for each gal in my group. 
  I printed the focus verse on Printed Treasures and chose a focal fabric for each rug.  Then I  dug through the scrap boxes for fabrics in colors of  the  focal print to complete.   It sounds easier than it was for me---I am not good at one or two color fabric schemes.  I also was trying to balance scale of print and mood of fabric.   I didn't use binding to finish  the edge; I just stitched and turned right side out.


  Of course, the cardinal one is my favorite...just because.  But this one is a close second.....the colors just went together so well and it seems so serene.  I did not expect to like it so much. 
    I got to use up a lot of strips--one of my goals for journals---but not enough.  I ran across a pattern in a magazine from several months ago that I think I will work on this summer.  It uses lots and lots of scraps....I will probably stick with the general layout, but adapt the construction to use short lengths and longer strips to try and make a serious dent in this stash.  Sorry to "string you along" with no more details, but I can't get side tracked until I get the DP/NY beauty batik quilt done. 
  Happy Mother's Day to all; enjoy it.
Happy stitching,