
Showing posts with label challenge. Show all posts

Monday, December 1, 2014

A Handmade Christmas Challenge

  While I haven't been very good at creating through out the year, I did make a few items to share for the Handmade Christmas Challenge at SewCalGal's blog. 
  Thanks for hosting this Challenge.  Hope everyone will visit all the entries and find some inspiration for your handmade Christmas projects.

    Recycled denim to market bags.....I couldn't bear to just trash a large piece of heavy weight denim. So in August/September, it turned into a trio of gift bags that can be used as a market bag.  I plan to fill each with homemade baked goodies for a few neighbors.
   A  folded piece of chili pepper fabric was used to finish off the top edge and canvas strip handles made these quick projects.


  I did a lot better in the decor department.....as it was time to do a little up-dating around here.  My love of cardinals is documented fact.....and the secret word is there is a cardinal hidden on each quilt I make.  (Always be sure to check the labels  :).    Anyway, this little table topper is called A Cardinal Sings.  Four string blocks create the background, fused applique, machine stitching, and more strings for the top and bottom borders.


  By mid-month I was still on the red kick!  I was inspired by a pin on Pinterest .  My version is appliqued instead of thread painted, and bold red for lots of zing!  The ornament shapes were found in EQ7 for this one.  Size is 12" by 24".....just right for the back of a door.


  The adventure continued  as I could not get the blue version out of my head.  Fabric selection actually took a couple of days.....and a quick trip to the LQS.    Here's my description of Winter Baubles in blue from my original post.
   Winter Baubles tells the story in the colors captured here.  There  are the  bright blues of the winter sky, the shadows of blue on snow covered paths,  the watery blues of sunlight reflected off the ice in the birdbath, and the darkest blue of night.  Like colored glass hung in a window to catch the streaming light, the baubles hang against a cloud of white. 
  This version could hang all through the holiday season and on into winter.  One or two baubles would work great on a mug rug.....a horizontal row would make a mantle banner or table runner.......a bauble or two appliqued to a tote bag....I better stop before I get that creative fever again!
Wishing you all a bright season of inspiration.....and happy stitching.

Wednesday, March 12, 2014

Week 2 for McTavishing

    I am way behind after spending the day supervising Sir Old Man's yard work.  He was having just a bit too much fun with the electric hedgers.....so glad the bushes will fill out again soon  :)

   So today I wanted to get some practice in for the McTavishing lessons over at Amy's Free Motion Quilting Adventures.    Last week Amy commented to me about trying to fill in a defined shape.  So that is the direction I took this week.  I did paper practice first and then off to the machine.
   And she is so right.....it is much easier with in a defined shape.  I still have everything  going in the same direction.  For some reason, I don't stitch an s-shape well.  Oh, well, that is how my brain/hands work.  But....those "c's".....they are not as easy as you think.  A couple of spots look good, and in others they are just too flat.  So I need to really put move curve into them.


I switched to piece of solid purple fabric.  Again I chalked in a couple of leaf shapes, and then marked in the edge.

  I filled in the leaf shapes using a light green thread.....so I could see where I was stitching.  The c-shapes are a little bit better.  I like the flame effect that happened in a couple of areas......I need to figure that out and learn to create it at will.

  Back to paper......before I try another piece.  

Saturday, March 8, 2014

Some things must end


  I had to bring some things to an end....there were too many piles in the sewing room that were half done.  So, first up was all the bindings.  Both the Buzz Saw and Misty Morn got their bindings attached.  The only thing left are the labels.  Printed and now ready to finish them up.


Moving on to the McTavishing lesson.  
  I got a comment to try again within a defined space.  So I drew a large circle and did some practice.  Much better....I still got lost in a couple of places.  Then I ran out of bobbin thread before I outlined the finished area, but you get a bit of the idea.  I need to use more of the c shapes to get the depth.
   Nothing comes easy for me....I am a "plugger" type personality.  I just keep at it, over and over.  So know you will be seeing more of this.


Lastly,  Let's Book It.  Click for details at Vroomans Quilts.
  I selected to do a  pattern from StrataVarious Quilts by Pershing and Hoover.  The Gum Blossom wall hanging really appealed to me....movement in the background and a strong accent, and some thread painting.  Sounded just right for me.
  After reading their directions, I thought I would try to follow.  Try is the key word here.....I did 4 of the background blocks via their method.  I felt it was too wasteful, and  time consuming.  I pulled out my telephone book, tore out a few pages, and did string piecing  on paper instead.


  The key element in their "strata" was the angle....it is not perfectly diagonal, like corner to corner.  So I figured out how to get that consistent line for my string piecing by creasing the phone book page.  This gives me the starting point for my first string.  I used up a pile of blue strips and put together the background.
  Back to the directions.....which said to quilt the background next before doing the applique and thread painting directly to the piece.  Whoa...stop sign!
   I prefer to do the thread painting separately and then attach it, and I want that applique to have more depth.  So, I am off doing it my way.  See why I rarely buy a pattern?  Don't get me wrong.... this book is great for inspiration!!!

And one last timely thought......if we set our clocks forward tonight, why will it be an hour later tomorrow when we get up?  For some reason, this idiomatic expression seems odd to me.   Now you see why Sir Old Man will not have this discussion with me.  Happy stitching.
 

Monday, March 3, 2014

It's a challenge

  The McTavishing lessons / practice is a challenge for me.  I spent the afternoon viewing the videos, looking for more, and then facing the paper.  I won't show my first attempts, so don't even ask.....they are in the shredder already.  But, finally, I began to see how these designs come together.

                                                                                     In one of Karen McTavish's videos, she is drawing the design and describes it as cartoon hair, and waves her arms around.  Then she says, "Farrah Fawett" hair, and I get it.  Flips, and curves, and waves....... I remember that era!

   So how to get those flips, and waves?  She uses a lot of "S" lines to begin.   But studying a bit more of her quilting,  I began to see the letters  J, C, and U.  So, now I see them....can I draw them?  Sure, not a problem.     The challenge came when I tried to combine them.
    I kept  drawing the same wave.  The trick is to remember to change the direction and throw in a curve going against the first wave.  That is easier said than done for me.  I think I just have that one track mind, and all my "muscle memory" knows is swirls.  So I will be filling up a few more pages as I practice this week.

   The second thing I noticed about her patterns is the illusion of depth.  Some lines move toward you and others move away.  Those little filler c's  seem to be the trick to getting the depth.
  And finally, the spacing.....not too good here.  Her spacing between the lines is more even.  Mine is all over the place and probably will be when I stitch.

   Stitch....did I say stitch?  Yeah, I decided  to try on the machine to get a base line of what I would be facing.

   This is about a 10 inch square that I tried.  By the time I got to the edges, I was frustrated.  I was lost or in a spot and did not know where to go.  It looks nothing like my drawing.  The spacing is all over the place.  And the waves disappeared.
   OK, I have a challenge here.....back to the drawing board.  I remember being frustrated with learning to do feathers, so I guess the same is going on here!  More drawing, and practice batts needed......happy stitching.

  I am linking to the Linky party at Amy's Free Motion Quilting Adventure.


Thursday, February 20, 2014

Unbound Buzz Saw


  The harder I try, the "behinder"  I get.  That means my plate is very full right now with small bits of progress on several things.   The second Free Motion class was finished up on Saturday.  This was probably the best group I have had to date, and they worked really hard at the lessons.  So we may add a feathers class for the summer.  The shop also wants a Tiara tips and hints class, so I am working that info up this week.   And throw in a demo, and tax time and you can see why I have a full plate.


   The Buzz Saw---Whopper quilt---is quilted, unbound, but quilted!  I have more thread tails to hide, and binding to cut and add  before I can call it done.


  This one is so big and heavy that I had to get Sir Old Man to lug it outside for me this morning. He is quite happy with his choice of pattern and is actually working on the bed!  I am elated that he is motivated to build that bed....now that the quilt is almost done.  :)

    His close up photo of the quilting..... note only a few straight lines through the batiks to hold them  in place.  I love how their colors stand out!  All the background is fully quilted...not quite hyper quilting, but plenty of thread was used.  I used 2 full bobbins on the border alone.


    We also re-arranged the sewing room.  It was time for a change, as I was feeling cramped. So we---really Sir Old Man did the lifting---shifted the machines around and moved the cutting table to the center of the room.    With the Tiara on the side wall, I have room for the extra support tables when I need them.  Or one of them can be moved beside the sewing machine if needed.


   And I am prepping for a demo at guild next month.  Kerri wants to feature flower blocks.  Ummm....does that sound like me?   This is the frayed edge technique that uses 4 layers of fabrics.
   I thought I would make up one block completely finished as a mug rug, and have the various stages of blocks to show.  Then I can turn the remaining blocks into a table runner.  I hope to get the sewing done on these Saturday while Sir Old Man is at a wood finishing seminar.


Free motion quilting McTavishing
   And in case that is not enough......
This starts up the first Monday in March.....McTavishing we go!!!!
 I ran across this new FMQ stitch along/challenge that starts soon.  I have tried McTavishing before, with so-so results.  Not bad, just not the beautiful designs she does.  So this little adventure will be a good challenge for me this year.  Details are at Amy's Free Motion Quilting Adventures.  This sew along type challenge will include linky parties for showing progress.  Hope to see some of you there!

  It is 70 degrees here today.....and last week we were snow bound.  So I need a little time outside in the sun before I tackle the bow flex or anything else.  Happy stitching.

Thursday, August 1, 2013

Finishes for July

The cutting table-----by sir Old Man!  The beautiful top was installed and quickly put to use.
Hiding in the Garden---challenge quilt finished.
Feather quilting on a Christmas Tree skirt.....Made by Ann for her Granddaughter.
French Braid table runner.
Faceted Jewels II---colorful string quilt.
All in Bloom water color wall hanging to be donated for silent auction.

 Yesterday I posted my August plan-----
  •   Finish the 2 place mats.....those stringy geese.
  •   Add to the watercolor and get a vision for it.
  •   Get the baby quilts pieced and make 2 bibs.  An almost finish would be good here!
  •   Continue making Scrappy TAW blocks.
  • Buzz Saw quilt.....get those borders on!
I think I should add one....survive the heat and humidity of August!  Staying inside  should give me a good reason to get a lot accomplished this month.
   Linking to Never too hot to stitch for the 2013 Year of Finished Projects.   Lynne is recovering from shingles....drop in.  I know she would love the company.

Saturday, July 27, 2013

All done!


The string quilt of colors is Faceted Jewels II, and the applique quilt is my challenge quilt, Hiding in the Garden.    These two have been hanging around for a while, as both started as NewFOs  at the beginning of the year.  

   This is a small version of the first.....only 42" by 56".   The blocks were string pieced onto a muslin foundation that was 7 1/2".  The binding is the same dark green used in each block.  I love the concentration of colors and the mix of values done this way.  This is probably the easiest quilt ever.
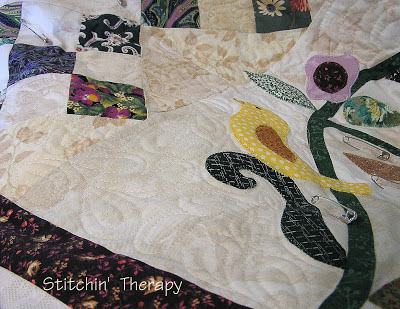
   The challenge, from Lemons to Lemonade, involved picking an ugly fabric out of the bag.  Luckily mine was not that ugly, merely dated.....a small calico from the later 80s!  I "hid" the ugly among the flowers, in the 9-patch trellis, and the border strip.  
   I mixed up the background fabrics.... white on white, and tans, and creams, for a shadowing effect.  The  stems are fusible bias, and all the applique was fused before stitching.
   Using lots of fabrics, I hoped to dilute out the ugly one.  If  I put enough in to keep you looking, maybe you would overlook that calico.


   I  went overboard with the quilting.....but it was fun to fill in all the open space with swirls, leaves and feathery things!    Note:  What's a feathery thing?  Not a traditional feather, but has lots of plumes and it often turns into something else like a leaf or swirl.   And I filled the border with feathers all the way around.
  Insight:  Take a chance.....with fabric or the FMQ.  If you put enough on it, the mistakes are less noticeable!  And after all that FMQ, you will be a lot more confident.


     Nice to finish up, because I need to get those 2 baby quilts started.  I have decided to go with a chevron quilt/modern zig-zag pattern.  So maybe I can get to cutting up some fabric today.
  Happy stitching.

Wednesday, June 19, 2013

Lots of stitches

     I know I went overboard with the thread and stitching on this......but I sure did have a good time doing it!    I think I finally have the hang of it after quilting this challenge quilt.


  I used some leaves and loopy vines to fill in around the appliques, but quickly moved on to some stacked teardrops and feathery things.  With this much thread......who is going  to notice a few missed stitches  :D   And hopefully, Sir Old Man will get the cutting table completed so I can get the binding cut for this one.
 
 I have a baking day planned for tomorrow.....cookies for Adventure Week for the kids, and cinnamon rolls for the Production Team.   And just maybe I will have time to squeeze in a few minutes for some stitching.  

Friday, June 14, 2013

My learning curve

New machine, new learning curve.
   It was time to change the needle in the quilting machine---she needs a name, but I haven't found it yet.  Easy, I thought, just pop in the needle.  And immediately I began to get a lot of skipped stitches.  This I was sure was operator error.  I checked my threading and noted that the front--facing me-- of the needle was correct with the groove.  Note---on the quilter, the  needles do not have a flat side.  They are completely round at the top.  The long groove in the shaft faces the operator and the scarf indent faces away.
   I re-read the book and saw a mention about the "eye being at 6:00".  I found a video that showed a slick trick--at least to me--on how to set the needle eye correctly.     By inserting a flower head pin into the eye, I quickly saw that the eye was not quite at 6:00.


   By simply loosening the screw, I could twist the needle to exactly 6:00.  Ta-da......no more skipped stitches.  Such a little tiny adjustment made a huge difference.
   So back to stitching--a little outlining and loops, a few leaf shapes thrown in.   I was getting a little tired and felt like the quilt and I were in a tug of war.  Nothing was moving like I wanted.  Sir Old Man to the rescue with his special car wax that he uses in the shop on the table saw table.   Improvement!!  He has promised another one or two coats to make it slick.


    I got brave enough to try a few feathers afterward.   And then I added some stacked teardrops and before I knew it, half of this quilt is quilted.  
    I am counting myself fortunate that I have had absolutely---knock on wood---no problem with tension.  The bobbin winder works great and I am winding on a medium speed to ensure evenness.  

   One thing I do for large quilts before they are quilted is to stabilize them into sections like Leah Day recommends.  She suggests to machine baste with wash away thread after pinning.  
(Note:  Once the quilt is completely quilted, the basting  thread will dissolve when washed or spritzed with water.)   Then you can begin to stitch any where in the section without the worry of any shifting.    For this quilt with 2 columns  of  applique, I did two basting rows vertically and one across the quilt to create 6 sections to work in.  

  Lastly.....there is the bobbin.  After changing bobbins about 6 times now, I finally have the hang of it I think.  It is the one back-breaking, knee-killing, on the floor to see contortion that is required.  While I can remove and insert the bobbin by feel, I have to be able to see where to clean and to oil.  That means being low...like down on the floor low.  Note to self----pick up a small stool to use in the sewing room for this task.    Believe me, if a real woman/real quilter had designed this, she would have included an auto-clean/auto-change cycle!  
     Insight:  Watch the videos to learn the proper way to do things.... like change a needle!
Happy stitching.

Thursday, May 2, 2013

A finish and a start, some progress

 So this is what April brought........a finish, a start, and some progress.
  •  The guild challenge quilt is put together with the borders on.  It is ready for pinning and then the quilting fun begins.  
  • Buzzsaw is in the works.
  • Stings and coins.....the on-going watercolor to use up lots of strips.  Only they seemed to have multiplied!
  • Loose Change is this month's finish.  This was the scrap quilt made from 5" square stash.
May is next up.....time for some plans and focus.

Water strip quilt----get it sewn together.  Nicki's recent comment gave me some additional inspiration on how to finish this one up.  I was stumped on the border--or not-- and now I have a vision.  Thanks for the help!
Make more buzzsaw blocks.  I actually got  a few  more done yesterday as they go together quickly now.

Never Too Hot to Stitch!Pin the challenge quilt....this month.  I have till September to finish this so it may not get quilted till later.


Start a NewFO......strings to carry me for the summer months.  I love the mindless sewing that a string quilt brings.  I get to play with color and create some drama.    I have been collecting ideas for layouts of string quilts to share.  

  And that is all I am committing to for May.....unless something else pops in.  
 Linking to 2013 Finish Challenge


Oh.....and I don't want to forget to welcome a new Mrs. Claus!
  This sweet little doll quilt came a couple of days ago.  It was made and donated by Happy Erme of the HGTV Message board.  She sent this to represent the state of New Mexico.   Such beautiful colors!  Thanks so much, I really appreciate the help and support.

Happy stitching.

Saturday, April 6, 2013

Whimsical garden is a top

    The borders are added to the guild challenge quilt.  Follow the stepping stones of the borders to see what is hidden in the garden....or at least that is my interpretation.   But before I pin it for quilting, I want to add more flower appliques.
   So that is one goal for the month met, almost.  And that means I can play with the new fabrics and begin to cut!


SewCalGal posted a new installment for Free Motion Quilting.  
  The tutorial is by Joanne of Thread Head and she is challenging us with more feathers.  I love her comment .....  "Just like signatures, we all develop our own style of free motion quilted feathers. This tutorial is to make you look at different styles of feathers, to figure out what you like and then try quilting some feathers to work on your own unique style."
   Exactly my feelings!  So I am adding this challenge to my list for April.

String Attack is going on at Stitched in Color with a series of tutorials on string piecing.  She is fueling my appetite for a string quilt.  If you need inspiration, check it out.
Happy stitching.

Sunday, March 31, 2013

March New FOs????

Uh-oh.....trouble here.  My  NewFOs turned into finishes this month.   I wonder if the enabler  Barbara at Cat Patches  will let me play this month.   (A newFO is a new project to help you build your UFO stash.)   I think she may  put me in the corner as an overly compulsive, too organized, no fun in that quilter!     Maybe  Smitty will plead my case, if I send him an extra pound or two of catnip!
Actually, finishes are allowed  :).

 So what did I start this month?

  The two projects for Project Quilting.....started and finished......the  tulip  mini table topper and a table runner, When Clematis Bloom.   Both of these projects had dead line requirements.  That's my excuse / real reason  for finishing up these two.


Another  NewFO that got finished was the baby quilt  that I just showed.  I really have a good excuse why this one got finished..... the baby is due next week.  So can I please play this month?   If  so, I'll be purring like a kitten.


   I did start  planning a quilt and selected the fabric.....does that count?    I promise to begin slicing into this fabric in April.  Pattern...nope, not telling yet!


    I do promise to start more projects---at least one for sure--- next month.  And to buy more fabric, and notions, and patterns...etc.  That's enough whining...... be sure to check out the Linky party for the NewFOs.   Off to start something new.....happy stitching.  

Friday, March 22, 2013

Project Quilting final challenge

"Hurrah for Spring" was the last theme challenge for Project Quilting.  I hope you have been following along and viewing all the entries, as there have been some really great projects finished.  It is always fun to see how we progress through the weeks....like watching Project Runway.  I view it as a way to "find my voice" and "make it work".....ala Tim Gunn.
  Spring is always a welcomed time....new growth and returning favorites in the garden.  I have 3 different Clematis vines in shades of purple scattered around the yard and they became my inspiration for When Clematis Bloom.  

 I stuck with my original fabric choices after all. Since  I needed a sample for the quilting class I will be teaching soon,  I left the center plain for lots of machine quilting.

I also like offset layouts---part of my voice---so the vines  are similar around the center, but not mirror image in the way they curve.  I kept it simple  and did not try to over design this one.                                                                  


When Clematis Bloom

  Then the fun began with the machine quilting.  I filled the center area with stacks of teardrops of all sizes.  They create wonderful texture when you allow them to grow out in different directions.
  A little bit of pebbling was used to fill in in some areas that were just too tight for a teardrop.  Then I moved to the border print area.  My original idea was to quilt in leaves, but I noticed the swirl in the print and decided to use that instead.  So lots of swirls along the edges.
    Flickr Group for Project Quilting.   It has been a great season.  Thanks, Kim, for setting this up.

Tuesday, March 19, 2013

Nickel scraps and challenge

Woohoo....this month is rolling along.  I checked on my list for March and I am almost there!
    The  5" scrap project is ready for quilting. It's on the floor because the design wall is in use.   My goal was to get the 48 blocks put  together this month.  Check!    I will get it pinned for quilting  this month....maybe.


 On the design wall is my guild challenge project.  The goal this month for it was to finish the applique and join the sections.  Check!
   I finished off the machine applique and joined the sections.  I had a few of the appliques to finish that overlapped the seam lines.....all done.  The remainder of the challenge "ugly" fabric was used for the inner border strip.  
    Now I need to figure out the outer border.   Right now I am playing around with the leftover background pieces  for that.  Or  maybe adding some 4 patch units between them......not sure yet.  I will let it simmer on the design wall for a while.


    The final challenge for Project Quilting was posted.  Our design inspiration is "Hurrah for Spring".  I began pulling fabrics for this one.....now that I see them in a photo, I may need to lighten up just a bit.
     

Friday, March 8, 2013

Challenge 5 for Project Quilting

Garden Gate page 28
   The challenge was to select a magazine or printed publication and turn to page 28, and use that page for the inspiration of this week's project.  Sounds easy....except we had recently discarded and cleaned out a lot of old magazines, so my selection was limited!
   I decided to use the first one I found.   Garden Gate page 28---- it was a lovely view of a front entrance garden of white tulips planted in mass.    It was easy to zero in on one white tulip but what else?  
   I liked the contrast of the deep green plantings against the cedar shake and faded brick of the  house.  Looking closer I noticed the weathered  blue shutters.  So I drew inspiration from the subject as well as the colors.


Simply White 


 To the stash closet and there I found the fabric to use for the background that closely resembled the soft colors of the house.
  The background  is pieced with strips of varying widths.   The tulip and leaves are machine appliqued.    Very simple, very white.....thus the name is Simply White.   Sometimes less is more.

 
  This mini banner is 12" by 14".


   I liked that  the challenge topic was different take on what we would normally get.  And thankfully, we were not sent to the hardware store or grocery for inspiration!   There should be great variety in the entries for this challenge.   To view all the entries on Flickr Group, click here.
   One more place to look for inspiration....... Happy stitching.


Related Posts Plugin for WordPress, Blogger...