Showing posts with label french braid quilt. Show all posts

Tuesday, November 19, 2013

Continue the braid: Find a focus

  Picking the colors and finding the focus for the French Braid is where you start naturally, and it appears to be the stopping point for many.  Once again I will send you to check out some of the examples pinned to my Braid Quilt board.  Begin by looking for the French Braid quilts and note the color combos and the focus fabric each uses.  Lots feature blues, and I love the one using fall tones.

  When I made my French Braid, I had just begun blogging and did not take enough photos to show my progression in the fabric selection.    So I am going to jump to this year and use the French Braid table runner to illustrate how I chose the fabric I used.

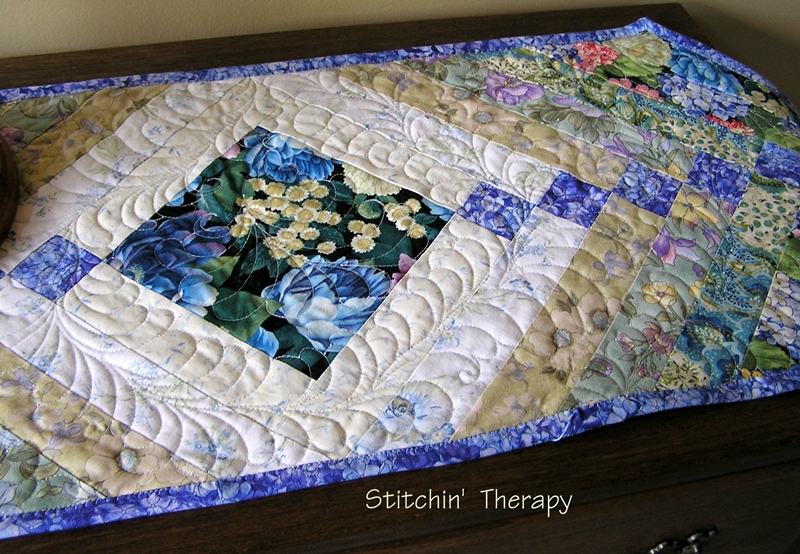
If you are afraid to try the braid technique.....this table runner is just the size to start with.  I left the photo large so you should be able to enlarge it and really examine the fabrics, too.
   The large center square fabric was my inspiration and focus.  It has a range of blue tones on a darker background with some softer yellow tones.
   I found a bright blue that I used for the smaller accent squares that was a very close match.  I could have used the yellow tone or a much darker blue for the accent squares.  Either would have been good, and just given a different feel to the runner.
   I used 7 different fabrics to create the braid run.....2 very light, 2 medium lights, 1 medium, 1 medium-dark, and ended with the focus fabric.

    This is the same photo in black and white.  All the color is gone and you see only the value of the fabrics.   Taking a photo of your fabric selection for any quilt is always a good idea, as it helps you see more clearly if the colors blend or contrast, or if one fabric just doesn't fit in.  I also use this technique when I do a bargello quilt.   This trick is a good one to use, especially with the braid technique.


Tips for your color scheme:
  •   Find a focus fabric, or one you want to use as your color scheme.  
  •   Now find 4-6 more fabrics based on the first fabric---select by color or contrast color.   Example---a fall fabric of golds and red tones.  Add a green print or two, and maybe use a golden brown as the accent square on the light fabrics and a lighter yellow with the darker fabrics.
  •   Be sure to have a change in value in the chosen fabrics....working from light to darker or visa-versa.
  •   Take a photo of the fabrics.  Line them up next to each other and see what happens.  Convert the photo to black and white.  Eliminate anything that doesn't fit and try again.  

   I pulled together a couple of examples to show.  I began with the dark purple print, found a fabric that had the same colors for number 2.  Then I went lighter in the purple, and next moved to a purple and yellow print.  Finally I found 3 lighter prints in the yellowish tones.  I would use a dark purple accent with these!  :)


  From leftover batiks strips.....I pulled 9 together that just might work!  But then, I find most batiks work well together.  So if you use batiks, be sure to get one or two very dark ones in there for dramatic effect.  
   So all of this is really a repeat of the selection process I use in general.  How you find a few good pointers in it.


  A few construction tips:

  •   To figure or at least estimate your length for the braid, it takes a little math.  Remember your strips will end up on point, so a 2 1/2" strip will really measure just over 2 3/4" when sewn into the braid length.  So I would roughly calculate by deciding on the length and divide by 3 to determine the number of strips I would need. So for a 60" braid length, I would plan on 20 strips (and probably throw one or two more in for good measure ).   It pays to be a little flexible with this technique! 
  •   If you have 7 fabrics chosen, you will need 3 cuts of each.  The repeating of the color run is what makes the design exciting. so plan on it.
  •  Accent square......chose your fabric for this square to contrast with some or all of the fabrics.  
  •  Accent square.....The accent square is added to just one of each of the strips for each "round" of the braid.  I first cut 1/2 of the needed segments.  Then I added a strip of the accent square fabric to a section of each fabric.  From this unit I cut the remaining segments---this unit became the second strip of each round.  It just saves a little bit of time and effort. 
  • Spray starch is your friend.....starch the braid runs before you trim them.

   Once you have the fabrics selected.....go for it. Cut those strips and stitch away.  I think you will be wonderfully surprised at what you can create.

  I will be baking for a couple of days, and preparing the final information on the Faux Braid.  Let me know if you have more questions.  Happy stitching.

Friday, November 15, 2013

The Oo-la-la Braid

  That's the extent of my knowledge of French.  So let's talk French Braid as in quilt.

   The  distinction between the Friendship Braid (on the left) and the French Braid  (on the right) is the accent square used in the French Braid.   The actual construction is the same in both.  The French Braid has the accent square that travels the length of the braid, and this is what carries the eye along the design.
  In both quilts I used separator strips between the bands of braid.  So I have the bias of the braid stabilized by the straight strip.


Another comparison photo....the two on the left are both done using the Friendship Braid technique, only the smaller one in the center has no separator strip.
  Tip:  When sewing bias to bias edge, pin a lot!    Be willing to do some easing if there is too much stretch going on.
   Tip:  Spray starch the bias.  This will help....just be sure to press and not iron in multiple directions.
  
 Tip:  I found that sewing with the bias braid band on top of the straight of grain separator strip worked best.  I was able to ease some fullness in.  Generally, instructions in books and such will tell you to put the bias on the bottom.  I found that only warped edges on this.

  The second thing to notice in the above photo is the width of the braid bands.  I used 2" strips in the Friendship Braids, and the bands were trimmed straight at about 5 inches.   I used  2 1/2" strips in the French Braid and the braid bands were trimmed to 9  inches.   How can that be?  It's a math thing.....that 1/2" gets multiplied when put on point and makes a big difference.
  For full detailed instructions of French Braids I highly recommend French Braid Quilts by Jane Miller.      Good photos, great inspiration, and cutting and sewing instruction.
 
   What I felt was lacking was how to select fabrics for a successful braid....how to achieve that blended look, etc.  So that is where I want to pass on my knowledge and things I figured out in this technique.  I am trying to consolidate a lot of info scattered throughout my older posts on fabric selection and creating  that blend, so bear with me.
    The "season" is quickly approaching.....and time gets eaten up with so many things.  I serve on the meal team at church and I have never seen so many requests and needs for meals.  This week I have been in the kitchen more than the sewing room.  And thanks for the great comments about this series of posts.  Happy stitching.

Thursday, July 4, 2013

More things to share

  This little doll quilt arrived a couple of days ago.....from Nancy of the HGTV Message Board.   so cute and colorful....thank you, Nancy for your help and being a wonderful Mrs. Claus representing Alaska.


  The Garden Braid table runner is quilted and bound.  This is not up for grabs....but it has been spoken for.  I had some tension issues near the end....so I think it is time for a new needle.


More patterns and blocks to share...

Item 1:   Two patterns.....a needlecase pattern, and a purse.


Taken


Item 2:  Here are three patterns by Eleanor Burns.
 Anything by her is great.  Take your pick or take all three.


All are Taken


Item 3:   The pattern is for Cathedral Windows. And a lot of squares for the insets squares you will need.
This just involves more hand work than I can do anymore.


Taken


Item 4:   Four blocks....Friendship Stars and more squares.


Taken


Item 5:  Patriotic fabrics.....2 are fat quarters, and the other 2 are large chunks of about 1/4 yard.


Taken


I'm hoping someone will put these to good use.....leave a comment and be sure you can be contacted by email.  

Wednesday, July 3, 2013

Celebrate

   I am finally back to stitching again.....And I can get to the design wall, the cutting table is loaded with project bins, threads, scrap boxes, and watercolor strip bins.  I can find things---mostly---so this is a celebration  post!!!
  I quilted some feathers on the braid table runner this morning. Now I need to trim and bind.


  Those string pieced blocks are being joined too.  This is a smaller size overall than the first one.  It should end up about 40" by 50".  I just love eyeing the colors  in this style  scrap quilt.


Now I need some takers....for the items I am clearing out.   This is the first batch of items.

   Item 1:    There are 23 of these blocks left.  They are about 7" ---square in a square pattern, with a "conversational " print in the center.

Taken


Item 2:
  2 patterns for Autumn  mini wall hangings.  Instructions for fusible applique and some embroidery.

Taken


  Item 3:   Two patterns.  One is for a table runner, and the other is a braid style quilt.  
  I never used either one....note that the braid pattern is for construction only.  It does not explain how to select fabrics combos or provide info on blending.  The person who passed it on to me was discouraged by that.

Taken


  If you are a follower and are interested in one of these,  leave  a comment and be sure you can be contacted by email.    Thanks.
  I will post more items later today.....check back.  :)

Sunday, June 30, 2013

June starts and finishes

  June------ A better month of starts and finishes......
  • The blocks for the Buzz Saw quilt--old NewFO-- are sewn together.   Now to find the border fabric...somewhere in my mess.
  • The Tiara quilter arrived and has been put to good use!  :D
  • NewFO----Small quilt made and quilted for practice.....going to Phoebe.
  • Quilted and finished the watercolor strings quilt....Ripples.
  • Quilting done on the guild challenge quilt.  Ready for binding.
  • Blocks completed for the jewels string quilt.  Ready to be joined.
  • Started flying geese string blocks.....NewFO.....whatever was I thinking!
  • Top constructed for braid demo. New FO that was unexpected.    Dana pinned it , so now I need to finish it!

Guild challenge quilted;  small quilt finished for Phoebe;  Ripples quilted and bound;  jewel string blocks;  flying geese string blocks;  French Braid table runner.

  I feel better after reading that list!  I actually did a lot better than I thought this month....at least I got one finished!
July plans  Here's what I need/plan/want  to do.
  •   Priority one-----Bind, label,  and finish the guild challenge quilt.  
  •   Jeweled string blocks----sew them together into a top.  
  •   Braid table runner----"uncover"  the batting ---again hidden in the mess---and finish this up.
  •   Make more string  geese!
  •   Buzz Saw quilt----- work on the border.    
  •   Start a NewFO----????  It better be a small project!  Actually I have that urge or need to create feeling that is only satisfied by working with a watercolor design.  So that's the plan, now I need a good inspiration  image.  
I'm linking to the NewFO party at Cat Patches......check out what others are up to.    Mrs. Cat Patches is a great enabler to get things rolling, and the cats provide endless entertainment.  I'm thinking she should write a book about Smitty's adventures.
Stay cool ---I'm still sorting through bins and boxes----and happy stitching.

Sunday, June 23, 2013

Catching up again

   Once again, I find myself playing catch up and trying to get back to my plans.  I'm glad I got all the baking done on Thursday,  because I  got a call  from our guild Program VP asking if I could help  fill in the  program for Monday night.  I know how hard it is to arrange programs, so I  agreed.

   That meant I needed to dig out the braid quilts.....oh, yeah, her request was the French Braid...get them washed. One was on the wall, one on the guest bed, and the other packed up till winter.
   I also needed a sample project to demo the piecing technique with....that meant digging out fabric and finding a ruler and rotary cutter.    (My sewing room is in the state of chaos/mess/can't find anything  until the cutting table made by Sir Old Man is brought up from the workshop.)


 I spent about an hour looking for a project box that I had set aside for a future braid project.....no where to be found.  So I raided the stash closet for floral  fabrics---they were the easiest to reach--- instead to make a short runner as a French Braid sample.  


  Luckily this technique is a quick sew project.  The hardest part is picking the fabrics.  I decided to use a different accent for the small squares rather than the large floral that is the starting 6" square.  I actually like this impromptu selection....an unexpected  NewFO for June.

  I had planned to be re-making the Roman shades for the guest room and in the garage......so hopefully that will get done this next week!  


And one more doll quilt!
  This one arrived from Jackie, Mrs. Claus in Iowa.  She is representing Hawaii for the HGTV Message Board group of Mrs. Claus participants.  I apologize for being late in getting this posted.
  I love her creative endeavor on this one.  Scrappy squares are top-stitched down on each larger square. I think the colors are so great and the scattered placement is fun!  Thanks so much for helping.

  One week left of June.....exactly where has this year gone?  I feel like I have been standing still and the escalator is passing me by at 100 mph.  I need to get on and get things done!  Happy stitching.

Saturday, September 25, 2010

Answering questions....

The first emailed question was about quilting the french braid quilt.   My quilt was done in batiks and  the runs were staggered when set together.  Each panel was about 9 inches wide, so it  had to be quilted down.  I did not want to use straight lines because the pattern is so angular.   As usual, I probably overdid it, but I used free motion to quilt a vine with curls and leaves.  There's a closer detail photo on the Free Motion Quilting page--scroll to the bottom.  Two reasons:  the curves and twirls create a lot of texture on the quilt once it is washed--I love the look of denser quilting on batiks, and the second....I like stitching curves.   I used meandering loops in the narrow strips between the black bands. 
 I have plans for a second braid quilt done just in florals---on florals curvy/wavy lines would be fine, because the pattern of the fabric will hide most of the quilting anyway. 
On the AK quilt, I saw a Moose, I also used a blended braid border.   I free motion quilted in large loops and swirls the border--confession time--to take in some fullness and stretching.  All braids have bias edges, and each time you touch it, it can stretch even when stay stitched.   

Second question  was about the jewel box quilt.  I went back and looked ......oops!   I started a tutorial  on the block construction and then apparently got side tracked and never gave details on finishing.  The finished quilt in shown on the Scrap Quilts page at the bottom.  Priceless Gems finished at 55 inches by 70 inches with a 4 1/2 inch border.  I used black for the background  and inner border strip and it required  2 3/4 yards.  All the other fabrics were scraps, so I do not have an exact amount used, but I would estimate about 2 yards for the rest of the fabric needed. The final border was whatever I had left of the black and 2 1/2 inch strips that were sewn into a piano key type pattern.  
Thanks, Jan, for the questions and catching my unfinished details.

Friday, April 23, 2010

Carolina Bliss


It's done..........Carolina Bliss is 66 inches by 85 inches. 
Off to Charlotte tomorrow to shop for shoes and jeans for Alaska  trip in May.  I checked the weather forecast for next month there.  Providing there is no more snow, it should be great with the highs around 55 degrees.   Either way, we are all getting excited about going.
Happy stitching.

Sunday, April 18, 2010

Quilting the French Braid

The quilting is done!  Thank goodness  for Isacord thread...especially on all batiks.  I used a free motion  vine....no pattern, but inspired by the Carolina Jasmine that is beginning to bloom by the shop.  I was out there earlier this week untwisting the curls and trying to get the tendrils to cover the fence I am using as a trellis.  Inspiration!  So when I began to quilt the french braid, I used a twisting vine and lots of curls.   I don't mark my quilt tops, as I can't seem to follow the lines.  My brain must be  mis-wired to my eyes and hands.  Anyway, I just seem to do better winging it free hand.
So here are a couple of close up photos of the quilting in the braid area.  

 For the plain border I used a simple loop and curl that looks like a lasso to me.  It's a great filler and stitches up quickly.  And if you have any fullness--never admit it--this loop and curl is an easy way to hide/disguise/take it in!    So I will be squaring it up and sewing on the binding tomorrow, I hope.       I went to the Greenville guild's quilt show on Friday.  Always see great quilts and get motivation at a quilt show.   And visited the vendors.....bad girl.  But here is the rationalization....I needed 3 reds---the right reds---to do the poppies for the watercolor on the design wall.  So, I only bought 3 reds of  fabric.  And some thread, and a couple of books.  Like one quilter I met said, "Thread is easy to hide!"   
 Till next time, happy stitching.

Tuesday, February 23, 2010

French Braid Quilt

I started piecing this quilt about 5 months ago.  It has been on the design wall in strips and pieces since then.   I managed to get very side-tracked onto other projects--generally smaller ones--and put off finishing the piecing on it.   I ended up piecing strips of several fabrics for the inner dividing bands  that are between the black.  I just felt like a single fabric drew the eye to the strips and not the braid.   The fabric used as the outer border is not in the braid at all, but it picks up the main colors.  Luckily I bought all that was left on the bolt at the Cotton company at Christmas and  have just enough for the binding too.  It is 76 inches by 66 inches right now.
I just realized that the top photo is the inverted position that I had originally planned.  So here is a shot of the original plan.  Now I can't decide which direction I like best.      A few words of caution about this pattern.  Press carefully--and in this case the less you handle and press the better.  The bias edges seem to stretch if you look at them wrong.  I cut the outer border on the length of grain so it would not stretch, and measured and pinned carefully to ease in any fullness.  I will plan the quilting--especially in the center bands--to take up any fullness there.  Loops and swirls will probably be the best technique for that....straight lines would only cause ripples and roping.
I also want to do this pattern in florals and really blend it....only in a smaller version.  But first I think my fingers need a rest, so no cutting or stitching tonight.  Just  a dose of aspirin.
Happy stitching!

Thursday, January 21, 2010

Exercises for creativity?


I have all four strip sets of the french braid done and up on the design wall.  Right now I am auditioning fabric to be used in the separator bands.  I originally thought I would piece the separator bands, but now I think not.  I have two different batiks that have strong dark and light areas and I will probably choose one of them to use by itself.  That's why it is still on the design wall....each time I walk in and look at it, I change my mind on the selection!  I have plenty of small projects to do, so there is no rush in deciding. 
I read through the first chapter in the Art Quilt Workbook that came in the mail yesterday.  Elin (one of the authors) was right in her comment, I am going to enjoy working through it. I thought it was so neat that she found my blog and left a comment. 
The first chapter briefly covered design principles---like I mentioned in an earlier post.  In the section on visual elements of design, one statement jumped out at me. Line direction communicates movement and direction.  Horizontal lines are calm and passive.  That was how I felt about the horizontal layout design in my Turning 60 quilt....a very calming effect!  
And the section on the creative process is great.  My post on my creative thought process for the guild challenge  explained how I got through my block.  Little did I know that there are a lot of ways to get past this.  And this section gives me insight to other ways to improve my creativity and get over the wall/block/stump/mountain!  First step is to do the  first exercise they suggest, which is word play.    Got my plan, now I need to get to work.
Happy stitching.

Wednesday, December 30, 2009

Stitching on the Braid

Last night I finished the scrappy mountain blocks--delectable mountains--that I had cut.  After the pressing I realized I had cut too many "downhill" blocks and not enough "uphill" ones  (the mirror image).  So I hit the stash again and cut the needed squares to make some more "uphill" blocks.  Here's some of the "downhill" ones.  I am using 10 1/2 inch squares to begin and then the strips are cut to 2 1/2 inches.  The block end up unfinished at 8 1/2 by 10 inches.  Since I am adding more blocks that I need, the quilt will end up large rather than a lap size. 
I have been piecing using the featherweight machine.  It began running heavy and needed a good cleaning and oiling.  And a new needle....remember it goes in sideways!   Even so, I love that little machine.
And back to the french braid......I had one run done and have begun the second, which is about half way done.  I wanted a photo to be sure I was happy with the colors.  The second run does not start with the same fabric as the first, and the third and fourth will be different too.  The photo shows the two runs....unpressed or trimmed.  The piecing is very easy once you get the system down, so the rest should go together quickly.
 I found some batik on sale while in Asheville that I believe I can use for the separator bands, as it has the blue, purple and rosy tones in it.  But that is for another day, I need to finish the piecing first!  That's why I usually have 2 or 3 projects going at once.  I get bored easily and my mind starts jumping around to something else.  By switching back and forth between projects, I manage to get things finished.

Thursday, November 12, 2009

Colors for French Braid Quilt

Color choices for this one is the challenge.  I thought I would try photos to help me decide which type of color run I would use for the french braid quilt.   My first choice was all blue to purple and quickly discarded as there was no life to it. 

The top photo is probably the front runner right now for me.  The fabric on the right will be the starting and ending point.  It has a golden tan background with the blue, purple, turquoise and rosy tones in the pattern.  So this fabric creates my palette.  The rest of the fabrics are laid out darkest to lightest by value, rather than by color.                                                                                                                                                          The second photo has the fabric groups in 2 color runs--the purple and rose and the blues.   And the photo below it is the same as the top (just reversed to make it easier to compare).  I will use the black as the accent square.  I plan on using a variation layout on the french braid.  I first braid will be colors 1-12, the second braid will start with #3 to 12 then #1-2, the third braid will be 4-12 then #1-3, etc.  Or at least something like that. 


I also plan to use separator bands between the braids.  I will probably use rectangles shaded like the braid runs.  I love the blended effect of color values and  prefer asymmetric designs.  So that is what I am trying to achieve here.  Since this is hard to visualize I guess I just need to jump in and try.   
But first to finish the one fabric quilt piecing, make a totebag for Christmas gift, and try the tutorial on thread painting from Shirley at learning fiber arts.   It's so true....I'm a quilter and my life is in pieces!  Have a great day everyone.
Related Posts Plugin for WordPress, Blogger...