Showing posts with label applique. Show all posts

Thursday, April 2, 2020

Morning Glories!

  Finished small wall hanging that I called Morning Glories.  I am not sure that there are turquoise morning glories but that is what I was reminded of here. 

 The design began as slightly abstract with dark on the side and a band of dark across.  The more I looked at it, I could see a fence post with broken post.  That lead me to adding some applique using these bold flowers in gold and turquoise. 


 Note the applique is fused fabric , cut out and tucked close to each other to create illusion of a vine climbing the post.  All edges are machine stitched with a small zig-zag stitch.

   So morning glories climbing a broken post seems a natural.  I ended up with a light binding...which is not what I wanted, but now it is done. 
  Hung on the office door it offers up a bright spot of Spring in our troubled world. 
    I think I am on my 21st day of house-bound habitation.  Not completely stir-crazy yet, but approaching outer limits of sanity!  After finishing laundry this morning, I am heading for the porch out back to enjoy some sun and fresh air.  Stay safe and stay well.
Happy stitching.

Friday, April 26, 2019

More FMQ


    I am working on the Jewel Box Star quilt.    This photo is from February when I was playing around with adding applique to the border.  

   The center has been quilted with a simple meander/stipple.  Now to the more intense outlining of the applique.

  Before I began I reviewed the points I picked up from Helen Godden video.

  • Since the applique stem and flowers are all connected, just start at one point and follow it all the way around until you have outlined it all.
  •   Second, if you have to stop, stop at a natural turn/point rather than in the middle of a long line or curve.  (Easier said than done in reality, but I tried to do that!)
  •  When beginning after a stop, get the needle moving before you move your hands/quilt.  This makes the stitching smoother, and without jerks in the line. 
  • Remember to breathe. 


  Before I  share this adventure in photos, the quilt police are banished.  No perfection here.  This is reality at its best.   It has been a while since I tried this style FMQ.

  Once I did the outline stitching, I decided to try some pebbling and dense stitching in the areas between the stems and inner border.  I love the effect but this is tough for my old eyes.   So I decided to mix it up a bit.  The next area was smaller stippling.


The outline stitching was good here.  The area was larger, and the closer stippling closely resembles the pebbling.  So why not?


   After a couple of hours, the intense concentration has sapped me.   And....I need to figure out what I will do around the rest of the border.  Maybe swirl flower will be a good choice. 


   On a personal note, my bother has a serious health issue arise yesterday.  He is having more test, scans, and doctors to see today.  I ask for healing prayers.  Thank you.
Happy stitching. 

Wednesday, February 20, 2019

Adding applique

  It's cold, with a little sleet here....so soup is on and it is warm inside.  I worked on the border applique yesterday.   First part of one corner done.....I need to make more stem pieces today.   And cut more leaves.  I am not going all the way around but plan on at least 2 corners with trailing stems.  I'll do as much as I like or as much as my achy fingers will allow.


  New idea brewing......
I took the time to play around in EQ7 after seeing a different use for small pieces.  The quilt is done in a log cabin setting using small rail fence units.    This link is to my Pinterest save, and the original quilt is from American Patchwork and Quilting.


Scrappy rails in 16 patch block

    I was fascinated by the idea of using the 2 patch rail fence to create units for a log cabin setting.  This would be an awesome leader ender project for scraps.  A perfect donation quilt too. 


  Basically you are making a log cabin style  block of 16 units of the 2 patch rails.  Each small 2 patch rail is alternated in direction--horizontal or vertical.    Each block requires 6 light units, and 10 dark units arranged as shown. 

  I have a lot of 2'' strips....so my cutting would be 2'' by 3 1/2'' log.  16 of these would give me a block that finishes at 12''. 
  If you work with 1 1/2'' strips, then cut 1 1/2'' by 2 1/2'' logs.  The block would finish at 8''. 
   If you elect to sew longer strips together and then cut, use Bonnie Hunter's tips to get variety.  She sews shorter lengths together, say 12'' and then cuts them into her desired size. 

   Happy stitching. 

Wednesday, August 9, 2017

Back in time to String Me Along


 Going back to  an early project.......String Me Along .
  I love this quilt.   I have it hanging in the sunroom and so enjoy all the details and fun things I learned and used in it.  

Here's the link to the post from 2011, when I finished it.


   I was looking at it yesterday and saw the hummingbird on it.   And that reminded me to check on the hummingbird feeder......it needed cleaning and refilling.    I enjoy their garden antics....swooping in, darting among the branches, hovering nearby, and then all out war to claim the territory.
  What you see on the quilt is what you can find in my gardens...... or could when things were in good shape :)


And one more critter on the quilt that we watch hopping around and nibbling our weeds, etc.  You might have to look close to find him as I sort of camouflaged him under the flower.

  Another post with a few details about the blocks, stitching, and such.   Most of the information on this quilt is scattered over about 6 posts and sort of jumbled.  It was early blogging days....I did not know what I was doing really:)  Second, some of the post have lost photos, need a fix, and such due I think to the blogger switch/change up format from a few years back.

  Would I do this again?  You bet.....only better and probably not as large.  I recently ran across the templates for the appliques I used.  Most of them were original, so I think that is why I kept them.   And there would be lots more floral fabrics.....instead of leftover bits and strings.

  But right now.....I am working on lots of small items for gifts, and guild boutique items.....more mug rugs:)  I have a couple of wall hangings to pin for quilting and that will be my time eater for the week.     So until I get some things done......happy stitching.

Tuesday, July 18, 2017

Using orphans and strings for a small project

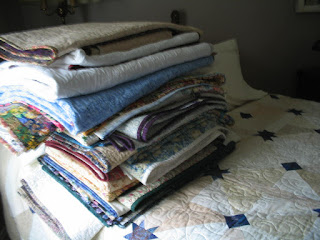
    The quilts and wall hangings are stacked for the trunk show this week.   I keep a master list of quilts I use,  and add in a new one sometimes.    I have 30 here....so to show them all in an hour means quick viewing, and fast talking :)


  There were a few small quilts I went thru to replace one I gave  away ....... Lavender Scents left with my cousin on Friday.    Bonita loves purple, and  this one just jumped right into my hands for her.  We had a great visit and  lots of hugs.  I loved her daughter's comment that she could see why and how I get wrapped up and lost in the sewing room.
  And all were very impressed with Sir Old Man's furniture and skill!


The heat is still here....it is an
 oven outside.  Good time for some sewing and maybe time for a small project.

  So I thought I would look for that  small project to occupy myself this week.   I have stacks of string blocks in all sizes, so something to go with them maybe.
  I found some small appliqued blocks, some string pieced blocks, and a stack of leftover triangles.......I could turn these into a simplified cover for Hot Legs!  The fitted cover  I have is good, except for the Velcro closures that catch on the thread.  I need to remove the velcro at some point.....instead  for now,   I decided to make just a flat style throw/cover  for her.


  I pulled out the Simple Folded Corners ruler and tried to figure out how to use it.   I could not make any sense out of the directions.   Bonnie made it look so easy! Although the instructions are written in English and have some pictures and diagrams, it was absolute Greek to me!  So I did one corner the old fashion way-----draw line, sew, flip and trim.


   Then I pulled out the ruler stickers and marked the lines on the ruler  to line things up based on what I did.   I think that is referred to as the indirect method versus  a direct application.
   The pink markers are the points for cutting off the corners of the appliqued block for the triangle corners.  The blue points are where to position for squaring up/trimming the full block.
  The markers are a luxury.....for old eyes that have trouble with tiny lines and numbers even with glasses at this point.  Life is short, buy the gadgets!


   Just a random layout for now to decide how to run the strings, or do I mix it all up?  Time will tell as I advance further.  One thing for sure, I need to re-watch Quilt-cam for the details on using this ruler.   Actually, there is a video tutorial on Doug's website........ In this case, technology helps :)


   Happy stitching.

Wednesday, December 14, 2016

Having way too much fun!

    Last night I read through my new book, a  get well gift from Lara at BuzzinBumble...... isn't she a sweetie!
I had commented I was putting her book on my Christmas list, and she offered to send me a copy for my recovery.  Happy dancing here.

   So I did an intense read and decided to begin today on my focus banner for 2017.  Nothing like the present to set a future course.
   The book is a great read, and I love the extra tips that Lara includes.  Her directions are clear and easy to understand.  It is not a complicated technique, it just takes a little planning and prepping.   So if you haven't gotten a copy.....put it on your Christmas list.  There's time:)


     Along the way, as I prepared my fabric for the words I want to use, I discovered a new use for campaign yard signs.   I slipped one inside a trash bag for my prepping.  And that is all I will say about it for now.


  It was time to begin work on the letter patterns for the applique.  Next, I pulled out my orphan block box.  I found a couple of blocks I loved that I could incorporate into the banner.  And then the improv/free piecing of the background.  I have a large zip lock bag of neutral strips, and pieces that come in handy for creating  mixed backgrounds.


   I had a rough sketch  as a guide to what I wanted.  I knew that I wanted an off set layout, and that a bit of color in some orphan blocks would be a good thing.  At this point, I need to square up the bottom and check to be sure I have enough room for the letters.

   You can get an idea of the type of piecing I am using....strips, chunks, a few 4 patch units, and a couple of blocks.  It is a matter of finding things that fit, and pressing well.  Square up the sides as you go:)


        And the first letter is a "B".    I am using a lot of batik scraps for the words.

  I did a search for alphabets for applique.  I found a couple that I decided to work from because the size was about right.  I traced over the block style letters I needed, adding a little curve and personality to them.    I added an extra strip across the bottom on the final size to be sure I had enough length.  

    I did a small bit of cutting with the rotary cutter---no problem.  The pressing is worse on the hand, so I pulled out the lighter travel iron to use.  Much better.  
   I got the lab results for my B12 level.....even with the monthly shots, it is too low for my nerves to heal and maintain my body.  I see the doctor on Friday to discuss  a different shot schedule.  I seem to do well for a couple of weeks after the shot, but feel my  energy level drop by the third week.
  I'm done for today.....happy stitching.

Friday, October 21, 2016

Friday Finds.....October style

pat-sloan-the-splendid-sampler-oct-bonus-block
From Pat Sloan


   Pumpkins are on the vine, and all over the place right now.  
Pat Sloan is offering this cute block pattern...she made her's white.  The post is here for this Splendid Sampler block.    My idea for it was as a mug rug, or on the ends of a table topper/runner.  It is simple enough to enlarge the pattern and mix up beautiful fall colors.


Martingale - Top Your Table (Print version + eBook bundle):

 This is a Kim Diehl pattern from book published by Martingale, Top Your Table.    The book is on sale right now :)
  You can't go wrong with her designs or patterns, and the colors are always so special.  


Hill Country Quilter: Quilting Aids:
From Hill Country Quilter

   This tip was stolen/borrowed from  special blogging friend,  from Mary at Hill Country Quilter.
  Mary shared her tip to keep quilts from falling off the edge of the table and causing drag......dreaded drag that weights down your stitching movement.  She uses a sit down machine like I do, but with a set of bookends (from the thrift store) attached via large binder clips to the table edge.  Brilliant!!!  
I am sure I have a set of those bookends somewhere.
  Be sure to read the whole post.....if you need a needle threader.  I hit the grocery store and found the GUM product for threading dental floss.....it works great as a needle threader.  With my vision changing, I need help to thread the Featherweight.  The floss threaders work perfectly.  Thanks Mary for these ideas. 


Pumpkin Pecan Cobbler...cake on the top, hot caramel sauce on the bottom!! Fall dessert central.


One more pumpkin pin.......a sweet treat/recipe for the season.  Pumpkin pecan cobbler sounds yummy and looks so good.  I am glad I picked up pumpkin puree at the store this week because this is on my to do list for the weekend.    This recipe is what my mother used to call  a pudding cake.


  As always, please pin from the original source.
Cooler weather this weekend.....finally.  Happy stitching.

Friday, May 6, 2016

Friday Finds

There's a blog hop going on to win a copy of Crafted Applique by Lara Buccella.  I am sending you to StormyDays blog to begin the hop, as Dana has a full list of sites for the hop,  and the first review.  She has a project made using the technique----which is being kept a big secret, like in mystery by the reviewers.   It's all in good fun,  and Dana deserves a good fabric bombing for not telling!


Mequilter shared a block that is simple and would work well in any border.  I love the simple change that color makes in a 9 patch.


mini quilts from fabric panels: From the blog at Keepsake Quilting.....this post shared 10 ideas for using fabric panels.   This entry is worth a quick look even if you think you aren't interested.  I generally ignore panels but recently succumbed to one filled with butterflies by Moda.  I figured if I did not buy it now, I would regret it later :)


Bursting Buds Table Runner by SameliasMum:  May is spring and this table runner from Samelia's Mum shouts it.  She is sharing a full tutorial and pattern, so stop by and say hello.   And check out her beautiful quilting on this project too!


As always, please visit the original source for pinning.
Enjoy your weekend.  Love on your Mom.  Make someone smile.  Above all, remember how great you are.  Happy stitching.  

Thursday, April 14, 2016

Fusing only today

   I was inspired to do a repeat of sorts.  So today was  just cutting and fusing time.    I had been piecing bricks to make a long banner or table runner.  I had planned a flying geese band for the border.  But I tossed that idea to the wind and decided to just add fused plumes.


   That's a quarter on the purple plume for size reference.  I traced off a few from leftover plumes from the large quilt.  I quickly gave that up and just winged it by cutting free hand.....faster and more quirky since sizes vary greatly.


  It's about 60'' long.  I will begin to stitch down the plumes and decide if I want more or not.  I do enjoy a good repeat...lol.


I need to finish up the bread I am making.....so stitching tomorrow.

Happy stitching. 

Friday, March 18, 2016

Friday Finds Creativity


From Pat Sloan......love this.:
From Pat Sloan
   Creativity keeps popping up in a lot of parts of my life right now.....or at least that is the word I keep seeing.   First it popped up as the topic for this week's Bible study.  I was reminded that God fills us with imaginings and the skills to fulfill them.  That was so affirming for me.
    Next I run across this poster from Pat Sloan, a creative guru if there is one.   It's good to have positive affirmations to remind ourselves that our quilting passion is our creative passion.  Embrace it and enjoy.


Free Easter Printables | faberge egg inspired design with small flower details.: From Hub pages.......printable coloring pages for Easter.   I actually saved this to use as a pattern template for applique......lol.  I had visions of making mug rugs with decorated eggs on them.....so maybe next year I will get an earlier start.  But a few printable pages would be fun to tuck into Easter baskets, along with some markers. 


 : From About.com......pattern for a Friendship star block.   There are a couple of different sizes shown with cutting measurements.  Also, there are links to some variations.  Perfect block to put together from leaders/enders!  I really need to make use of my box of triangles.  


WOW! Love the color!:


   Creative setting and use of color in this quilt!  Naturally my eye was attracted by the color and value in this and then I looked closer.  The diagonal setting gives it a fresh updated look for the simple squared boxes.  Of course, this might be a good setting for some orphan blocks, too.  

 From Pinterest.....the link is dead but says it was found on myquiltplace.com.

Update:  Here is the correct link from the maker,  Cathy Tomm 


1:

   For EQ users......Do you eq blog offers great tips.  This short tutorial was on creating labels in EQ7 to print out for your quilt.  
  While you are there....be sure to check out the fabric giveaways from Moda!


As always, please visit the  original sources that I have linked for pinning.  
Enjoy these finds and happy stitching!

Thursday, February 25, 2016

Early Spring for February Let's Book It


 This is an older publication and I've never made a project from it.  I love the crazy patched backgrounds and cute appliques.   I took inspiration from a project, but did not follow the directions.....lol, story of my life.


  I used large chunks and hunks of  small prints/ muted prints to create my background.   I liked the offset balance in this layout, so that is how I stitched it up.


  I modified the basket shape and made it slightly taller.  I was fusing the basket to the background.....and cut out the center portion of the fusible for the basket.  This is the Pat Sloan method for fusing.....it keeps those large areas from being stiff.  And you get the benefit of the edges being fused---read as no fraying.


  The basket, stems, and flowers are fused and stitched down with a small zig zag stitch.  I thought the overall design needed a little kick, so I added a bit of fabric as ribbon ends.  The edges were stitched with a decorative stitch to give a ruffled edge appearance.


I also used a decorative stitch on the flower petals.


      Quilted with swirls and stippling for texture, and finished with a soft blue binding.  I pinned it to the design wall and was not satisfied.   Either I needed additional buds or blooms on the left, or  something.  It hung there for a week or so and it dawned on me I had something to finish it off with.


Just what the basket of blooms needed.....a couple of butterflies.  These are ready made appliques that I have had in the stash.  A little black thread to add them to the finished piece for some balance.


  Early Spring---a cute finish for Let's Book It.  I am so glad I don't have to follow the rules to play along with this monthly project.

  Let's Book It project is hosted and presented by Sharon at Vroomans Quilts.  See the details and linky party there every month.  For that matter, just join us.

  Next month I am reviving a "rejected" book project and turning it into my project of the month.  So I have a head start.....
Enjoy....happy stitching.

Friday, January 8, 2016

Friday finds....January blocks

  Looking around I think there are two blocks that seem to be everywhere.  Is it the year of the circle or the bow tie?   I am doing the circle dance.....and the bow tie is on my list for this year's projects.  So maybe I am just noticing  things I like.

Val at Quiltyfolk blog is hosting the Quilty 365 challenge for the circles you see dancing all over the place.   These are a few of mine....I have added a half circle for a staggered layout.   And i will be introducing a smaller size of circle too...I think.
 Be sure to visit the linky party and see all the variations.   She also has a page of details on her blog.


Stitchin' Therapy: Bow Tie block:

Bow Ties board on Pinterest....click here.   I have a good collection of layout ideas....X and O, blended, on-point, even a zig-zag one! Scrappy ones, ones in batiks, artistic ones. Surely one is calling to you.
This quilt now belongs to Remy....he needed a big boy quilt.


Stitchin' Therapy: Bow Tie block:
Over at Marcia's Crafty Sewing I saw the mini bow tie challenge.  366 days this year and you make a mini bow tie each day.  Or maybe for 6 months you make any size yo want?  If that is the case, check out the great tutorial at Dora Quilts and she includes a size chart to help!

I am considering this.....lol.


rogue quilter:
And the cutest small project I saw this week  was at Rogue Quilter blog!  Since winter has finally arrived for most of us, a few snow balls seemed perfect to match the temps!  Janet enhanced the tree with extra stitches  and gave such personality to Mr. Snowman.   I don't think I will be in trouble for snatching her photo.  Just in case....go visit her for the details.


Free table runner and pillow Patterns | Snowman Quilt Patterns - Free Applique Patterns for Snowmen: Here's a snowman image if you should happen to need one....hint, hint!

Update:  Janet shared the link for the free pattern  for ''Snowball'' by Kathi Campbell for Heart to Hand....click here it. 


And with that I will call it a wrap.  Please visit the original source for pinning by following the links provided.

Enjoy....happy stitching.
Related Posts Plugin for WordPress, Blogger...