Showing posts with label fabric selection. Show all posts

Wednesday, March 7, 2018

Fabric Selection

   I had several questions in emails this week about fabric selection and where do I get my fabrics.   I buy fabrics everywhere.....remember I have been collecting these fabrics for a very long time.  But excellent fabrics are out there.  I do not purchase a full fabric line, rather I go for the ones that will work for these designs.    And I love to pick up older fabrics at estate sales or such. 
   As for fabric selection, these is a lot of info buried in my older  posts.  So I dug out a class handout that I have used to illustrate fabric selection for watercolor designs.


Water Color Class Fabric Selection

Here are examples of fabrics in my stash that I use. This first photo is arranged by value.


  This selection are light fabrics. Note the light background and pale print. The last two on the right have deep/stronger prints. They are considered light mediums.


Your fabrics should include several colors and value in its pattern. Light areas and dark areas merge and blend when viewed next to each other and from a distance.

  
 Not all the fabrics I use 
are floral patterns.  
The top row of fabrics in this photo are good choices. They are 3 types of paisley prints.  Note the curved lines of the pattern.


 The bottom row are fabrics to AVOID, These are tone-on-tone prints, small calico prints and 2 color prints. They will read as solid, or dots.
  Now hit the stash and see what you can find!  Remember you only need a few 2'' squares of each fabric, so scraps are a great source.


Monday, November 20, 2017

Sewing on

  One set of appointments done, 2 more this week....ugh!  But I am thankful they are just check ups and check ins.  Except for the mammogram this week, but we will not think of that yet.  I have some blocks to show that I have stitched a bit.

 
   The first four blocks are pressed, fused and appliqued down for the baby quilt...... and the remaining blocks are set to go under the needle.  I will be stealing time between the appointments and a little bit of baking this week to work on these during the day.  I am using a pale yellow Aurifil thread for the buttonhole stitch on them, so that means using the Janome for stitching.


  The 16 patch blocks......I am loving them and the entire process from the selecting fabrics, sewing stratas, sub-cuts, and sewing again.  If you need a good/excellent tutorial for a 16 patch block, I have just the place for you to learn.  At Exuberant Color, Wanda has put together a perfect tutorial on her technique....click here. 
   I was inspired by her garden series projects to try this.  So the only way to learn, for me is to do.  I did a few.    Here's the mix of what I have sewn so far using 2'' strips. 


  Here is the cropped version of what I think will be in the "shade garden"  quilt.    Or maybe a couple of them need to shift to the country garden one.  Time will tell.

  I have more strata strips sets sewn and I work on them in spare moments or while watching TV in the evenings.  The Featherweight is perfect for this project. 


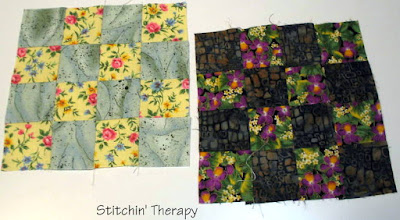
  I took a couple of photos to share the fabric selection part of the process.  I thought I would see how a light version and a darker version worked on the same floral print.   The upper block has a medium to light mottled fabric verses the dark plum in the bottom.  Quite a difference....the top one is mellow--country garden, and the bottom has drama--shade garden-- and the green in the print pops more to me. 


  The floral in this print has a lot of value difference....dark areas and light areas.  The top photo it is paired with a batik and then with a deep plum fabric.  I think both will work in the shade garden version. 


  The selection of the pairs is an interesting exercise for figuring out contrasts.  The shade garden needs enough contrast to be seen, but not too strong overwhelm.  I need to dig deeper into the stash for the alternate fabric for pairing with the florals. 

  So that's the plan for the week.....stitch between appointments, bake a few things ahead for Christmas.  We aren't doing a turkey dinner for Thanksgiving.....crazy for the 2 of us.  It's eat out or have a steak in....lol.  We have a beautiful week of weather, I plan on stealing moments to enjoy it.
Happy stitching. 

Wednesday, November 15, 2017

Those 16 patch blocks

  I put together a couple of the 16 patch this afternoon to see what I had come up with. 


    I immediately saw 2 different  gardens.....a country garden and a shade garden.    All of the combinations in this photo remind me of a country garden.   The type with a few weeds, volunteer plants, some shade and bright sun. 

  Selecting the 2 fabrics to pair together is the hardest part for sure.  If the contrast fabric to the floral is too busy, the combo will be quite muddy.


   In this group I paired dark batiks and a dark green with brighter florals.   This says shade garden to me, which is fine by me.  I'm just not quite sure how it will all combine. 

  I have plenty of floral strips already cut, so I have a huge selection to pick from.  The darker contrast takes more time to hunt down.  Since this is an experiment to see what happens, and what I like, I'll just mix and match till I am satisfied. 


  The first 4 blocks of the orange peels are ready for stitching down.  The color is a bit off here, but these blocks make me smile.  I see a happy little girl twirling and laughing.  Exactly what I think these fabrics need. 


So I have plenty of work for me this week.
Happy stitching. 

Tuesday, October 10, 2017

A very scrappy Double 4 Patch

    Several years ago, I saved the instructions for the Double Four Patch quilt that  I found  here at Mary Quilts.    Matter of fact, I have saved lots of her instructions as they are clear, and concise, and easy to print.

  A good variety of layouts for the Double 4 Patch can be found on Pinterest.  Here is the link to my board for some I found.   And there are some very beautiful ones based on color and not scraps.

  Last week I had a question about how to select the fabrics when putting the block units together....randomly select a dark and a light?.......was the actual context.   Answer......Ummmm, yes and no.  I don't really delight in being confusing, but sometimes things are not so cut and dried.


  This is the photo I shared for  my scrappy version.  On the left are 2 patch pieces, obviously dark and light, that are ready to become 4 patch units (paired sets in the center above the clothes pin).

Then on the right some 4 patch units sewn with large squares above.   Look again at the 4 patch unit that is sewn.  The print squares are  not true dark values, but rather relatively dark because they are placed next to very real/true light squares.


  Searching thru the stack I found a few more blocks/examples to talk about.    First note the variety of the "light" squares......tan, cream, beige background or neutral prints.   There is even one  that has some obvious dark  there on the right.......the major part of it can be called light. 
  I usually think about Bonnie Hunter's standard.......anything lighter than a brown paper bag goes for the neutral.....even with peeks and pops of other colors.   So a couple of the darks in the upper right hand unit are a bit too brown to fit the light spot.   I decided to put them in as a dark fabric value.

     Then look at the lower left corner......I put that print in the dark spot of the arrangement.   Two reasons:
  •  1. Light background but enough of the dark print is showing....over 50%.  That pushed it to the dark slot for me.   
  •  2.  The  use of lower contrast--in this case, the background blends a lot---can give the element of surprise that pleases the eye.    In vintage quilts you often find fabrics arrangement like that.  It could have been luck, but I prefer to think they had a delightful sense of value and design :)

   Dark selection.....easy.  Dark to light, and again note that I throw some neutrals in that have some color to them, although the color is quite faint.   So for strong darks.....yes, use the random selection for a very scrappy look.  


   A very scrappy look, I say.  Guess you need to see what I mean.   
   This is what is on the design wall of the few blocks I put together already.   For my set/layout, I want the darks, big and small parts, moving up and to the right.  All the lights will be set to move to the left.  

  It doesn't look like much yet, but I love the look in real life!  You can get the idea of the unexpected  effect in some of the blocks.  


    And now that I have brought more confusion probably to this, I will just go sew a few 4 patches.   Happy stitching.

Monday, November 28, 2016

Deciding on Geese

   These wild geese were flying every where as I pulled out several fabrics to try as sashing.  There a dark blue, a grayed-black, and a dark tonal green.  I tried a red, but quickly knew I would not be happy with it and put it away.  Of these 3, I liked the dark green best.  The black needs to be darker and truer with out the grayed splotches.  So since we were planning a quick trip to Fletcher, NC, a short stop at Foam and Fabric would solve the black dilemma.


   I did find a beautiful black tonal fabric I will use for the geese.  But I will save  photos of it until I get some geese strips sewn.  Nicki suggested the name of Flight in the Night if I used black.   We will see......
    I also picked up a couple of books at 50% off....I am such a sucker for quilt books.    The Color book is by Becky Goldsmith  of Piece O Cake fame.  Lots of great projects in it to entice me.   I am reading thru it right now and will share a review maybe of wisdom I gleam from it.


   Sir Old Man spotted this one on the flat fold table.  I did not need this, but loved all the sentiments/sayings expressed on it.   So one yard will make a ton of mug rugs and snack size mats for using, giving, or donating.  I love making the small size projects in between the big stuff.


   I will probably be silent for a day or two.....carpel tunnel surgery is tomorrow.  Thank you all for the support.  I will be back.  Happy stitching.  
Tuesday, June 7, 2016

Just make my day

  A very wonderful and day brightening email came last week.  This quilter found my blog via searching for watercolor quilts.  No surprise there, but what she created with the information and tutorial was so inspiring to me.  This just made my day.....think Clint Eastwood and arms full of fabric.

  Christine said....."you gave me the information, inspiration and confidence to have a go - especially useful were the tips on fabric selection.  Here's a pic. of my first attempt (indoor shot as here in S.E. England it has rained all week!)."


 I think she has a natural eye for value.   She did an amazing job with this first piece.  Her future plans include a cascade piece and then a full size quilt   Her next step is to collect more fabrics for variety.    Great job, Christine, and thank you for letting me share this here.  I do hope you will share future projects, too.


   More variety makes it easier to blend value for a watercolor.  
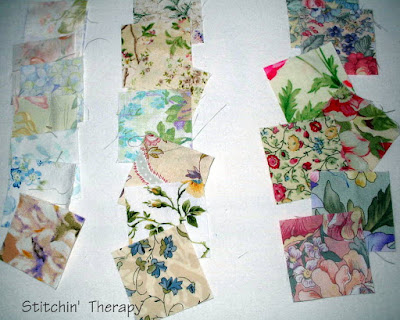
I set up a couple of photos to show the different fabrics I would typically use in a project.  The lightest fabrics on the left are what create the "glow"  in the watercolor. The next row is a medium light group   And the third is more medium value.


   This photo shows the range from medium to dark value.  Variety is  just as important.  It does not mean you need 50 cuts of one fabric, rather a few cuts of at least 50 fabrics.   And don't be afraid of the dark values....they add depth to the entire piece.

Thanks again to Christine for sharing and inspiring me.  I may not be able to teach locally right now, but sharing on-line is a great substitute for me!

  Health update......I have been referred to the Spine Center for testing and a specialist.  I know that is a good thing, but it scares the dickens out of me.   Also, I started some meds for nerve pain  and hope it will improve my functioning for now.  I am dreaming of being able to sew a little....it would feel so good to play with fabric again.    That would just make my day.....happy stitching.

Wednesday, January 20, 2016

Willa said......

This is the week of the full calendar ---- dentists and doctors.  So today is the only day to get some sewing done.

  Over the weekend I put Hot Legs through a workout and got the quilting done on this one......She needs a trim and some binding to be finished.    The quilting is minimal on the orange peels....outline the peels and swirls in the border.  For me, this quilt is more about the design, fabric, and the glow of the layout.


  This morning was spent testing a block idea that has been rumbling around in my head.   While I was sewing,  I could hear Willa in my head saying, always make a test sample to be sure of your measurements, and colors.   Who was Willa?  A very dear lady with incredible quilting skills that I met early on in my quilting life.  She was a formative part of our quilt guild and we all learned so much from her.  I remember walking into our small quilt shop and watching her pull fabrics for a "new quilt".  She had a pattern, but did not like the colors.  She had ideas to improve the layout.  She had 2 or 3 "reject" blocks that she had made.  Willa was sure there were better combinations to be discovered.   Personally, I thought her rejects were beautiful!  So my efforts today are a reminder of the lessons she shared.


Strip Stacks By Erla, Gudrun  - Quilt is made with 2-1/2 strips and yardage for the background fabric. The pattern includes 3 sizes (crib, lap, full). The Lapsize uses 1 Jelly Roll This quilt is very simple to put together, great for beginners.:      The pattern?  This is Strip Stacks by Erla Gudrun.  It is perfect for a jelly roll quilt in 2 1/2'' strips, and I am sure you have seen a few of these around.
   But what if I wanted to use 2'' strips?  Ok, I managed to resize the measurements.   What I was not crazy about was the assembly of those long...long...long vertical bands.  I have done that.  I much prefer a block to work with.  Add to that, I wanted to insure placement so I could get a blended effect using some floral fabrics.


 I created the block on paper, and went to EQ7 to get this.  The basic layout was easy....it was adding the wide strip to the bottom of the block that will allow me to create the staggered layout.  Without the wide strip, all the blocks lined up in a blur.
   I realize I am taking away some of the vertical design elements doing this.  The other option is to use longer pieces of the light background to extend to the needed size.


    My sewn sample block using floral fabrics.
I need more testing.

  • Value placement is more crucial to get the look I am going for.  
  • Maybe a consistent background fabric will improve it.
  • Lighter centers strips might be a better arrangement.
  • Try the longer vertical strips for the bottom length.
   Thank you, Willa, for the lessons you gave us.  This one is for you.

Happy stitching.

Thursday, April 2, 2015

Where have all the flowers gone?

   All the floral fabrics have gone to Fletcher,  NC!  I found an abundance/plethora/amazing quantity  of beautiful fabrics yesterday at Foam and Fabrics Outlet.  Not the modern prints---most of the newer prints do not work for me---- that I always seem to find, but the packed and mixed floral fabrics I love to use in my watercolor quilts.  Of course, I spotted this batch of purple fabrics right away.
   Sir Old Man was very patient and willingly carried my selections to the cutting table.  Along the way he was trying to understand my vernacular.....like packed floral,  light background, blending, and transitional fabric.  


  There were several tables filled with flat fold fabrics, and one table was just batiks.  I found a beautiful variegated dark blue/purple/green.   Another couple of gals were also looking at it.....but in the end they gave it up to me..... at $4.99 a yard I just took it all.  I do have a plan for it, so no guilt about adding to the stash.  

   In response to a couple of email questions......I do not buy by the collection.  Most collections you pick up in a fat quarter pack or jelly roll  do not work for my style of fabric selection.  Those collections tend to contain fabrics with very similar values, and plaids or stripes, which are just not something I use.  I  prefer to use a variety of values and size of prints also.


   These are the ones I came home with....I bought yards.  Many times I only purchase 1/2 yard cuts because you can get a lot of 2" squares from that.  I have a plan for at least 3 of them.  Recently,  I donated the blooming nine patch quilt that I made several years ago.  I have a desire to make another one to keep, but my stash did not have fabrics with enough yardage for one.  By filling in with a few new purchases, I believe I can put one together now.
  We rounded out the day with a stop at the original destination for Sir Old Man.....a new woodworking/tool store.  He needed new drill bits....actually he wanted additional bits.  Just another way to build his stash of tools!  While he looked for a special sand paper, I browsed the book selection for him.  Ah.....I found a book on making small boxes, and a foot stool, and a small cabinet I could use.
 
By now, both of our wallets-- and cash stash--- were depleted......luckily  I still had a gift card that we used for a late lunch.   A good day trip for both of us.

   Time to wash up some fabric, get it bolted, and make some plans.  Oh yeah, there is other laundry to do, dinner to plan, and other chores to fill  out the day's plans.   Just a thought------ Do you realize how many more quilts we could complete if that other stuff didn't take up so much time?  
Happy stitching....and egg hunting!

Tuesday, January 13, 2015

Beginning English Garden quilt --the layout

   Last year Deb at a simple life quilts and I discussed doing a Year of Floral quilts.  Life intervened and we never got to the planning stage.  I am starting my year off with a floral quilt, and have plans for a couple more that I will share with  my variations.

 In my last post I showed the block I was using for the English Garden quilt.  It is a variation of a log cabin.....and you need to pay attention to the assembly and add logs to the proper side.  Ask me how I know.....I had a few that had the light and dark small square switched and they had to be ripped.


   So I teased you with the layout description.   Here's the photo from the book of the layout.    Note: the original pattern was made with 1 1/2" strips....I am using 2".
   The layout for the English garden quilt is a little different than most quilts. The rows need to be assembled vertically since the blocks are staggered.   I had to study the diagram to see that each row lines up differently than the previous one.

   Here's the book photo of the quilt....can you see the twisted ribbon effect?  Again this would be a great two color pattern, or done in batiks.


 After making the blocks, I was overly anxious to see what a few blocks would look like.  So a layout test came next with just a few blocks and a couple of strips that will be part of the vertical sash.    This photo also gives you a chance to see the fabrics I am using.
  I also made an adjustment  to my fabric selection for the background....I'll share that when I get it cut......which is my next step for today.
   There's a forecast for freezing rain tonight....and also in the morning.  I may miss the Bible study group if the forecast is correct----you can't get down our hill or across the bridge safely with that slick stuff around.  Bad weather = more sewing time.
   Before I hit the rotary cutter, I want to say thanks for the support for my change in focus.  I had so many extra emails about it that I was quite surprised.  Many expressed the need for blogs with details and instructions rather than just photos of finishes, which are so great to me for inspiration.  These are young and older quilters that don't have access to a local shop or instructor.  Some are just plugging along, lost in trying to figure things out for themselves.   So sharing the wealth of knowledge and experience in our heads and hands  might be just what they need.   Renew your process pledge and pay it forward!  Happy stitching.   

Wednesday, November 26, 2014

Selecting the blues of winter

  I have been working on the blue version of the baubles.    I found lots of different shapes and patterns on Pinterest for the baubles.....way more that I needed.  Then the truly difficult part was required, that being fabric selection.     For some reason, I have a hard time selecting blues that blend well.  It has always been that way, and this time was no different.

  My first step was to pull out all the blue fabrics that I liked---any shade, any value, and any pattern.  I just piled them up on the table.  Two fabrics jumped out at me as having the winter blue colors I wanted.....the swirled dark and light blue, and the print on white to the right of the large ornament.   I set those aside.

  Next, I began to eliminate fabrics because of the pattern-----stripes, and  solids just did not read well.
   Then I removed the fabrics that had too gray a tone.....they looked too dirty, like  trampled, wet snow.   Some fabrics were heavy on the green tone, some way too light, and others much too dark.


   This was the stack that I was left with.  I then cut a small piece off of each one and placed it randomly on the white background fabric just to be sure the fabrics reflected all the shades of winter blues.   Stand back and look at them....squint a little, too.  It seems to help :)


 And here it is in progress......... those decorative stitches on my machine have come in handy for this project.  They make a perfect decorative chain between the baubles.   I rarely use these stitches, so I had to experiment to find ones that worked....or at least that I liked.

  On to pie making and some laundry....then happy stitching.  
Related Posts Plugin for WordPress, Blogger...