Showing posts with label orange peel. Show all posts

Friday, December 22, 2017

The baby quilt

  Quilted, bound, and finished......ready to be in the mail next week.  I know the baby is not due for 6 more weeks, but it feels good to complete this one for Chad and Amber's new little one.                                                                   
  The colors speak to me of summer days,  sherbet ice cream,  and happy times.  A medium green border to hold the design and let it float across the sunshine colored background. 


  The blocks are large at 12 1/2'' with orange peel sections machine appliqued.  I enjoy making these using fusible interfacing.  Here's a good tutorial for this technique.  


  The quilt finished at 42''  by 54''.  A bit larger than I originally planned....I say that is some growing room for her. 
  Quilting inspiration was vague.....I resorted to my usual swirl and curl and it turned out soft.  It is what I wanted anyway. 


  We have errands to run today, and my brother arrives tonight.  Tomorrow is cookie making day with Remy, along with other required baking.  So most else is done until they begin the un-wrapping stage.  I will wish all a Merry Christmas and send blessings to each one who stops by.  I will be back next week when the dust settles. 
Merry Christmas and happy stitching. 


Monday, November 20, 2017

Sewing on

  One set of appointments done, 2 more this week....ugh!  But I am thankful they are just check ups and check ins.  Except for the mammogram this week, but we will not think of that yet.  I have some blocks to show that I have stitched a bit.

 
   The first four blocks are pressed, fused and appliqued down for the baby quilt...... and the remaining blocks are set to go under the needle.  I will be stealing time between the appointments and a little bit of baking this week to work on these during the day.  I am using a pale yellow Aurifil thread for the buttonhole stitch on them, so that means using the Janome for stitching.


  The 16 patch blocks......I am loving them and the entire process from the selecting fabrics, sewing stratas, sub-cuts, and sewing again.  If you need a good/excellent tutorial for a 16 patch block, I have just the place for you to learn.  At Exuberant Color, Wanda has put together a perfect tutorial on her technique....click here. 
   I was inspired by her garden series projects to try this.  So the only way to learn, for me is to do.  I did a few.    Here's the mix of what I have sewn so far using 2'' strips. 


  Here is the cropped version of what I think will be in the "shade garden"  quilt.    Or maybe a couple of them need to shift to the country garden one.  Time will tell.

  I have more strata strips sets sewn and I work on them in spare moments or while watching TV in the evenings.  The Featherweight is perfect for this project. 


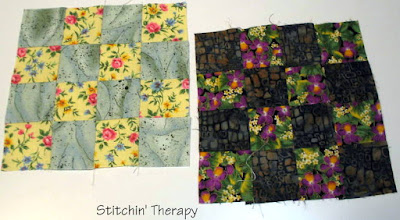
  I took a couple of photos to share the fabric selection part of the process.  I thought I would see how a light version and a darker version worked on the same floral print.   The upper block has a medium to light mottled fabric verses the dark plum in the bottom.  Quite a difference....the top one is mellow--country garden, and the bottom has drama--shade garden-- and the green in the print pops more to me. 


  The floral in this print has a lot of value difference....dark areas and light areas.  The top photo it is paired with a batik and then with a deep plum fabric.  I think both will work in the shade garden version. 


  The selection of the pairs is an interesting exercise for figuring out contrasts.  The shade garden needs enough contrast to be seen, but not too strong overwhelm.  I need to dig deeper into the stash for the alternate fabric for pairing with the florals. 

  So that's the plan for the week.....stitch between appointments, bake a few things ahead for Christmas.  We aren't doing a turkey dinner for Thanksgiving.....crazy for the 2 of us.  It's eat out or have a steak in....lol.  We have a beautiful week of weather, I plan on stealing moments to enjoy it.
Happy stitching. 

Wednesday, November 15, 2017

Those 16 patch blocks

  I put together a couple of the 16 patch this afternoon to see what I had come up with. 


    I immediately saw 2 different  gardens.....a country garden and a shade garden.    All of the combinations in this photo remind me of a country garden.   The type with a few weeds, volunteer plants, some shade and bright sun. 

  Selecting the 2 fabrics to pair together is the hardest part for sure.  If the contrast fabric to the floral is too busy, the combo will be quite muddy.


   In this group I paired dark batiks and a dark green with brighter florals.   This says shade garden to me, which is fine by me.  I'm just not quite sure how it will all combine. 

  I have plenty of floral strips already cut, so I have a huge selection to pick from.  The darker contrast takes more time to hunt down.  Since this is an experiment to see what happens, and what I like, I'll just mix and match till I am satisfied. 


  The first 4 blocks of the orange peels are ready for stitching down.  The color is a bit off here, but these blocks make me smile.  I see a happy little girl twirling and laughing.  Exactly what I think these fabrics need. 


So I have plenty of work for me this week.
Happy stitching. 

Monday, February 6, 2017

Put value into your quilts

  The email basket has been full the last few days with questions about the watercolor and color wash quilts.  I have been asked for patterns, and instructions, and for how-to-dos.
    First, I do not have patterns for the water color quilts, or wall hangings.  Each one is unique, and I couldn't reproduce it if I tried.   Each 2'' square is different and will be used or placed differently in different quilts.   The fabrics often dictate the design that emerges.  I work from impressions of things I see, from photographs that I have saved, and from sketches.

  Second, for instructions please see here......Tutorial to Design a watercolor.  It is a page at the top of the blog.  I have links to several posts of questions.  I work through fabric selection---so important---and then on to a tutorial to design.   I talk about the technique of using fusible interfacing, of how I blend the fabrics, how to use the value viewer, or Ruby Beholder.  The entire page is a how-to-do this thing I do :)

  There are books, and photos, and other blogs to research and study, but the best way to learn is TO DO.    I learn best by doing something.  As much as I love to read, if I want to be proficient at something, I must try it for myself.    So I suggest, if you want to do a watercolor quilt/wall hanging, first try to improve your skills at using value by putting some value into your quilts.


   Here's a simple example from last year.  The block is the Bow Tie block.  Block size is 6 '' here.  I used all floral fabrics for the bow ties, and the background fabrics were mixed from white, ivory and tan, to grey, light blue, and light greens.    The lightest value blocks were grouped in the central area.  The layout progressed to medium value to darkest in the corners.
   That simple arrangement fools the eye and gives a color wash effect to the overall quilt.  Of course, I threw in a zinger by twisting a couple of blocks and making a circle too :)


   Pretty much the same thing for the orange peels.   Once all the blocks were made, I divided them into 3 stacks....light blocks, medium, and darkest ones.   Then guess what came next?
   I arranged the lightest blocks first on a diagonal through the center.  Then the medium value blocks blended into the darkest ones, which I placed on the edges and in 3 corners.    A traditional pattern with a colorwash effect......all because I paid attention to the value.


    One last example from my Year of Floral Quilts.  I should say, I am still in my year of florals......I may need to rename it to the decade of florals.  Oh, well.
  The barn raising layout is off set and then extends into the border on one side.  Note the dark center, and then the lighter ring......Value!


  All time favorite pattern for so many quilters is the log cabin block.  This is a log cabin variation, the half log cabin. This past post gives the details.  

  The small photo shows the value arrangement that I used in each block.
  So pick a favorite or traditional pattern add value into your fabric/color selection.  Cut fabrics, make the blocks.  Sort blocks into light, medium, dark values based on the overall effect of the fabrics used.  Play with layout to show case the blocks based on their value.  Stand back and be surprised.

  Maybe I can inspire you to try putting some value into your quilts.  It is more that just contrast.  It is light and dark, sunshine and shadow.  It is spark and movement, and energy and drama.  A small project is the perfect way to experiment, test your self, and to train your eye.  Please try :)
Happy stitching.

Wednesday, September 21, 2016

Blogger's Quilt Festival

  It comes around twice a year....the Blogger's Quilt Festival hosted by Amy at  Amy's Creative Side.   She works hard to give us a showcase for our quilts.....that's my motivation for entering this year.  Please take a few minutes to view and enjoy the entries.  Voting is next week I think.


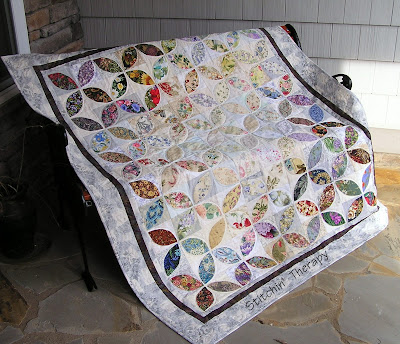
This is Season's  Glow, my orange peel quilt.  Begin late last fall, it is the last quilt finished in my Year of Floral quilts.  My intention was to explore traditional patterns and translate those patterns into color wash designs  with floral fabrics.


  I have a very large stash of floral fabrics, so no duplicates in fabrics for the orange peels.      The orange peels are machine appliqued.  I shared the technique using fusible interfacing that I used to turn under the edges here.


Quilted by me..free hand all the way.  I did a simple outline on the peels, and small swirls in the border.
The border fabric is a soft mottled grey print that gave this quilt an old fashion look.


  Season's Glow is 55'' by 65'', and entered in the Applique Quilt category.


Thanks for stopping by and enjoy the festival.......happy stitching.

Monday, January 25, 2016

Finished orange peels

  In September/October of last year, I began working on the orange peels block.  It was to be part of my Year of Florals....using traditional pattern translated into a colorwash effect using floral prints.  My original intent was to mix up the florals, but in the original layout, I realized that was not to be.


 Each layout produced that stronger colorwash effect.
  I finally gave up trying to be different and let the values and fabrics create the design that pleased my eye.


   This became the final setting for the orange peels....which I named Season's Glow.  Begun in the fall and finished in mid-winter, it seems to catch the light of the seasonal sun.


  I kept the quilting simple on this one because for me it is all about the fabrics and values.  Outlining the peels was done free hand---no rulers----so you may see some inconsistency.  That's okay by me.  The outer border was done in loose swirls....enough and not too much.


  The fabrics are a big assortment of florals from the stash closet.  No duplicates in the peels either!  Call me guilty of hoarding florals I love.   The border fabric is a soft mottled gray tonal print that was also used as background in some of the orange peel blocks.  I had enough of it on hand and liked the way it looked.


Season's  Glow:
Overall size is 55'' wide by 65'' long.


    Now to stitch down the hanging sleeve and I can call it done.  I took my time on this one....a plus for enjoyment.  Future enjoyment....the visual treat of the glow it has.

  Happy stitching.

Saturday, November 14, 2015

I got to be me.....

  Our first heavy frost was last night and the cactus is in full bloom.  It's a bit early for the blooms, but then everything seems to have a mind of it own.   And things don't always make sense.
   The bombings in Paris last night just left me in shock.  Senseless to destroy so many lives.  Yet that is what terror is all about.    Our world is spinning so fast, and I look to hold on to something that resembles sanity.  Bloom on, cactus.


 On the sewing front,  some birds are in flight!  The top rows are assembled, and the rest are ready to add.
Fly safely.


More Orange Peels.......I know, I know.  I tried re-arranging them in a scattered style.....it looked awful to me.  Then I tried an arrangement of like colors---blues, reds, purples, etc.   Just ghastly.
   I came to see that I was not speaking with my voice.  I was trying to re-shape myself.  This is who I am....so be it.  It makes me happy.  Note----I changed the title of this post.

  I have a few more peels to add to make this square....then decide if I want it larger or just to add borders.
Enjoy your weekend, I will be back mid-week....happy stitching. 

Friday, November 6, 2015

A few Orange Peels

  I missed setting up some Friday Finds this week, but some of those important things got done......like the  four insurance company  thing, and freshly fluffed and washed quilts for the trunk show line up.  Most of that is sorted and ready to go.
 

    That means I got in the sewing room for a couple of hours to stitch up a few Orange Peels.  I shifted things on the design wall just to see what I was getting myself into with this project.  I have to smile because I still tend to group like colors and values together.  I am not sure I will leave it like this.  I have more light prints to sew.....and I think I need more dark and medium value prints.   I really had intended to mix them all up but now I will just wait and see.


  The Birds in the Air is stacked and ready to sew into rows.  I have had enough triangle fun for a while.    I think this was the final arrangement.  Every time I moved one, I found I had to move another one....and so on.  So I finally stopped and said enough.

   Wow.....the sun just came out!  It has been days of clouds and rain.  More is on the way, so I am sure this won't last long.   I need to grab some Vitamin D.   Happy stitching.

Tuesday, October 27, 2015

Orange Peel ----some details

 I am working one the Orange Peel blocks in an off and on  tempo.  The steps get tedious, so I am just working a few at a time.   Here are 4 I completed.....all light value.  Along the way in this process, I realized I was doing a couple of things that I had not mentioned in my previous post.

  Thus for the record, here are some details.


  • Trace pattern on to the fusible interfacing onto the non-bumpy side.  
  • My fabric is cut into hunks....not cut out by pattern.  The interfacing is placed bumpy side down onto the right side of the fabric. 
  • Stitch completely around the drawn pattern.  Use a very tiney stitch length....I am using a 1.8 length.
  • Trim away the excess.  I am leaving about 1/4 seam allowance on the sides/curves.  At the point I am trimming very close....1/8'' probably.  
  • Cut slit in the interfacing for turning.  Carefully turn right side out.
  • Smooth the side curves with finger or  "the purple thing" tool---my choice.  Gently poke out the ends with the tip of the tool.  I found that if I carefully kept the purple tool  against the fabric (not the interfacing) I could nudge it out better.  Note here:  You might have to use a pin at the point to get it pulled out.
  • Turn the peel over and finger press....or use the wood clapper to flatten!
  • Fuse peel to background and stitch in place.


  I did a finger press to establish the diagonal line on the background fabric ---4 1/2" squares--- before fusing the peel in place.   I am using a buttonhole stitch with a deeper bite/wider width and a shorter stitch length than the factory settings.  My width is 2.5 and length is 3.5.  Slow sewing, especially at the tips!


Sir Old Man has been in the workshop for a whole week.....and I have been summoned for a preview.  It's windy and raining and cold......off to grab a jacket and galoshes....lol.  Got to see what is happening there.  Then I will get the soup on for dinner tonight.   And I will add a couple of slices of bacon for flavor, no matter what the world powers think!   :)  Happy stitching. 

Wednesday, October 21, 2015

Testing a design pattern

   It's no secret that I prefer simple patterns that allow the fabric to do the heavy work.  When I am bored or need some mindless sewing, I pull together a rail fence quilt or even a simple 4 patch. This time I thought I would begin one I have not done.....ever.   I started collecting ideas and tutorials for an orange peel quilt......often called a pumpkin seed quilt.   And there are a lot of them out there.  Big, small, and in-between.....pick your size.


I decided to do a test version and be sure I liked the size and the technique I chose.
  Size....this block is made of 4 units each 4" square.  The appliqued orange peel is just under 2" wide.

  Technique......I did not want to do Heat and Bond fusible on this one because of the stiffness of the fusible.  So I tried the applique method using fusible interfacing.  More on that later.


  What I determined:   While I like the technique---I have used it before---I did not like it for this size of applique.    This size of orange peel is a little tedious to work with for me and my stiff fingers.  So for a quilt of many pieces, I was going to try it a little bigger one.

The stitching was also tested.  I picked the buttonhole stitch on my Janome and played with the width and length of the stitch to find one that took a large enough bite of the applique without being too big.  I shortened the length some also so it was easy to work around the ends.


I went searching for a larger pattern for the orange peel.....and chose the middle one from   Sewcanshe.     Nice and fat ones....easier on my fingers, too.  The block size only went up 1/2'' to 4 1/2''.     I have been cutting fabric over a few days to get a jump on these.


There is also a good tutorial on using the  fusible interfacing technique there.  Mine in a condensed version......draw pattern for stitching onto the interfacing smooth side.
Place "bumpy" side of interfacing face down onto the right side of fabric.  Stitch.
Slit the interfacing enough on the back to turn right side out.    Finger press and work out the tips before pressing onto the background fabric.  Fuse to fabric and sew.

I only need to make about 160 of these....lol.  Since I have at least that many floral fabrics in my stash, it won't be a problem.  Then I can have a design wall party and see what happens then!
Happy stitching.

Related Posts Plugin for WordPress, Blogger...