Tuesday, August 31, 2010

Trapunto, anyone?

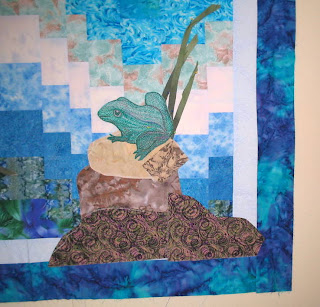
I added a few details to the waterfall and frog wall hanging and began stitching down the stems.  For the stems I used 1/2 inch bias strips and a buttonhole stitch on the machine.
When I got to the leaves, I decided to try some trapunto on them.  I learned the technique at a workshop with Leah Day.  It's very simple and I was doing raw edge applique anyway.  So before stitching the leaves on I placed a piece of scrap batting behind the leaf and pinned it in place.  Then from the front I stitched through the leaf, the background fabric and the batting.  The photo shows the stitching from the back.  The next step is to cut away the excess batting, so that only the leaf shape has batting behind it.
Tip:  When cutting the excess away, keep your scissors parallel and flat to the background fabric to avoid a disaster of snipping thru the front fabric.  The stuffed effect is seen  when the entire piece is batted and quilted-- the trapunto shapes will stand out.
The thread painted frog got the trapunto treatment too, but not the rocks.  The top rock that he is sitting on has a turned under edge and  is blind hem stitched down.  The turned under edge style applique gives the illusion of being on top, so I didn't think it needed trapunto too.  The other 2 rocks are stitched down with a decorative satin stitch because they were raw edged and not fused. They will have a flatter appearance and hopefully recede.  At least that is what I am trying for. 
I have a few more leaves to do and then some snipping, and a little shading with the pencils before I am ready to quilt this.

Monday, August 30, 2010

Dye catcher....avoid disaster

This is why I always wash fabric before using in a quilt or quilted project.  I had a stack of fat quarters....blues, a couple of greens, a black, and some purples...that needed to be washed.  I threw a white dye catcher sheet into each load.  And this is what I got back.... Excess dye that I do not want to bleed onto the backing or of other fabrics in the project. 
Better safe than sorry.
Happy stitching.

Wednesday, August 25, 2010

Frog fun....thank you, Carol

Carol's comment yesterday on the design wall  project set off my creative process.   A frog by the falls--just like the one that serenades us to sleep each night.  So I sketched one from a photo  and then again a bit larger.  Out came the threads and a piece of the sun painted turquoise fabric.  A few hours later, I have  a singing frog sitting on a pile of rocks watching a dragonfly!  Everything is simply pinned down right now--I need to play a bit with the balance. 


The Process:
Thread painted frog is done on 5 layers in a hoop.
The turquoise fabric is sandwiched between silver tulle and solvy.  The pattern is traced onto the top layer of solvy.  The base colors of green are stitched over him in sections following the body lines and shape.  Then a few lighter threads of silver, pale violet, and pale green.  Then the medium values are stitched--mainly I used teal and turquoise shades.  Then back to the highlights and finished with dark green along the edges and the teal for outlining the legs, eye, and along the back ridge.  Here's a closer look at him. 
The rocks in this photo show that I just cut hunks of fabric and actually on the top rock just pinned a square that I will cut to fit as a shadow. 
The green stems are one inch bias strips that I will shape and curve when I am satisfied with the overall balance. 
Look back to the top photo and you can see I cut a few leaf shapes that I will add at the base of the rocks and on the reeds.   My husband came in an suggested I do a dragonfly....so from my baggie of practice thread painted pieces I retrieved one with perfect--for this--purple wings. 

This was a most  magical  experience in the sewing room.  I was literally taken over by this today and loved seeing it take shape.  A giant, huge, wonderful Thank You to Carol for giving me inspiration
Now I am one day behind in preparing for the family cookout Saturday. I will have to work overtime tomorrow to get things done.
InsightWhen I am inspired...sew now!  Then play catch up tomorrow.
 Happy stitching!

Tuesday, August 24, 2010

On the design wall

 While putting away fabric yesterday, I found a practice piece from about 2 years ago that I had never finished.  I did this using the Quarter Trip Around the World technique from Eleanor Burns.  I wanted to see how the strata worked, etc. before beginning my Shenandoah Colors quilt.  Seeing this practice piece now, after working through the Art Quilt Workbook,  is like viewing a blank canvas waiting to come to life.  It reminds me of the pond less waterfall we put in the backyard a couple of years ago.  No fish, just lots of plants and grasses.  I love the soothing sound of the water as it spills over the rocks......I think I have an art quilt to do!


Monday, August 23, 2010

Creativity to me is....

I was catching up on blog reading yesterday and really enjoyed this post on Carol's blog about a creativity quiz.  It's  a short quiz that gives you some insight to your creative style. 

Here's what my answers said:
"Creativity is separate from the real world for you. But it’s a magical world in which you like to immerse yourself. When you’re involved in it, you get the wonderful sensation that there are no limits, that anything is possible. What you are really looking for is harmony — you want to feel you are a part of what you create. Planting flowers, writing poetry, embroidery or putting together a photo album, these are all suited to your sort of quiet creativity. You want to fall in love with what you create. You also think of creativity as a part of you in which you can take refuge and feel protected.  Creativity acts as an ‘encouraging parent — loving, enriching and supportive’. You would love to use your creativity to retreat into a world that is kind and reassuring. For you, being creative means having the chance to become one with what you create, bathe in the glory of it and allow yourself to be taken over by it. This is why you seem more suited to the sort of creativity that calls for gentleness, subtlety, harmony and patience."

I found it pretty amazing to read because harmony and reassurance are 2 things I see myself seeking in life in general, too.  What an artist statement this makes. 
Insight I describe my watercolors as a way of expressing myself.  Through the blending of the fabrics, I create the harmony that I seek in my own life.  It's the way I become one with what I create.

Happy stitching.

Saturday, August 21, 2010

In the garden

Finally I know Fall is just around the corner.....because she is back.  For the last three years we have seen the giant webs and watched the Writing Spider spin her creation  among the plants near the back walk.  This year the web is stretched from the Black Pine to the catmint and lavender.  You can see the giant X her legs create as she works on the writing.   The white writing stands out against the pine needles. 
This is a side view ....you can see how huge she is.    We were cleaning up the back porch and trimming and cutting a few things back this morning when Russ spotted the writing.  We decided to give her a wide berth.  I had a severe reaction to a spider bite last year and even though the bite is not suppose to be poisonous, I chose not to take any chances. 
I finished up the 9 patch blocks and cut the extra triangles for the blooming 9 patch.  Time now to begin the block to block and then row to row construction.  Happy stitching. 

Tuesday, August 17, 2010

On the design wall---Blooming 9 patch continues

I have taken a few days off to rest my hand from arthritis flare up and tendonitis again.  Monday  was a wonderful trip to Asheville with Sabra to spend time with a dear friend, Ladelle.  Laughs, old times, and great sandwiches.....nothing compares to dear friends.

Here is my original layout that I created in EQ 5 for the blooming 9 patch pattern.  I was working from a photo in a magazine and then later found a pattern in an older book I had.  Unfortunately , the pattern in the book  did not give  very good details on fabric or value selection.  Their version  jumped from blue to yellow to green....but  it did show the block layout .  So I figured a quick plan in EQ5 would be all I needed.
The center 9 patches  were easy...both light fabrics with the #2 light in the center and corners.  Note that the diagram has it reversed.  Then the next round is the #2 fabric in a plain square.   This is where I realized that the placement  and position of the fabrics in the 9 patch was going to be important.  Once on the design wall the original placement was "choppy" to me and did not blend across the design like I intended.  So I switched a row on the 9 patch and achieved a better flow.   
This became a guideline for the rest of my  construction......The large floral should be placed in the corners and center of the 9 patch block, and the smaller floral should be the other 4 patches of the block
That placement gives better blending from one round to the next.  Here's what I have so far on the design wall.   I also have 4 of the lightest 9 patches in my center instead of three.  This will increase the length  and turn the original lap quilt into a "foot of the bed throw".....I need a term to describe this use, I guess.  Anyway, it will turn out about 50 inches by 80 inches.  The center area is large enough for some appliqued vines and flowers ....maybe I will use some of the sun painted fabrics after all. 
Insight:  Take the time to plan your design and layout.  It  could save  some ripping out! 
InsightBe flexible.  Of course, I am not good at this....but it is a good reminder to me to try.
Happy stitches.

Saturday, August 14, 2010

Sun painting fabrics

Last week I decided to try to get the shaded gradations that Jill described in her blog,  The Quilt Rat, using setacolor translucent paints.  The violet did not turn out as well as the others.  I didn't start dark enough and  I will have to try it again.  I did get a wonderful crackled effect on the dark values by wringing out the fabric and shaking it out but not smoothing it when I put it out to dry.    It's messy...wear gloves and old clothes, and doesn't take a long time.  And in this heat wave the fabric dried in less than 30 minutes. 
So what do I plan on doing with this?  Well .....the colors  are found in the blooming 9 patch quilt, so I may have to try  machine applique in the center of it...or not.  We will see how it turns out. 
Happy stitching.

Friday, August 13, 2010

Blooming 9 patch begins

I spent yesterday  logging in quilt show entries, and entering the descriptions for the show program.   This is the second year I have  done the registration, and even though it is fun, I won't volunteer to do this again next year.  I think someone else should have the "pleasure" of this job!

The blooming 9 patch is the next quilt project on my list.  It has been simmering for a while on the edge of my mind, naturally, since I love blending fabrics and traditional patterns. I have seen several of these quilts in shows and magazines, some more appealing to me than others.  I took some time to analyze why I liked some and not others before I even started one.      So exactly what is a blooming 9 patch?

The anatomy:  The design develops from the simple nine patch block made of 2 fabrics that is set on point and alternated with a large square of  one of the fabrics in the nine patch.  The design radiates from the center out.  The progression from the center out can be light to medium to dark, or even dark to light to medium.  A different layout will result in a very different overall effect. 
     This fits well with my philosophy of easy pattern and let the fabric do the work.  I know I want to create a watercolor effect in this one. 

The "blooming" part:  Floral prints give this pattern the name of blooming.  Floral prints of different size (large and small)  are easily blended together for a pleasing effect.  Ideally, each step in the progression will have a large print and a small print that work together.  
     This is why I liked some quilts in this pattern and not others.  The fabrics did not blend and seemed to jump and stand out in odd places.  I like the English country garden effect that blends, not a desert style garden with a few plants against the earth or rock.    So fabric selection was important.

Fabric selection:  I decided to make a lap size quilt, so I only needed 6 to 8  fabrics.  It took a while to whittle down my choices---since I have a large floral stash.  But it was made a bit easier because  I needed yardage for the darker (which will be the outer rounds on mine)  9 patches and setting triangles.
Here's my initial selection of fabrics.  Just taking a photo and viewing on the computer lets me see the blending.  I am going to add one more light---the very lightest that will be in the center 9 patch blocks. 
There are 2 fabrics--number 4 and 5--the dark backgrounds with large blooms that will be used interchangeably.  Huh?  Big word to say that I don't have enough of either one to make all the required 9 patch blocks, so I will mix them up to get enough strips for the blocks.  They are of the same value and print size, so that when cut and used in the blocks, the difference will not be noticed.  And if they are, I will just say I planned it that way. 
Ok, off to cut 2 1/2 inch strips and setting squares.  Happy stitching. 

Wednesday, August 11, 2010

Sunday, August 8, 2010

I saw a Moose

This is  probably the last post about the AK quilt---I saw a Moose.  It has been fun and quite a revelation, an epiphany,  for  me.   As I was sewing on the binding, I was listening to the radio and a  country song ( I listen to all types of music!)  came on that was taken straight from one of my favorite quotes. 
Life is not measured by the number of breaths you take,
but rather by the moments that take your breathe away. 
The song recalls  the importance of slowing down, and taking time, and of the joy of the race and not just the winning.  Tears ran down my face as I listened and knew why this quilt is so important to me and why it has taken a dozen posts to get through it.   The trip to Alaska was full of  "moments that  take your breathe away".   The creation of each block caused me to slow down and enjoy the process.  Drawing the patterns, dying fabrics,  and using techniques I had recently learned through the Art Quilt Workbook were added bonuses.  I will be reminded of the joy of the trip and my family each time I see it as I walk down the hall to my sewing room...especially the purple moose. 
  The label is almost as large as the quilt, but I love it.  I had planned to use the block on the left on the front of the quilt, but it just didn't work.  So, I moved it to the back and made it part of the huge label.  Then I found the moose graphic, and had to include him. 
  And finally, the entire thing.  Hope you have enjoyed the adventure as much as I did.
 And I get to cross another one off my list.
Happy stitching.

Drum Roll, please

Ta-da!  My husband just pulled two names out of the jar for the Share the Stash giveaway.
The fat quarters go to Lisa.
The watercolor squares go to Bea.
Congratulations to both of you.   I have sent you emails for your mailing addresses.
Thanks to all for participating and for the extra emails and nice words.  I never thought there would be so much interest in the 2 inch squares.  I may do this again next month. 
Happy stitching.

Saturday, August 7, 2010

Odds and Ends

There's a wonderful tutorial on creating fabric gradations on  Quilt Rat blog.  Last week Jill did cobalt blue and we exchanged comments about it.  Today she has posted a full tutorial on her method in orange  gradations.  She uses setacolor paints and very hi-tech equipment---plastic cake lid, popsicle sticks, plastic trash bag---just the items I have used before too.  Check out her blog and wonderful doodles, too.

It was marvelous to spend a few hours with Pat, Jan and Donn.  Pat and I have been friends since elementary school and then shared an apartment in Orlando after we graduated from college.  We haven't seen each other in 30 years, only keeping up with each other through letters, photos, and phone calls over the years.  I attribute my list making skills to her, and she says she now reads a lot.  For a few minutes we were 20 again and  remembering our antics.  Of course, we embarrassed Jan  in the diner with our hoots and cackles---just like old times. 
InsightTrue friends are priceless.  They love you for who you are and where you are.  Treasure them.
The label for the AK quilt is printed, the quilting is done, and only the binding remains.  Photo in a day or so.
  Remember the Giveaway is tomorrow.    Now I am off to bake bread.
Happy stitching.

Wednesday, August 4, 2010

Passing it on

This morning was such a delight.  I am teaching a young girl to sew and use the sewing machine she was given.  Emily is like a little sponge, full of questions, and interested in all facets of sewing and crafts. She  learned to thread her machine and how to put in the bobbin.  Then she got to sew straight stitches.  The first few rows were all over the place.  Then she got  the technique down--thread tails, pressure foot, and needle in the fabric  and she began sewing straight rows.  She was jumping for joy.  We completed a pin cushion for her first project.  I sent her home with a stack of strips to sew together, which we will turn into a pillow next week.  She called her homework assignment "fun work".    Next week  I plan to make her start a journal on each session, so she has notes to follow later on.  And she will have a place for her own ideas about what she wants to learn and do. 
It's wonderful to share what you love doing.
Happy stitching.

Monday, August 2, 2010

Share the Stash Giveaway time

The yardage that I won on ebay is now washed, pressed and neatly rolled into mini-bolts.   Imagine fabric lengths stretched down the hall, into the guest bedroom,  and through the great room .... and you get the idea of how much I had to roll.   As  I am rolling it up and I realize this is a lot of fabric! 
I cut fat quarters from  them to donate to my guild for the FQ Basket raffle.  And then I cut a few strips for 2 inch squares.  This is still a lot of fabric.........So I think it is time for a giveaway to share the stash.


Fat Quarter giveaway is 2 different  fabrics.  Both are Hoffman floral prints.  


Second giveaway is about 100 watercolor  squares----2 inch squares that include lights, medium, and darks. 

Leave a comment and mention fat quarter or watercolor.  Be sure your email is enabled  or included in your comment.  I will number names and draw winners on Sunday, August 8.  So jump in, if you are interested.
Happy stitching.
Related Posts Plugin for WordPress, Blogger...