Showing posts with label log cabin. Show all posts

Tuesday, August 7, 2018

My glass is half full aka The Distant View


   A finish finally on the floral log cabin quilt.  Big sigh.   I was beginning to think it would be a couple more months to pull this one off.   Yet, my wrist felt better after  a week of rest and I finished up adding the binding.
  I began working and planning this quilt in March.....this post.... has the block recipe/cutting and measurements that I used.
Then in this post in April I was beginning the layout and talked about second guessing myself in the fabric choices.


  Along the way, I did work on another quilt or two, and one had to get quilted.

   Fast forward to August and here we are!   She is done...quilted and bound.
Floral log half cabin blocks are set on point.  By paying attention to  the placement of the values of the fabric, the last round in the log cabin becomes the "trellis" that we are viewing the garden through.
 

      Placing the lightest value fabric at the top creates that dimensional effect of the garden in the distance.


    The setting triangles are a deep green with a faint tonal print.  I like the way it sets off the blocks and makes things pop.
While I quilted swirls thru the blocks, I stitched feathers in the setting triangles that make the border.

   To carry the florals to the edge, I debated on a floral binding.  Instead I decided on a flange binding using the floral as the faux piping.  I love how it turned out.


  I had printed up a label a few weeks ago, calling this  A Distant View.
You can see the binding flange here.

  Anyway, as I was sewing on the binding, my mind wandered.  I thought about  the trick this block creates and fools the eye to think we are viewing the distance.  And it came to me that altering our position or stance creates a different view.

Insight:   We can look backward, or forward.  Hindsight gives us wisdom sometimes.  Looking forward gives us options, choices we can make.


  So I decided this quilt should have a nickname.  And noted it on the label.  My glass is half full......my choice as I move forward.   The last 2 years have drained my glass, yet I will not let it keep me down.  My life, my choice.


   The Crepe Myrtles in the back are almost finished with their glorious blooms.  One low hanging branch  over the deck needs to be trimmed back, but before we do that, a photo or two.

    My Glass is Half Full aka A Distant View is 55'' by 66'' .  Machine pieced and quilted with swirls and feathers.  Binding is a 2 fabric  flange binding.  I have used this several times before as it is easy for me since I only machine stitch now.  Tutorial can be found at Missouri Star Quilts.


  I'm going to relax a day or two and just enjoy this finish.  Then I will jump in and pin to quilt the garlic knots top.   Enjoy your week, and stitch on.

Happy stitching.

Tuesday, May 8, 2018

Variety and options

  Time just gets away from me and blogging takes a hit it seems.  I did not realize it had been a week since I posted.  I was able to get thru most of the items I put on my list to accomplish last week. 

 
    I had the floral log cabin up on the design wall, and in need of squaring up the edges.  Got that taken care of and decided I needed a small border at least.  So I added that.  Now, she needs pinning and quilting.  I ordered batting and it arrived yesterday, so I am putting that onto the list for the next week or so. 


   My container of leader and ender 2 patches is filling up!  I keep a stack of them next to the machine to use when I am joining blocks, and rows, etc.  I finally got the mess of them pressed open.   

 Here's my  Leader/Ender method....a la Bonnie Hunter at Quiltville. 
   Any leftover strip of binding or other piece 2 1/2'' wide gets cut into squares.  I keep a tray of them on the cutting table.  Every so often or as needed I sit down and match them into pairs.  These are then stacked up and clipped together by my machine.  At the end of the row....use a 2 patch L/E.   That leaves something under the machine needle as I prep for the next row/block. 


  Part of the 2 patches were stitched as I put together this small lap quilt of string blocks.  The blocks were 5 1/2'' unfinished ones I had left over from something.  So this is only 40 by 40 inches. 

  I have options noted on my list.....

  •  Add a strip around this as border or frame.  
  • Add more blocks to make it larger. 
  •  Add a frame strip and then add string row at top and bottom to turn it into a rectangle design.


 My last bit of variety for the week was sewing up this watercolor for a table runner.  Lots of rows mean lots of leader and ender parts:)    It needs a good squaring up and pressing before I get it finished.


   I stole this off facebook this week.  May I add.....each day is a miracle too!
Happy stitching.

Friday, April 27, 2018

On point

    I love the look of blocks set on point,
but I sure hate the joining potion of the assembly.    To be clear it is the corners that make me batty.  So I tend to cut over-sized triangles to be sure everything fits.   I only ended up with one set that had to be ripped out....because of a setting triangle going in the wrong direction.  I am sure you never had that happen :) 

  Any way, by the time I reached this point 2 days ago, my wrist was in agony.  Inflammation from over use and low pressure system, I think.  So I haven't gotten the remainder of the border on, or even cut the strips.    For now, this top  is resting on the design wall.  I moved on to something less strenuous. 


  I sewed up a few more garlic knot blocks.  I had several people ask about how I would plan on setting them.......Not on point, lol. 

   So on a small design board I laid out a few blocks with all oriented in the same direction.   Interesting how the background of light comes together in a "knot" that goes in the opposite direction in this layout. 

  My backgrounds are all light...muslin, tonal beige, etc.   And since I am using up what ever I had leftover from other projects, not every block's background is entirely the same. 


  The second layout I tried is the linked in a circle style layout.  The background lights come together and form a large open space, while the knots form a circular chain. 

  Check Pinterest if you want to see full size tops and quilts for a better idea.    I like them both ways......but at this point I am undecided for the final layout. 

  This block is also called Arrowhead.  For my version I am using 2'' squares and the blocks sew up to 6 1/2'' unfinished.   I am using floral print scraps for the accent squares and trying to make a dent in my other 2'' strips for the main color. 
You guessed it....I am making little headway!


  I did mention floral fabrics didn't I?    For a detour I am sewing up the rows of this watercolor......probably a table runner to be donation for guild auction.    I can sew the rows, but not press until the wrist is less painful. 

   Sir Old Man will get the stitches out this next week.....and the eyes are done!   He has been in the workshop a few times.  He got sidetracked on a couple of small projects for the sewing room for me.   I will share just as soon as he gets them finished.    Happy stitching. 

Friday, April 20, 2018

Last blocks

   I cut and added the setting triangles on the floral log cabin on the design wall......and realized I was 4 blocks short.  Honestly, I can't seem to count anything correctly any more. 

  I stitched up the last 4 blocks and they need a good pressing.  So yes!  My adventure for the weekend will be rearranging the whole layout, and beginning to join the rows. 
  And since I seem to have forgotten how to count, I probably will need to cut another group of setting triangles.  I have the fabric because I bought extra.  A little voice told me so :)
   Looking at the calendar, I have kept my focus for the month  as this post said!    That is practically a first for me to not get distracted. 

  The sewing room has been reorganized and lost bits found.  I did not really move furniture that much, just more of a shifting  for more elbow room.  I kept finding ends and pieces of projects in different boxes.  I emptied 6 of them.  And now......
  The string bins absolutely are over flowing.  So I think I need to think about some mindless sewing and making up a big stack of string blocks for future projects.   


  I added a few more garlic knot blocks to my stack.   I pulled out the 2''' strips from the found leftovers  to make more knots.  I have 30 blocks made so far and at least 20 more sorted to make. 


   Sir Old Man had the second cataract surgery done this week.  He did very good, and is  being patient about being home and not doing yard work, etc.  By next week he will be able to do his usual routine.   The worse part of this has been getting up at 5 am to be there at 7 am.  Wow, does that mess up my sleep pattern.  But it is done with now, and we will return to regular programming. :) 
Thank goodness!
Happy stitching. 

Sunday, April 15, 2018

On the wall again

  A couple of days ago  I got that wild hair and started shifting furniture and moving things around in the sewing room.  I wanted a better configuration for sewing with some elbow room.    Since I am usually an accident waiting to happen....... it did.   I caught my foot on the mat under my chair, I stumbled, but luckily landed in the chair.  Unfortunately, I caught my wrist in an awkward position and it is quite sore.....not broke or damaged, but quite sore.   So everything came to an abrupt stop.  I got no further and  stuff is in a mixed up jumble.   Guess I need a couple days of rest before moving things again:)


   That leads to where I am with the log cabin blocks.   I have another 8 or so ready to press and fill in the bare spots.   Hopefully then I can figure out how many more I need to finish.
  We ran into JoAnn's this week to pick up some felt to recover a small design board.  I found a green tonal that I think will work as my fill in triangle fabric.

  We thought Spring had decided to visit us....at least for a couple of days.  It is warm and stormy  today, and then we expect freezing temps in 2 days.
   I saw a post that said something about apologies from Mother Nature, Spring was delayed because Father Time was driving and refused to stop for directions.  That is just about how it seems to be going.


  I still have  a couple of  leader and ender type projects going on.  Some times I am sewing together random     2 1/2'' squares to make 4 patches.  I have a good size stack but no a real plan for them.
  When I have a need to complete a block to see progress, I make a block or two of the garlic knot blocks.  I just keep sorting my left over strip ends into sets and clipping them together.  One block takes 10 minutes and I can feel I really accomplished something.
Keep on stitching.

Monday, April 9, 2018

Let go....don't over design

  As easy as I said this block was to construct, it sure has me second guessing myself.  Not the construction, but the values of fabrics and the placement.  I added another dozen or so blocks to the previous ones. 


  I found myself thinking I should maybe add dark value sashing between the blocks.   For sure the added strips  give a very  3-D effect, but  for  some reason it appears too stark to me.    Maybe over contrived or over designed......I decided no to the extra strip for sashing.   I am willing to let go.   I am willing to let the strips or floral prints fall where they may. 


 Nature is full of shadows, some are stronger or darker than others.  Shadows give fullness and depth to our world and  the things around us.   I am reminded of the eclipse this past August.  At the moment of totality, all the shadows disappeared.   The view was flat and one-dimensional.  All colors were grayed and dull.  I remember feeling like I was in a time warp or in another world because everything was different without shadows. 


  I realized that I should let the shadows play and create their own effect.
  So off came the extra strips, and the blocks were placed next to each other.   I am much happier with the "trellis" effect this layout creates.   For now, I will cut some more strips and continue on.

   As for the setting triangles, I plan on using a more solid  or tonal for that and a narrow border.  That is until I change my mind...lol. 

  Even if Spring can't arrive on time, I am building another spring garden quilt with this one.   Happy stitching.

Monday, March 19, 2018

Time to build a log cabin

  We made a trip to the local used book store over the weekend.  I picked up a book, A Log Cabin Notebook, by Mary Ellen Hopkins.  She was one of the first and best quilters to break things down into simple steps.    I have several of her books, but not this one!  So for $3 I was happy.
   We all know you could spend a lifetime making log cabin quilts and never have two the same.   With this book you have a lot of inspiration.  It  has a good tutorial on log cabin blocks... from traditional methods to chain piecing, lots of layouts and design ideas.

  When I did the post on lesson from a log cabin variation,  I showed several quilts using the quarter log cabin block.  Mary Ellen calls it a "chevron log cabin" block in her book.    So call it whatever you prefer,  it is a block I really like.


  I shared the "recipe" I am using to make this block a week ago in this post using 2'' strips.  If you prefer to use 2 1/2'' strips, feel free to adjust the size and measurements.   I have some strips cut and  will be officially starting this project next week.  I am using floral fabrics, and have heard from one who plans on using scraps, another who wants to use up theme fabrics.  Join us if you like, as it could be interesting to see the different looks.


  All those floral fabrics in Boxed Squares.....it is very busy and fun!  And finally all sewn together and ready for quilting.  I will probably use straight line quilting on this one.....nothing else will even show up.  So this is my main task this week.

  Second big task this week is attending to Sir Old Man, who is having cataract surgery on his right eye.  The left one will follow in a few weeks.  We think we have the schedule figured out....like drops in the morning, drops at night, do this, but not that.   He is so use to being in control that the thought of this is driving him a little bit crazy.   Wish me luck:)
Happy stitching. 


Wednesday, March 14, 2018

Once again...time changes

  
   I caught a couple of hours  or so I thought, in the sewing room yesterday.  I got up to stretch after sewing a few rows, checked the clock and thought  I can sew another hour.  Then I went to the kitchen for a drink, and looked at that clock....what, it was time to start dinner! The time change gremlin got me again! 

   We deliberately did not discuss the time change, nor were any clocks changed until Sunday morning.  Much less stress that way, I thought.   All clocks were changed....except the one in the sewing room.  So now I feel my whole week is just "off" .    Once again!

  But all the Boxed Square blocks are joined...so far.  Just one more row to add and I will call it done.


 Just to give you a tease.....I made a few of the Log Cabin blocks to test my measurements for the planned next project.    They went together quickly and now it will be cutting and planning layouts for starting these.
   I heard from Linda  and she jumped in and has a set of 4 done already.    So glad she is working on these too.

  For anyone else who plans on sewing along....remember the whole point to this layout is to blend values and get a trellis or sashing effect from the darkest value.


   I have some large squares and strips cut.  This is how I am laying them out.  They are in the position they will be sewn in.  I can squint a little bit and see if the blending is working before I sew.   If one strips is too light or dark in a position, I can shuffle thru the stack and find one I like better. 
   Once I am satisfied with the group, I am clipping them together  until they are sewn.


 For good measure I did a couple more garlic knot blocks..... I am working them in as leader and enders.

   These are quite addictive too.  I am enjoying playing with the colors and matching them up for different combos.

    Happy stitching.


Saturday, March 10, 2018

Log Cabin block "recipe"

  Before I start a block,  I need a  guide to help me keep things straight.   Just like when I cook or bake, I need a recipe.

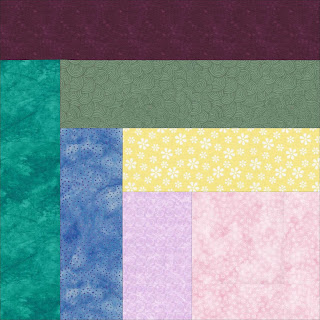
    I labeled this quarter log cabin block  with the sizes needed using 2'' strips.  The notation of light to medium to dark refers to the value of the strip to use in that placement.    This block will finish up at 7 1/2''.
And of course you could add another round of logs to this and make the block larger.  But since I plan on setting this on point, the 7 1/2'' block is large enough.

For each block  Cut:
3 1/2'' square ---- lightest floral
1 @  2'' x 3 1/2'' --- light floral
1 @  2'' x 5''--- light floral
1 @  2'' x 5'' --- medium floral
1 @  2'' x 6 1/2'' --- medium  floral
1 @  2'' x 6 1/2'' ---- dark medium to dark  floral
1 @  2'' x 8''  ---- dark floral

   This is an early "Heads Up'' for a couple of other readers who have asked for instructions to sew along.    Linda from Art in Search and I had a plan to work on this block together.  She is still recovering from surgery, so her pace has slowed down like mine. 
  So for other readers who are in a hurry, I put together this "recipe" for cutting.  You might prefer to use scraps, batiks, or selected colors rather than the floral fabrics I will use.  I can't actually predict how other fabric prints will turn out.....but that could be a fun surprise.   
   I will repeat the cutting list, which is the correct sewing order too, when we get ready to begin in about 2 weeks.  For now, I plan on making some cuts for testing.

  I have one quilt pinned and one to go...and of course I need to get the two quilted-----that is why the 2 week delay.  At least that is my plan for now.
Happy stitching. 

Saturday, March 3, 2018

Lesson from a log cabin variation


   I have had this project in mind and on my to do list for a while.  This was seen at a quilt show in 2014----all floral fabrics and of course it called to me.

  I ran across several very similar designs on Pinterest over the last couple of years too.  So I finally sat down to figure out the pattern.  LOL......who knew?  It is a log cabin variation.  And I have done this several times with different value placement.


  Look familiar?   A log cabin block called quarter log cabin, or off-set log cabin.   It is the block that became the Faux Braid.  The divided placement of value--light on one side, and dark on the opposite-- was done by Sharon at Vrooman's Quilts and I had to make one.   This links to her tutorial using jelly roll strips. 


  I made not one, not two, but at least three quilts with this block.  And each one looks different.


 Done all in batiks.


   Done in floral fabrics.
  Actually, I did two in florals....one to keep and this one was donated to an auction.   This one used 2 1/2'' strips.


   Again, the same block using 2'' floral strips in a barn raising layout design.  For this one  I had to adjust the cutting measurements due to the size of strip I was using.


  This is a close up of the block in the inspiration quilt.
 Differences to note:
  • First, the starting square is over-sized for the strips. 
  • Second, the design is arranged on-point.  
  • Third, the value placement radiates from lightest in the starting square to darkest to the last logs added. 
  • The dark logs form a trellis design with a 3-D effect against the light areas.  


  My next step was to go to EQ7 and find a block to draft and color.  Then I can make a test block to measure.  (Imagine this block rotated to look like the above inspiration block.)
  I will actually print out a plain block and mark it up with values and measurement.


   A note on the starting square that is over-sized.  My logs will be 2'' strips, so they will finish at 1 1/2'' in the block.   I want the starting large square to be twice that size.  So for the square to finish in the block at 3'', I will begin with a cut square of 3 1/2''.   If my logs were narrower, I would still double the size for the starting square.

  Insight:   Lesson learned once again......from a basic, classic, simple block many design variations can be created.  

  •   The size of the logs can vary and alter the finished design.
  •   The arrangement/placement of value can change the appearance of the       block.  
  •   The setting placement changes it all.  
   I am not re-inventing the wheel, just breaking it down into simple parts.  The design process is difficult for some quilters and I get many emails about how I figure things out.  So this seemed like a great block to give some insight to my thought process.    
  My next step is to do some math, cut some fabric, and try a test block. It's the only way to  be sure it is what I want.  But for now, I have more rows to join on those boxed squares and backing pieces to join......good rainy day sewing.
Happy stitching.  

Monday, February 6, 2017

Put value into your quilts

  The email basket has been full the last few days with questions about the watercolor and color wash quilts.  I have been asked for patterns, and instructions, and for how-to-dos.
    First, I do not have patterns for the water color quilts, or wall hangings.  Each one is unique, and I couldn't reproduce it if I tried.   Each 2'' square is different and will be used or placed differently in different quilts.   The fabrics often dictate the design that emerges.  I work from impressions of things I see, from photographs that I have saved, and from sketches.

  Second, for instructions please see here......Tutorial to Design a watercolor.  It is a page at the top of the blog.  I have links to several posts of questions.  I work through fabric selection---so important---and then on to a tutorial to design.   I talk about the technique of using fusible interfacing, of how I blend the fabrics, how to use the value viewer, or Ruby Beholder.  The entire page is a how-to-do this thing I do :)

  There are books, and photos, and other blogs to research and study, but the best way to learn is TO DO.    I learn best by doing something.  As much as I love to read, if I want to be proficient at something, I must try it for myself.    So I suggest, if you want to do a watercolor quilt/wall hanging, first try to improve your skills at using value by putting some value into your quilts.


   Here's a simple example from last year.  The block is the Bow Tie block.  Block size is 6 '' here.  I used all floral fabrics for the bow ties, and the background fabrics were mixed from white, ivory and tan, to grey, light blue, and light greens.    The lightest value blocks were grouped in the central area.  The layout progressed to medium value to darkest in the corners.
   That simple arrangement fools the eye and gives a color wash effect to the overall quilt.  Of course, I threw in a zinger by twisting a couple of blocks and making a circle too :)


   Pretty much the same thing for the orange peels.   Once all the blocks were made, I divided them into 3 stacks....light blocks, medium, and darkest ones.   Then guess what came next?
   I arranged the lightest blocks first on a diagonal through the center.  Then the medium value blocks blended into the darkest ones, which I placed on the edges and in 3 corners.    A traditional pattern with a colorwash effect......all because I paid attention to the value.


    One last example from my Year of Floral Quilts.  I should say, I am still in my year of florals......I may need to rename it to the decade of florals.  Oh, well.
  The barn raising layout is off set and then extends into the border on one side.  Note the dark center, and then the lighter ring......Value!


  All time favorite pattern for so many quilters is the log cabin block.  This is a log cabin variation, the half log cabin. This past post gives the details.  

  The small photo shows the value arrangement that I used in each block.
  So pick a favorite or traditional pattern add value into your fabric/color selection.  Cut fabrics, make the blocks.  Sort blocks into light, medium, dark values based on the overall effect of the fabrics used.  Play with layout to show case the blocks based on their value.  Stand back and be surprised.

  Maybe I can inspire you to try putting some value into your quilts.  It is more that just contrast.  It is light and dark, sunshine and shadow.  It is spark and movement, and energy and drama.  A small project is the perfect way to experiment, test your self, and to train your eye.  Please try :)
Happy stitching.

Thursday, June 25, 2015

Summer Potpourri

   Years ago on early summer mornings, I would gather blooms for the petals to make potpourri.  Daisies, and cone flowers, cosmos, and rose buds, and my favorite lavenders were snipped and then laid out to dry.  By the end of the season I would have a colorful mix for holiday gift bags.   I still have a yard full of blooms, but no longer do the  gathering for potpourri.


   Which leads me to this recently  finished quilt, named Summer Potpourri.   All the blooms of summer captured in  a quilt in the early morning sunlight.  Capturing memories in fabric.....it is part of what I do.


  This is the block I used......a quarter log cabin---ala Faux Braid layout.  
I love this versatile block.  It works up great in scraps, batiks, or my florals.


  On the design wall, I experimented with the layout.  The final arrangement was the old favorite, barn raising.  I just off set the final layout and added an extension into the border.


   I used a 1" purple strip to frame the blocks before adding a 6" border.   As I joined the strips for the border, I inserted a few random squares.....some of those flower petals that fell out of the gathering basket.  Actually, it is my way of camouflaging/ disguising  the joining seam.


  The quilting shows better on the back, which is a simple white muslin.  A lot of open swirls throughout the center blocks, and leaves and vines along the border.


 Summer Potpourri is 58" by 72".....bound and labeled.  Binding is a mix of floral prints.


  Another finish for the Year of Florals.....and not a dent in the stash!
   I have come to the conclusion that the stash will always be more than I need or can use.  No matter what I do.  The stack/pile in closet stays the same---insert evil grin---do you think fabric fairies visit me at night and leave more?    Maybe I will leave some cookies out for them tonight.

  Happy stitching.


Related Posts Plugin for WordPress, Blogger...