Saturday, November 28, 2015

November Let's Book It!

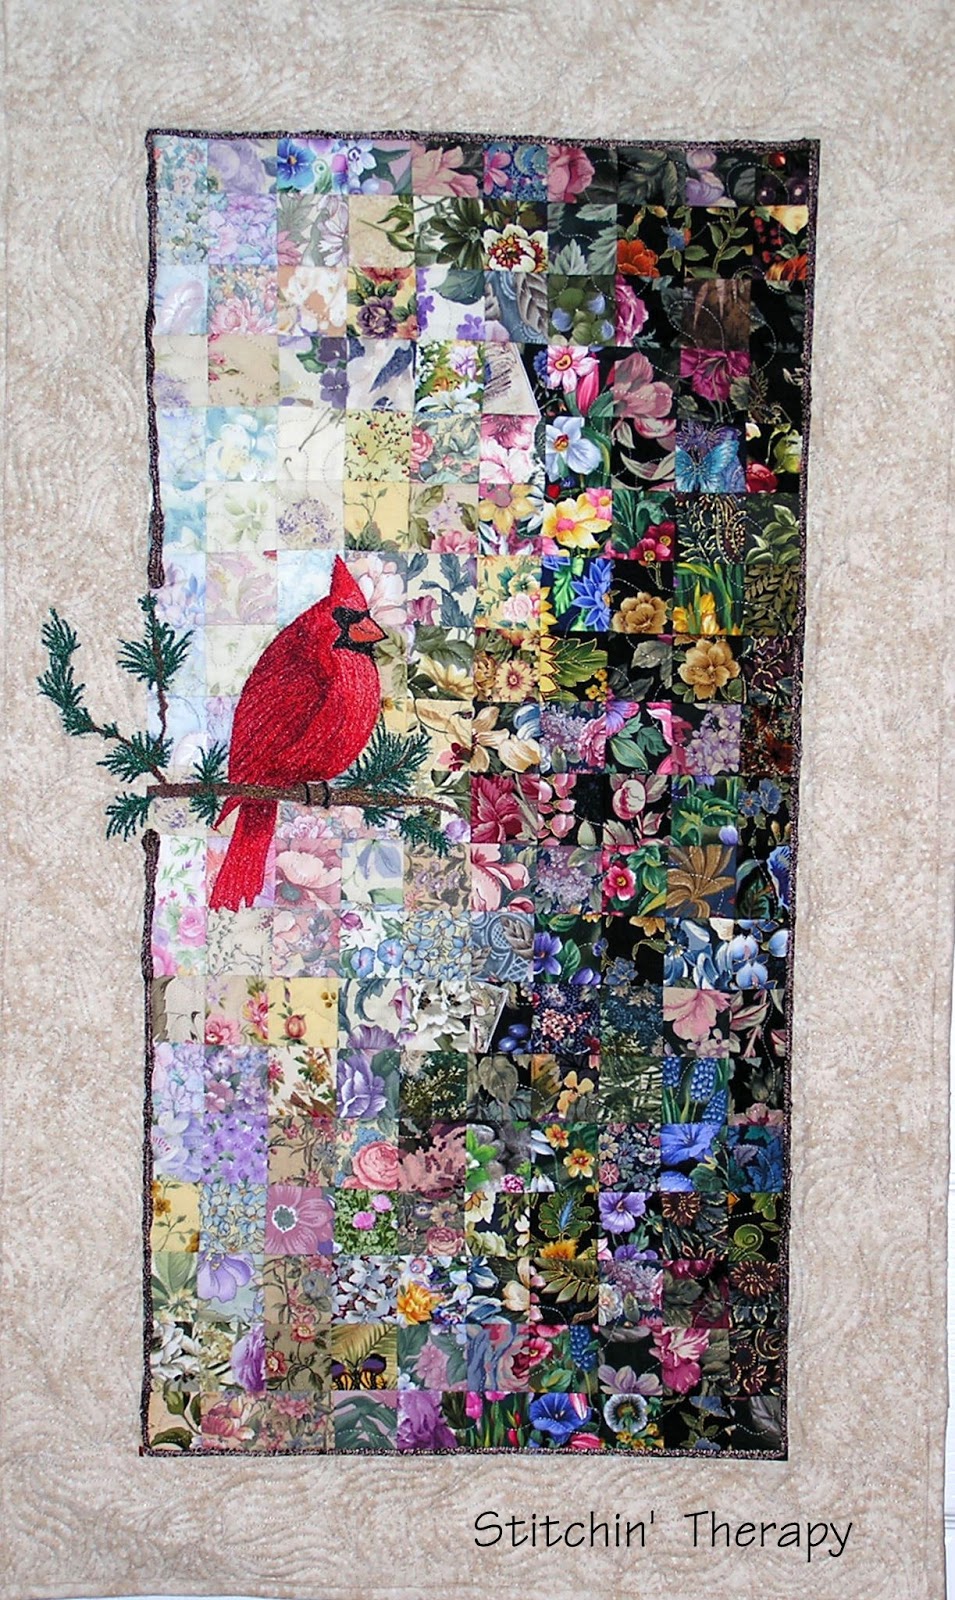
   This is the last report for Let's Book It for this year.   My project has been hanging around for a few months.  OK, more than a few months.  It has been on going since July.   But that's just fine for a Book It project......no finishes are required.

 
  But I did get it to the flimsy stage.  And all the birds are flying in one direction!   I love the softer tones in this one.  It will need a border or two as it is smallish, only 32'' by 44''.  I will think on that through the holidays and see what comes up.  For now it will go on a hanger to free up some design wall space.  


Because those crazy orange peels need some room to grow.   I think I started this one in September and I just keep adding a few every week or so.  Eventually I will call it done, but for now a few more won't hurt.


  I caved in and picked up a few paisleys for my collection.  See I do use things other than florals.   I only got a yard of these three.....


  But I hit the Jackpot on these two!  End of the bolt jackpot means there was less than a yard after my cut.....so I got it all! One was about 3/4 of a yard extra, and the other was about 1/2 yard.  So I was a happy camper.  Fabrics are from Fabric.com

  I plan on using one of these in a Blooming Nine patch after the first of the year.....providing I don't get sidetracked!   So I got 3 yards of both....just to be on the safe side and the jackpot extra is icing on the cake!  And that gives me 5 new fabrics to make orange peels.

   Back to Let's Book It....... Sharon at Vrooman's Quilts  says we need a month off for the busy Christmas season.  So this is the final link for this year.  Drop by and see the cute basket wall hanging she started for the month.  And I hope you will make plans to join in next year and make up a few items in your files of patterns.  
  first it is time to wash up some fabric.....then happy stitching.

Wednesday, November 25, 2015

What is a mug rug?

   I took a cue from Wanda at Exuberant Color and decided to work on mug rugs this week.   With all the rush and food prepping, those small projects can fill in a couple of hours quickly.

This is the first batch that is now ready for pressing and quilting.  Most of these are test blocks  for the plume technique, along with a couple of strings ones.  I am not using binding for them, as I have used the "birthing technique".    I just sew all the way around the rug and turn it right side out thru an opening in the backing.

  Update:   Question from Linda about the birthing technique I use.....
I understand a regular pillow case technique - pull through and then sew up the edge but you are saying you use two pieces of fabric for the back. I don’t get it! 
Are they two full pieces? It’s not like a pillowcase that you slide a pillow in because that wouldn’t be good for a mug rug. I’m confused. I looked at your post in July and I still don’t understand. 
Response:  
Sorry for the confusion.  Instead of leaving the opening on the side of the mug rug to turn, I create an opening on the back.  I cut an oversize piece for the backing....then cut it into two pieces.  I then sew it back together leaving an opening for turning.  My hand stitches are getting worse with the arthritis so a few "poor stitches" on the back are not as noticeable as along the edge.  It is an extra step but worth the effort for a neater edge finish.     Also, I do use narrow binding for the larger snack mats.  I sew to the back and turn binding to the front.  I use a blanket stitch to finish that technique off.    These are what are working for me now.  

  I will be giving some of them to guests at a couple of brunches and lunches during December.  Since these are going to non-quilting friends, I plan on including a hang tag to explain what they are.


So, to my quilting friends and bloggers, here's a page of hang tags!  I found a sample on Pinterest that I worked from.   I think you should be able to save the photo and print as a page. I will probably print on card stock before cutting them out to attach to the mug rug.

  My turkey is thawing and other dishes prepped for tomorrow.  That was all possible to Sir Old Man and his clean up help.......for which I am very grateful.
And now I can enjoy finishing a few mug rugs and enjoy a cup of chocolate.
Happy Thanksgiving and happy stitching. 

Monday, November 23, 2015

Selecting fabrics that blend

  I promised a post on blending fabrics last week. Looking back through older posts, I realized I had started covering this topic back in 2012.  So I have selected part of that post and added a bit more to help with this part of watercolor technique.


  On the right are the "light fabrics".  There is more background color---from white to light tan---showing and the design or print is light or faint looking.  Note the low contrast between the background and the print.   These can be hard to find, so when I do discover them, I buy a lot!
  Update note:  Janet reminded me that often the backside of a fabric will work for a light.  When you have a difficult time finding the right fabric, flip it over and see what the back side looks like.  It could be just what you need!  Thanks, Janet.  


   On the left, are some light medium fabrics.  Again, the background is light, but the print is stronger and has more contrast with the background.  The one on the far left is a great example of a "sprigged" print.  A 2" square of this one can blend into a very light area like a sprig the extends from a branch of a tree.

 The above photo are a collection of medium fabrics.   These are the work horses in watercolor.....they often bridge from a lighter  area to a darker one....as well as being the most used.  The background may range from light to darker cream, or  tan....maybe a light green even.  The design is darker and in good contrast with the background.  Usually there is less background that shows, making them "closer packed".  


And the dark fabrics......give the watercolor depth and life.  The background color is dark.....black, brown, blue, green.....and the design has strong contrast.   The areas of light and dark on the dark background provide the way to blend and merge the squares for a water color.  


  I talk so much about the right fabric, I thought I should also mention the wrong ones.  These are great fabrics, they just don't work well for blending in a watercolor.  Why?   Mainly because  they are one or two color fabrics.  Either they "read" as a solid or a polka dot from a distance.    Step back from the computer and look at them again.   The second fabric---purple paisley---fooled me when I bought it.  I thought it would work, but just does not blend well because the design is so evenly spaced.  So save these fabrics for another project or turn them into backings.                 


  If you have selected the right type of floral and paisley style prints, you still may face the challenge of making them blend.    Remember the real blend comes the value not the color you are using.  I created a collage photo to help show a simple blend from lightest to darkest.  


Top row------ from the lightest to the darkest.  If the lightest fabric is in the central area of the watercolor, you need to move out to the edge getting darker as you go.  

Middle row---- a close up detail of the first 4 fabrics.  The second fabric is a "sprigy" one that has a lot of background showing and introduces a darker stem.   The third fabric picks up on the background color of the second fabric and has more of the darker stems and leaves.  

Bottom row---  the second fabric in this row is what I consider a workhorse fabric.....it does so much!  Generally it is a dense or packed floral pattern with little or no background showing.  It has strong contrast in the pattern with distinct light and dark areas.  So it can go from medium value to dark value in just one square.  
  The last two squares in this row are dark values with the square on the end having more black background showing.  That is the drama factor.  


     This is one of the Cascade wall hangings.  You can see how I used the above blending technique to quickly move from the center of light to the darker edge.    One other thing to note on this is the effect of large/huge blooms....like the red at the top left.  By positioning 2 or 3 squares that have a  large flower in similar color next to each other, you create the appearance of a very large flower.  
And the rest is up to you now to experiment and train your eye. 
  •  Get use to using the value viewer.  
  •  If a square doesn't work, give it a quarter turn or flip it over to see if the value is better. 
  •  Stand back....about 10 feet  before you judge too harshly. 
  •  Take a photo and view it on the computer.....changing it to black and white from color is a great trick I have not mentioned.  You will be surprised at the effect of just viewing the value.  
  • That is also a good tip to use on traditional quilts.  Sometimes we use too many medium values and then wonder why the pattern looks flat or uninspiring.
Whoa....this is long.  So I know I have over whelmed many,  hopefully you got thru it.
Happy stitching!


Friday, November 20, 2015

Friday Finds.....tip and patterns

   It's Friday again....where did the week go?  I get comments about this feature all the time, so it will continue next year.   I may miss a few weeks during the holiday season, but I will try to pull at least one together for December.
 So if you are new here or even new to blogland, these photos and patterns are not mine.  They are things I pulled from around the blog world and pinned to my Pinterest boards.  Follow the bold link to get to the original source, or see he side bar for the link to Pinterest.


How to clean up stray threads in your sewing room without vacuuming! Perfect!!!:    Got stray threads......on the floor, design wall, by your chair?  And no lint remover around.  Make your own thread grabber.  I found this idea at the Seasoned Homemaker.  She calls it "no-vacuum sewing idea".  I call it smart.
There are a lot of neat ideas on this site.
  The photo is all you need.....plus a small foam paint roller and a bristly hair roller.  I am adding bristly rollers to my list for the next trip to the $ store.

Update note:   I found the bristly rollers at the $ store---4 for $1. I did not have the paint roller with foam head.....but I did find a foam craft brush.  It is the perfect size for the small hair roller.  Instead of rolling, I just dabbed at the threads.....worked perfect!


   Here is a downloadable project from All People quilt.  I love the chunky baskets....have I shown this before?   If so, it is worth repeating for the season.
It is small enough to put together in a short time.....only about 33'' by 40''.   A good weekend project that would make a cute gift.


tula-pink-elizabeth-misdirection-quilt:

For flying geese fans------
A free pattern from Tula Pink.   I am not a big fan of the modern prints, but I do like some of her fun designs.   I love this funky quilt.......maybe it reminds me of how my mind feels some days.  It is aptly named, Misdirection.   Click here to download the pattern.     If nothing else, it is a great inspiration for your own design.


As always, please visit the links given for these patterns and ideas.

 Have a great weekend.....sew, or read, or just enjoy your family.   As for me, I am prepping a few dishes for the big Turkey Day meal for the men in my life.  It's how I tell them I love them  :)

Wednesday, November 18, 2015

Class in Columbia

What a fun group of quilters, The Greater Columbia Quilt Guild  I met in Columbia, SC for a trunk show and class.  I forget how inspiring it can be to see what other guilds are doing.  I loved their show and share projects.
 Plus I got to meet fellow bloggers, Elizabeth and Jeanne.  

Elizabeth did a quick post today about my visit......and I snatched a couple of photos from her.  With this large class,  I was too busy pointing and blending to take photos!

  Martha was learning how to use a value viewer.   She had the center focal point established and needed to blend to the dark areas with medium value fabrics.


  Lynne just jumped on the horse and rode away with her design.  We talked about using "sprigy" fabrics, which she needs to add, to blend from the light to darker areas.


  I always get more out of teaching a class than the students realize.  This technique is like breathing to me.  I need to remember that there is a strong and long learning curve to the process.
To that end, I plan on working up a couple of post that will focus on blending fabrics.  It is more than the print, it also includes the background of the fabric.   Another post will cover fabric selection..... many of us are afraid of dark fabrics, yet they are so important in our quilts.
  And lastly, Elizabeth stole the day for me with her stackable storage bins for 2" squares!    I plan on visiting the fishing tackle department very soon to see what I can find.

  I need to finish unpacking the stuff.  Then I am making cornbread dressing for next week.  I like to make it in advance and freeze it.  Just one chore/dish made ahead for Turkey Day.
  And a huge, big thank you, hugs and kisses, to Sir Old Man.  This trip would not be possible without him.  He's a greater supporter/holder of quilts/ driver/transporter of supplies, and all round good guy.  Got the idea?  He is why I make cornbread dressing...grin.
Happy stitching.

Saturday, November 14, 2015

I got to be me.....

  Our first heavy frost was last night and the cactus is in full bloom.  It's a bit early for the blooms, but then everything seems to have a mind of it own.   And things don't always make sense.
   The bombings in Paris last night just left me in shock.  Senseless to destroy so many lives.  Yet that is what terror is all about.    Our world is spinning so fast, and I look to hold on to something that resembles sanity.  Bloom on, cactus.


 On the sewing front,  some birds are in flight!  The top rows are assembled, and the rest are ready to add.
Fly safely.


More Orange Peels.......I know, I know.  I tried re-arranging them in a scattered style.....it looked awful to me.  Then I tried an arrangement of like colors---blues, reds, purples, etc.   Just ghastly.
   I came to see that I was not speaking with my voice.  I was trying to re-shape myself.  This is who I am....so be it.  It makes me happy.  Note----I changed the title of this post.

  I have a few more peels to add to make this square....then decide if I want it larger or just to add borders.
Enjoy your weekend, I will be back mid-week....happy stitching. 

Friday, November 13, 2015

Friday Finds

How about a couple of  blocks this week?

Friendship Star QM Bitty Blocks: November’s Friendship Stars  These are called Bitty Blocks and are from Quiltmaker.  Click here for a good little tutorial on making these Friendship Star blocks. They have more small blocks...just follow their links.  They are a great size for borders, too.


Turning 20 or Taking a Turn quilt pattern. Pick out just 20 fat quarters and stack them up in 5's (4 times) and cut per this diagram and SNAP you have a whole quilt ready to sew! This works great and in a single weekend you have a quilt! Happy quilting! CZ1:   This is the Turning Twenty Again block....the big block.  The pin says I uploaded it, but not so.    And I am not sure where I snagged it from.  Before I get jumped on for copyright....save the photo and print it for your library.

   Anyway,  I get asked for info on this one a lot, so here it is.  By using 20 fat quarters, you can create a large quilt in a weekend....easily.  Twelve blocks makes a nice size throw quilt.
  Fabric selection is important here.  It works wonderful for batiks.  I made Autumn's Carpet using this pattern.    Use a focal print and coordinate other fabrics-----not using strong contrast lets the fabric do the work.


(7) Name: 'Quilting : Applique Add On's - Season's Greetings 1:

 From Craftsy......beautiful applique patterns.  I could not resist those swirls.  Just viewing them is wonderful inspiration to add some zing to seasonal projects......which I need to get busy on.


what a great idea. Now if I can remember to buy one of these containers. Ribbon is really hard to store and this is perfect.:
  I thought this was so clever!  To keep your ribbons in check and organized, place them in a bin with holes on the sides.  The ribbon ends are feed thru the holes for easy access.  Check out the  other  So Clever ideas.


And that's a wrap for the week of Finds.  As always, please visit the original source for pinning.
 
  The sewing room is in total disarray as I am getting all the small stuff together to take for the class on Tuesday.  The quilts are sorted and stacked.....it is all the other stuff I need to take!  I feel like I am packing to move, but that's not so.
Hopefully, I will get some time to stitch up a few more of those orange peels......the stack is growing.
Happy stitching.

Tuesday, November 10, 2015

Trunk Show edition

   It's the Trunk Full of Quilts over at Whims and Fancies blog.  
Online Quilt Trunk Show | Whims And Fancies
I had visions of sharing some large quilts and new photos.....yet I moved to plan B because the sun hasn't  cooperated this past week.  So here's the trunk......


 Let's open the trunk and see what we find.   It could be filled with pirate's treasure, but in this house I bet it holds a different bit of wonder.


     Changing Seasons is a mixed technique wall hanging.  It began as a regular watercolor in the center.  And then it evolved when I decided to add cardinals sitting on a branch.  The branch needed to be anchored to a tree, and so I "grew" up a tree.
   The tree is fused applique with several layers of fabric.  I would cut a hunk and pin it up on the design wall, stand back and see it if created depth.  This went on for about a week.  I ended up adding twisted yarns and cording in areas for more texture to the tree and branches.
  The border was by chance.  I did not have enough of the one fabric used on the left side.  So I looked for large hunks to finish it off . It  ended up with a scenic type border----from sky to horizon to ground.   A narrow strip of black pushed the outer border back for even more depth.


 Remembrance is also a mixed technique wall hanging.   On the left is a section of leftover watercolor squares from another project.  To it I added cobblestone blocks of pastel batiks.  The cobblestone blocks are a scrap technique from Wanda at Exuberant Color.    She has such wonderful ideas and does amazing work.

  Once I had the background created, I was inspired  to use the Veteran's Day symbol of poppies.  I love how they stand tall against the sky.


  The poppies are fused applique with a small amount of thread painted detail in the centers.    A narrow filet of a yellowish batik was added before the border went on.  I liked how it made the flower centers pop.


 Hope  is always hung somewhere in the house.  It has a seasonal appearance, but  I keep it up all year round.  It is a basic watercolor background with thread painted cardinal and pine branch.

  I went through a period of doing a lot of thread painting and this was the final one I did.  There are 3 sections---cardinal, main branch and pine needles, and smaller clumps of pine needles.  Each section was thread painted --with a zig-zag stitch---onto bridal tulle sandwiched between sulky as a stabilizer.  Once completed the sections were cut out (sulky dissolved) and appliqued onto the wall hanging.   A few extra thread painted stitches were added to blend it all together.


  I don't remember exactly how many shades of red I used, but I think it was in the range of 9-10.  The highlights were actually pink.

  Appliqued cording was added to separate the border.


     One more to say Welcome for the season.  This is a small table topper.  The pineapple was made from strips and strings of  yellow and gold fabrics in a braid pattern.  The pineapple shape was cut out and appliqued to a string background.  Three shades of green were cut and fused for the leaves.  I did not have enough fabric for a border on 4 sides, so I made do with just 2.  I love the off set look and use it a lot now.


Now, click on over to the Trunk Full of Quilts linky and see what other inspiration you can find.
Happy stitching.

Friday, November 6, 2015

A few Orange Peels

  I missed setting up some Friday Finds this week, but some of those important things got done......like the  four insurance company  thing, and freshly fluffed and washed quilts for the trunk show line up.  Most of that is sorted and ready to go.
 

    That means I got in the sewing room for a couple of hours to stitch up a few Orange Peels.  I shifted things on the design wall just to see what I was getting myself into with this project.  I have to smile because I still tend to group like colors and values together.  I am not sure I will leave it like this.  I have more light prints to sew.....and I think I need more dark and medium value prints.   I really had intended to mix them all up but now I will just wait and see.


  The Birds in the Air is stacked and ready to sew into rows.  I have had enough triangle fun for a while.    I think this was the final arrangement.  Every time I moved one, I found I had to move another one....and so on.  So I finally stopped and said enough.

   Wow.....the sun just came out!  It has been days of clouds and rain.  More is on the way, so I am sure this won't last long.   I need to grab some Vitamin D.   Happy stitching.

Thursday, November 5, 2015

Trunk Show coming

I was hoping for some sun today for taking good photos.....no such luck. Still cloudy and some drizzles of rain.  So, instead I am sorting quilts for my trunk show in 2 weeks in Columbia, and setting aside quilts for photos when we get some sun.

  There's an online Trunk Show coming...details here.   Whims and Fancies is hosting it as a giant linky party to your trunk show.   There is also a button on the sidebar.  It begins on November 10.....that's enough notice to put together a post of some of your finished quilts or projects....big or small, just finished.


  This block is left over from last month's playing on EQ7.  I haven't gotten any further with it...like making a block or pattern template for cutting.  I labeled it "what is it", and I don't remember why.  It's a one patch block---a split rectangle---- that is not quite a pinwheel.  It's stolen from this pin on Pinterest.   I also saw it made up with black as the background and it is striking.  I hope to work out the size for a couple of versions and come up with a template for cutting.

  Otherwise, I am knee deep in paperwork over this insurance renewal stuff.......I hate this mess.  It gives me a stinking headache and takes away from my sewing time.  I need sunshine.  I need chocolate.  I need some sewing time.  

Monday, November 2, 2015

It's been a long time coming

  No sewing yesterday  after all.....instead we set up the bed!  I can't believe it is finally finished and residing in the house.
  Saturday  night Sir Old Man brought all the parts  up to the house......for them to acclimate overnight.  Then the next afternoon was the take down of the old bed.  And some cleaning......where did those dust globbies come from?


  The beginning of the set up was like a three ring circus with 2 people using arms and legs to hold it all in place.  A few adjustments and shifting happened, as we tried to make sure it was square.  Yes, square like in 90 degree corners.  I knew how to check that!   Using my extra long tape measure , we measured corner to corner.  A few nudges and it was square.


 With the buzz Saw quilt on it......I really  have just  been sitting and looking at it.  Then running my hand over the smooth, satiny surface.


I love the slight arch along the top of the head board and foot board.


My nephew says it is awesome.....with icing on top!

   I truly have never owned anything so beautiful.  You can tell I am smiling.  What's even better......my feet touch the floor and I don't need a parachute when I get out of bed!


   Sir Old Man out did himself....as always.  He is a perfectionist and this was his labor of love.  From the fuming tent and duct tape, to the battle with the humidity this summer marring the finished---requiring a total re-do----he persevered.   He learned through the process, he says.  And that's exactly how to develop any skill set.....do it! 


    It's been a long wait for the bed.....but so worth it.  I am calling this saga over.  Thanks for coming along.
Happy stitching.
Related Posts Plugin for WordPress, Blogger...