
Tutorial on Designing a Strip Pieced Watercolor:
Rather than re writing this info, here are the links for a 3 part tutorial to create a strip pieced watercolor lap quilt or wall hanging.
Part 1
Part 2
Part 3
Frequently asked questions and posts with answers.
Links to posts that may answer your questions or provide the details you need.
A question on Value New: Added October 2017
Strings and Watercolor post
Selecting Fabrics for watercolor
Blending fabrics
More questions on watercolor
Design Guide for the Cascade wall hanging New: Added August 2014
Swatch Card for printing This can now be found on the Pattern Page.
For a wall hanging using gridded interfacing foundation:
Interfacing for the foundation
**New: Updated info on gridded interfacing January 2015
** Update: Pellon is no longer producing the 2" gridded interfacing, only the 1" grid. Bosal and Whims still have the 2" gridded at a cost of $6/yard! For my money, I would use the 1" grid with the 2" squares.....just remember that is 4 gridded squares per square of fabric.
I use the 2 inch gridded interfacing for my watercolors. It is readily available and makes all the stitching a breeze. I decide on the approximate size I would like to create and cut the interfacing accordingly. Just remember that the seams will reduce the size of the squares from 2 inches to 1 1/2 inches. For example, if I want to create something about 20" by 30 ", I would cut the interfacing 14 squares across by 20 squares down. This will finish when sewn to 21 inches by 30 inches. (14 times 1.5 = 21)
The interfacing in pinned to the design wall with the bumpy, fusible side facing out. Note: See detailed Fusing and Sewing instructions at the bottom of this page.
Fabrics
Florals, and more florals. All sizes of prints....some closely spaced and no background showing, and others with background showing and less dense florals. I also use some paisleys and swirl-type designs. All types of leaf prints, but I avoid tone-on-tone type prints, as they hard harder to blend.
 I begin by deciding where my light is coming from, and which area I want light and which part darker.

 Third photo: This shows the left side that has been redone and filled in.

 The home stretch! The photo on the left is almost done. At time point I had been blending fabrics for just over 2 hours. And the photo on the right shows the completed section and how it will blend with the blocks in the center portion.

 Use a ¼ inch seam allowance. You can sew either all the vertical seams or the horizontal seams first. I usually sew the horizontal seams first because there are more of them. The “fabric” rows will literally fold over on themselves because of the interfacing. Just be sure to have the black design grid line, which is the fold line on the interfacing straight as you sew. NOTE: I alternate the directions of my seams when sewing to help prevent warping or twisting or skewing of the design.


Rather than re writing this info, here are the links for a 3 part tutorial to create a strip pieced watercolor lap quilt or wall hanging.
Part 1
Part 2
Part 3
Frequently asked questions and posts with answers.
Links to posts that may answer your questions or provide the details you need.
A question on Value New: Added October 2017
Strings and Watercolor post
Selecting Fabrics for watercolor
Blending fabrics
More questions on watercolor
Design Guide for the Cascade wall hanging New: Added August 2014
Swatch Card for printing This can now be found on the Pattern Page.
For a wall hanging using gridded interfacing foundation:
Interfacing for the foundation
**New: Updated info on gridded interfacing January 2015
** Update: Pellon is no longer producing the 2" gridded interfacing, only the 1" grid. Bosal and Whims still have the 2" gridded at a cost of $6/yard! For my money, I would use the 1" grid with the 2" squares.....just remember that is 4 gridded squares per square of fabric.
I use the 2 inch gridded interfacing for my watercolors.
The interfacing in pinned to the design wall with the bumpy, fusible side facing out. Note: See detailed Fusing and Sewing instructions at the bottom of this page.
Fabrics
Florals, and more florals. All sizes of prints....some closely spaced and no background showing, and others with background showing and less dense florals. I also use some paisleys and swirl-type designs. All types of leaf prints, but I avoid tone-on-tone type prints, as they hard harder to blend.
A note on the background color of the fabrics: Avoid bright yellow and red backgrounds as they do not blend well. You need backgrounds in white, beige, tan, green, dark blue, brown, black. The darker backgrounds create the shadows and add great depth to the overall effect.
Cut 2 inch squares. It is very important to be accurate, and in this case, less is best. Don't cut 2 1/8", or you will need to trim before you press and sew. I use the June Taylor shape cut mat with slots to maintain consistency.
Sort the squares into value--light, medium, and dark. I go a bit further and also sort the mediums and darks into lightest and darkest values.
 I begin by deciding where my light is coming from, and which area I want light and which part darker.
I will place a few random squares of the lightest fabrics in the general area right onto the interfacing. Then I begin on the edge with the darkest fabrics and start the outline. I generally work from the bottom up blending the values as I go.
In this photo, you can see that I have the outer dark edge about half way done. About mid-way I have begun to bridge over to medium values. And to the right the lights and medium have been placed where I want the lightest area. The "strange" blocks to the right are an experiment for this watercolor. These blocks will be the center with some sort of fused applique and the watercolor will blend out from them.

Second Photo: Now the entire dark edge is built. And some of the light area has been re-worked. Where there are gaps near the bottom area is also being re-worked. Pieces that do not blend right or stand out or create a sharp line are just removed to the side.
 Third photo: This shows the left side that has been redone and filled in.
Notice that the background on the fabrics used is dark, and yet there are areas with strong color too. The dark is the negative space that provides the depth.

 The home stretch! The photo on the left is almost done. At time point I had been blending fabrics for just over 2 hours. And the photo on the right shows the completed section and how it will blend with the blocks in the center portion.
I will now fuse the fabric to the interfacing. I can press while it is on my design wall because my husband used the foil covered insulation ( he made sure to place the foil towards the flannel). I use a small travel iron and press--not iron--over the entire section. Then it can be moved (and the pieces will not fall off) to the ironing board for a strong press and fuse well.
Stitching the seams and finishing
Use a 1/4 inch seam and stitch all the horizontal rows. The interfaced fabric literally folds over on itself and is easy to stitch each row. Then snip! Snip right through the stitching line at the intersection of the vertical row--on the black line. This will allow the vertical seams to be spread in opposite directions for the rest of the stitching. Then stitch all the vertical seams. Press and press well. The watercolor is ready to be bordered, or not, and finished!
Update: Add a focal applique
For this wall hanging I decided on poppies as the focal applique in the light area. And I drew my own pattern from a photo.
Trace the pieces needed in reverse onto fusible web and fuse to the selected colors.
Cut out the pieces from the fused fabrics. Pin in place, overlapping as required. Take a photo to be sure you are happy with the placement and arrangement. Then fuse to your wall hanging. Stitch all pieces down with either a straight stitch, zig-zag, or buttonhole stitch. Just be sure to secure all the edges. This is the unfinished wall hanging with just the poppies pinned in place.

Finished.....The poppies were fused and satin stitched down. I used thread painting around the center for the stamens and accent. A filet inset and border to complete the wall hanging. A note about the pieced blocks that form the background for the poppies....I used mainly batik scraps for this portion. The blocks are the "cobblestones" that Wanda at Exhuberant Color created. Any size square or rectangle becomes the center. Add strips to each side log cabin style. Square up to a common size. Blocks may be slightly crooked and uneven, but that's the beauty of it.
FUSING
I work on a design wall that is made of foil faced insulation covered with flannel. I can press directly onto it using a small travel iron. At this point I do not use steam, just heat. My objective is to lightly fuse the fabric onto the interfacing so I can move it to the ironing board for a heavy press.
If you are working on a small foam core board or portable design board, you can slip the interfacing with the fabrics onto the ironing board. Here is how.
- Place the design board on a table close to the edge.
- Move the ironing board next to the table and adjust the height to the table's height.
- Lift the bottom, or top edge, and gently pull it towards you onto the ironing board. Just move it enough to get a few rows on at a time.
- Press and then move a few move rows onto the board. Press and repeat till completely pressed.Then PRESS again to be sure everything is fused in place. Now you are ready to sew the rows.
SEWING
 Use a ¼ inch seam allowance. You can sew either all the vertical seams or the horizontal seams first. I usually sew the horizontal seams first because there are more of them. The “fabric” rows will literally fold over on themselves because of the interfacing. Just be sure to have the black design grid line, which is the fold line on the interfacing straight as you sew. NOTE: I alternate the directions of my seams when sewing to help prevent warping or twisting or skewing of the design.
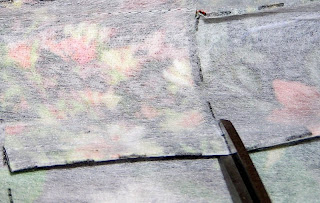
When all the horizontal rows are sewn, you need to clip each seam at the intersecting black line.
And you need to clip through the stitching.

Clipping the stitching at the intersection will allow the sewn seams to be pressed in alternate directions when you stitch the vertical seams.

Stitch the vertical seams just like the horizontal seams. Now to press your work.
Press from the front. I press with steam at this point. You will have to work with it row by row to make it flat. If you press from the back—use a press cloth to protect your iron.
