Monday, July 31, 2017

Just a little thing....

    A message this morning from Martingale, the book publisher, brought this notice of free patterns offered.    I thought the table runner was too cute, so I had a peek.  I have won and bought books from this site before, but did not remember free patterns.   Just thought I would pass the info on about this little thing.


  It almost felt like a fall morning today as we enjoy an early cup of coffee on the porch.    Good to enjoy it as I know it won't stay around too long.    My brother and Remy were up for the weekend, and the news is their  return flight was canceled due to the tropical storm and they will be stuck in town until Thursday!  Sounds good to me, as Remy owes Sir Old Man some time cutting the grass.


On the design wall........
  A small water color has been on the wall  for a couple of weeks.  I had added a narrow border in soft gray and then was not sure of how I wanted to finish it.


   I began playing and fusing squares to the interfacing to add.   I love doing a "reverse value" layout in the borders.  By that I mean the center has a dark edge or bottom in this case, so the outer border needs to be light and work up to medium.
   I have the sides sewn here....they go from light to medium to dark.   Across the top is dark, and they are fused but not sewn.  You loose a good amount of fabric in the seam allowances.  


   Once I got everything sewn, and attached I had this.


   Or would this be better??
   Up side down gives a different view on the world.  It is almost like a path leading you thru an arbor.    Just another way to ask "what if...."


   Have you heard about the solar eclipse?  Well, here in Greenville, SC we are in the right place for a view of the whole shebang!  And the news is already starting to go crazy with dire predictions of crowds and traffic.  Guess we will heard 3 weeks of this .....all for a four hour event.   It's not like people will be moving in for a long stay.  But I do need to pick up the free eclipse glasses.....so stylish I hear.
Such is the latest here......happy stitching.

Friday, July 28, 2017

Blog banner quilt is Scrappy Trips

    I have been quieter the last few weeks, slower too.  I had debated on resting a longer while from blog posting and not really starting anything new.   I wasn't going to close my blog, but I did feel I had repeated myself so much that I was boring.
Insight:   Things occur and happen to direct you along the road 
you are suppose to take.  There are signs we can chose to ignore, 
but with advanced age I have learned to be more 
receptive to directions.  At least sometimes. 

   All of this to say......this has been a week for emails and questions....not just requests for patterns.  Questions are a good thing.  Questions ask for help, provide direction, point up details I have forgotten, and they let me know what readers/followers want to know.   So after 3 questions about the quilt shown in the blog banner, I think I needed to provide details.  A hunt thru past posts revealed a big lack of details.  I have no idea what happened about that.


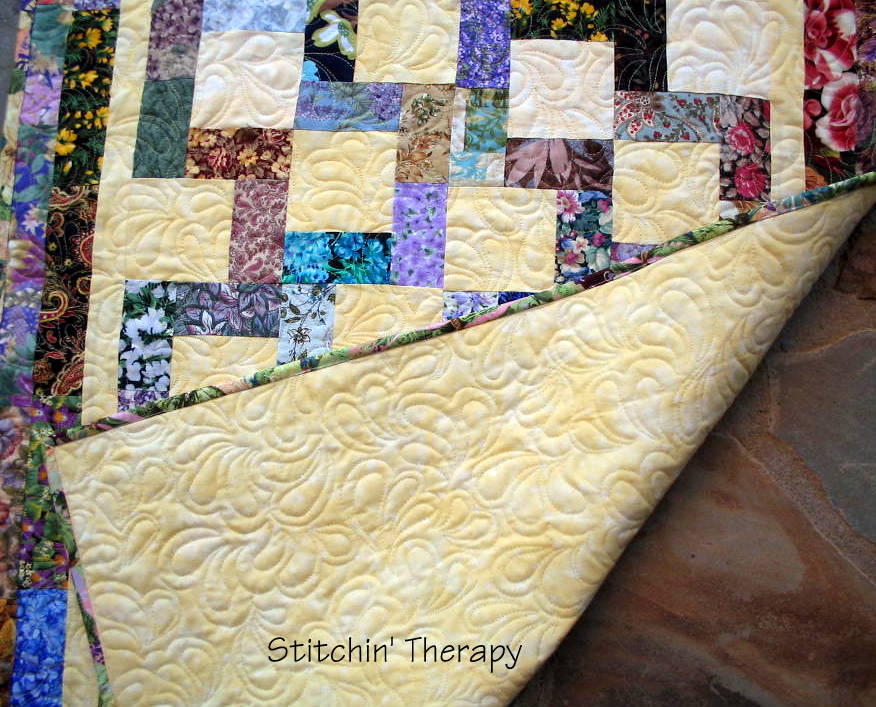
   Trippin'  Thru the Flowers is from 2014.  I began working on this as a Let's Book It project in April/May 2014.  The pattern is from Bonnie Hunter at Quiltville.    She calls it Scrappy Trips.   It is a Trip Around the World variation.....many small trips in fact.  My version is based on value rather than one color.   So.....chains of value radiate around the center square creating diamond bands of value.   Doesn't that sound rich?

  Value......not color.  Value is the lightness or darkness of the fabric.   And the secret to a quilt with the changes in value like this is variety.  You can't have enough floral prints to chose from :)   
 Three things I use to work with value in a water color (or a scrap quilt) are
  •  a value viewer (ruby beholder), 
  • a design wall, 
  • and a camera.   
Learn to sort your fabrics into correct value groups.   I use a ruby beholder viewer.  Additional tip....... Visit Exuberant Color for some good lessons... variety of value  ,  a lesson on value .  I learned great lessons from Wanda's blog, and there is no reason to create my version when she is a master at this.  

Design wall.....big, small, permanent or portable, it is so important.  I can stand back from a design layout about 8-10 feet and see how the values are working together.  In this design I wanted to  see distinct lines of dark and light.  I needed areas of medium value fabrics to blend to the dark and to the light fabrics.  

A camera....if all else fails, take a photo.  Look at it on the computer and amazingly, I can see where problems lie that need to be fixed.  Added tip....turn the photo into a black and white version and you will see instant photo based on value!


Back to the quilt............  
This is how the Scrappy Trips is put together.  4 blocks come together to make up the small trip around the world unit that you see.   If you read thru Bonnie's pattern, you will know that it takes 6 strips for each block unit.    So I had to make several variations for the variety in the full quilt.
   I laid out the strips according to value from dark to light before sewing them together.  It was important to be sure the dark and light fabrics were distinct and not too "mushy".   The lowest block on the left is just a little bit too mushy.  Compare it to the upper corner block that is diagonal to it.  Much stronger light in the center creates the radiating diamond.     So yes, I did have to do some planning--not too much--- to be sure I had light center units forming as well as dark center units.  

 And now a little further along.
   I got better as I went along....selecting fabrics to put together to blend and to have contrast.  
  In the pattern instructions, after you make sub-cuts you unpick a seam to join the rows.  The strongest dark or lightest light fabric was needed to run thru the center to get the pattern.  


   So many Scrappy Trips became Trippin' Thru the Flowers.   And  then became my blog banner.......as it speaks dearly of the floral fabrics I love.   The blended values  remind me of shadows  in the garden in the evenings.  Movement can be strong and still gentle and that is what this quilt says to me.  
Happy stitching.

Wednesday, July 26, 2017

Older post on Blending Fabrics

  I recently had questions about blending fabrics and where to go for information on it.    There are many books on the watercolor technique and all will have some general information, but there is nothing like hands on, learn by doing.  I went through some older posts and found this one from 2015 to re-post and share.


Selecting fabrics that blend

  I promised a post on blending fabrics last week. Looking back through older posts, I realized I had started covering this topic back in 2012.  So I have selected part of that post and added a bit more to help with this part of watercolor technique.


  On the right are the "light fabrics".  There is more background color---from white to light tan---showing and the design or print is light or faint looking.  Note the low contrast between the background and the print.   These can be hard to find, so when I do discover them, I buy a lot!
  Update note:  Janet reminded me that often the backside of a fabric will work for a light.  When you have a difficult time finding the right fabric, flip it over and see what the back side looks like.  It could be just what you need!  Thanks, Janet.  


   In the above photo...... On the left, are some light medium fabrics.  Again, the background is light, but the print is stronger and has more contrast with the background.  The one on the far left is a great example of a "sprigged" print.  A 2" square of this one can blend into a very light area like a sprig the extends from a branch of a tree.


 This photo shows  a collection of medium fabrics.   These are the work horses in watercolor.....they often bridge from a lighter  area to a darker one....as well as being the most used.  The background may range from light to darker cream, or  tan....maybe a light green even.  The design is darker and in good contrast with the background.  Usually there is less background that shows, making them "closer packed".  


And the dark fabrics......give the watercolor depth and life.  The background color is dark.....black, brown, blue, green.....and the design has strong contrast.   The areas of light and dark on the dark background provide the way to blend and merge the squares for a water color.      
Added note:  When looking at this type of floral print, do not focus on the individual bloom or pattern.  Rather look at the over all impression.    The dark background color/value will push these prints into the medium/dark category.  But there may be individual squares that are cut that can be medium value or light/medium value.  Those squares will help bridge from a dark area to a lighter one. 


    I talk so much about the right fabric, I thought I should also mention the wrong ones.  These are great fabrics, they just don't work well for blending in a watercolor.  Why?   Mainly because  they are one or two color fabrics.  Either they "read" as a solid or a polka dot from a distance.    Step back from the computer and look at them again.   The second fabric---purple paisley---fooled me when I bought it.  I thought it would work, but just does not blend well because the design is so evenly spaced.  So save these fabrics for another project or turn them into backings.                 


  If you have selected the right type of floral and paisley style prints, you still may face the challenge of making them blend.    Remember the real blend comes the value not the color you are using.  I created a collage photo to help show a simple blend from lightest to darkest.  


Top row------ from the lightest to the darkest.  If the lightest fabric is in the central area of the watercolor, you need to move out to the edge getting darker as you go.  

Middle row---- a close up detail of the first 4 fabrics.  The second fabric is a "sprigy" one that has a lot of background showing and introduces a darker stem.   The third fabric picks up on the background color of the second fabric and has more of the darker stems and leaves.  

Bottom row---  the second fabric in this row is what I consider a workhorse fabric.....it does so much!  Generally it is a dense or packed floral pattern with little or no background showing.  It has strong contrast in the pattern with distinct light and dark areas.  So it can go from medium value to dark value in just one square.  
  The last two squares in this row are dark values with the square on the end having more black background showing.  That is the drama factor.  


     This is one of the Cascade wall hangings.  You can see how I used the above blending technique to quickly move from the center of light to the darker edge.    One other thing to note on this is the effect of large/huge blooms....like the red at the top left.  By positioning 2 or 3 squares that have a  large flower in similar color next to each other, you create the appearance of a very large flower.  
And the rest is up to you now to experiment and train your eye. 
  •  Get use to using the value viewer.  
  •  If a square doesn't work, give it a quarter turn or flip it over to see if the value is better. 
  •  Stand back....about 10 feet  before you judge too harshly. 
  •  Take a photo and view it on the computer.....changing it to black and white from color is a great trick I have not mentioned.  You will be surprised at the effect of just viewing the value.  
  • That is also a good tip to use on traditional quilts.  Sometimes we use too many medium values and then wonder why the pattern looks flat or uninspiring.

Happy stitching.

Monday, July 24, 2017

Looking back to look forward

Therapy Quilt and The Rest of My Story
 

  While this blog is focused on my quilting projects, it is also a record of the events in my life.  And hind sight is always much more in focus and revealing to me.    Looking back gives me perspective to look forward.


  One year ago, I was still in rehab and learning to stand and walk with a walker.  I was being treated for a B-12 deficiency, and lead to believe all things would return to normal in a few months!  This last year has included 3 months of occupational therapy for motor skills, 6 months of physical therapy for balance, walking and standing without falling over.  Neurological visits and testing and a clearer diagnosis of Pernicious Anemia and a life time of B-12 injections, and severe carpel tunnel in one hand and moderate in the other.  Surgery on both wrists---enough said--it was a nightmare time.  

   Teaching myself to sew again.....all those fine motor motion skills were weak.  I continue to suffer with the numbness and nerve pain in the fingers and hands.   I walk now on my own for short distances.  It takes a full concentration to maintain balance and not stumble.

    Feet and legs are numb  and the muscles tend to "lock up" and not respond at times.  I think this is due to over stimulation  from the nerves to the muscles.  I pray it is a sign of healing.   The nerves in the  feet are required to sense the ground/horizon for balance.  I have learned a few techniques about keeping my balance and using my toes and my eyes.   Vision changes have improved again....vitamin deficiencies can lead to lost of eyesight.   Since increasing the injections of B-12 to twice a week, I have begun to feel pain in my feet.  Pain is a good thing---some times.  I get thru the grocery store or shopping by having my hands on the shopping cart.  It keeps me grounded while I scan the shelves and look thru racks.   Awkward but vital for me.

  So on days like today, the thoughts haunt me.  Will I ever get better?  How long will this go on?  I want to be independent again.  I want to freely walk in the yard, climb a hill, go to the Farmer's Market......just things to enjoy.   I make myself stop and pause to think again.

  Insight:  From the fortune cookie.......

  Yesterday I cooked breakfast, went to the grocery store, put groceries away, planned the week's meals,  did 2 loads of laundry, and folded clothes.  I cooked the ground chuck for Shepard's Pie, washed up some dishes, made a late lunch.  I had a short nap, answered emails, and sorted more fabric, etc.   Exactly what in the world am I complaining about?  I have improved because a year ago I could do maybe one or two things before I collapsed.  Am I where I want to be?  No, but my life is not a race, it is my adventure.  
                     
      My adventure is slower and less arduous than most.   I am more appreciative of the things I can do, of the people I meet, of the times I enjoy.  I can still challenge myself to try new things, to be the best me I can be.  I look forward to seeing the next year of my adventure.

Saturday, July 22, 2017

Where did all this come from?

  Fabric...more fabric!  I spent the day re-organizing my floral fabric stash.....it was spilling off the shelves and onto the floor.  It was time to get things back in order.   And it seemed like a good time to cut some large squares --8 1/2''--  for a future Scrappy Mountains quilt.  So as I sorted thru pieces, I also cut.
   I rolled longer pieces onto form core boards, folded pieces 1/2 yard or less, and small pieces got cut into strips.  After 5 hours I had conquered one and a half shelves.......2 more to do.    I am going to be this a while it seems.


   And then.......Sir Old Man brought in the mail.  Only one thing in the mail box and it contained-------fabric!
 I ran across the Quilted Twins on FB recently.  So naturally, I visited to see what they had to offer!  Beautiful floral fabrics were scattered all throughout their offering.   Yardage for about $4, and shorter pieces for even less.....just too good to pass by.


But wait there is more!  Fabrics I would describe as "vintage floral fabrics"  grabbed my sight.  I spied the navy calico type print, and that sealed the deal.  I recently use up the last of this piece for the last class.  It is a great dark fabric  for watercolor quilts, and there was a yard and a quarter for less than $4.

    So it is 5 am and I am brewing coffee and getting set to sort more fabrics......The heat is expected to be 100+ degrees.  Air quality is poor today, so we are advised to stay indoors if possible.  That won't be a problem.
I may not win, but boy, do I have fabric:)
Happy stitching.

Tuesday, July 18, 2017

An oldie

   Annette asked about the pattern  for the quilt on the bed from my last post.  Luckily I knew I had it ... in the folder I keep of patterns used for quilts that I have made.  Actually, it was where it should have been, only I had to hunt for the folder as it was moved in the re-organizing.    


  From McCall's Quilting in June 2005, the pattern is called Star Light.  The basic block is a large pinwheels and the sashing creates the stars.  I pieced this the summer of 2006 on my Featherweight as my domestic machine had died and not been replaced yet.  


  I made it larger ----and in 2 sections for easier quilting----as I wanted it wide enough to hang long and cover the sides of the bed.  I think it ended up about 90'' by 110''.    The original was in red and cream.    If you are a follower in dire need of the pattern, email me with a request.  I have a PDF.  
Happy stitching.


Using orphans and strings for a small project

    The quilts and wall hangings are stacked for the trunk show this week.   I keep a master list of quilts I use,  and add in a new one sometimes.    I have 30 here....so to show them all in an hour means quick viewing, and fast talking :)


  There were a few small quilts I went thru to replace one I gave  away ....... Lavender Scents left with my cousin on Friday.    Bonita loves purple, and  this one just jumped right into my hands for her.  We had a great visit and  lots of hugs.  I loved her daughter's comment that she could see why and how I get wrapped up and lost in the sewing room.
  And all were very impressed with Sir Old Man's furniture and skill!


The heat is still here....it is an
 oven outside.  Good time for some sewing and maybe time for a small project.

  So I thought I would look for that  small project to occupy myself this week.   I have stacks of string blocks in all sizes, so something to go with them maybe.
  I found some small appliqued blocks, some string pieced blocks, and a stack of leftover triangles.......I could turn these into a simplified cover for Hot Legs!  The fitted cover  I have is good, except for the Velcro closures that catch on the thread.  I need to remove the velcro at some point.....instead  for now,   I decided to make just a flat style throw/cover  for her.


  I pulled out the Simple Folded Corners ruler and tried to figure out how to use it.   I could not make any sense out of the directions.   Bonnie made it look so easy! Although the instructions are written in English and have some pictures and diagrams, it was absolute Greek to me!  So I did one corner the old fashion way-----draw line, sew, flip and trim.


   Then I pulled out the ruler stickers and marked the lines on the ruler  to line things up based on what I did.   I think that is referred to as the indirect method versus  a direct application.
   The pink markers are the points for cutting off the corners of the appliqued block for the triangle corners.  The blue points are where to position for squaring up/trimming the full block.
  The markers are a luxury.....for old eyes that have trouble with tiny lines and numbers even with glasses at this point.  Life is short, buy the gadgets!


   Just a random layout for now to decide how to run the strings, or do I mix it all up?  Time will tell as I advance further.  One thing for sure, I need to re-watch Quilt-cam for the details on using this ruler.   Actually, there is a video tutorial on Doug's website........ In this case, technology helps :)


   Happy stitching.

Friday, July 14, 2017

Odds and ends......

  Class/workshop went great on Monday......and I have been recuperating from all the energy used.   The gals did very good and seemed to catch on.   No photos....I am hoping they will send me photos of their projects when done.    So on to the next items on the monthly plans.....the trunk show and talk for the Loose Threads guild next week.  I have been pulling out the quilts and wall hangings to share.

  Sir Old Man picked up the new computer software program for Printmaster for me.  A little time spent with it and I managed to get a couple of labels made and set up my new cards.  I exported them as a PDF to a file for ease of use.  So that's something else off my list....yay!

  Yesterday I caught the monthly education video from Handi-Quilter.    I now have ideas on what to do with my assortment.....remember these?  I have a drawer full of lace linens too!

  It featured Kelly Cline, one of the educators.  But wow!  You might want to see what she does with vintage hankies, and linens.  Here is her website....Kelly.  I want to share her photo....but won't as I don't have permission.  So go look!

  So now I have a lot of ideas swirling around in my brain.  Once they settle down maybe I can come up with a plan.


Rail Fence...have made 3 quilts in this design...just different colored fabrics. It is so easy and yet so pretty.
  Rail Fence ideas......I set up a board on Pinterest for ideas.    This is the Leader/Ender pattern of the year from Bonnie Hunter.  No size, fabric, or pattern required to join in.  I ran across one that sparked me....so I may be doing another one, just smaller.
   And C&T liked Bonnie's idea for a year planner book and have put it in the works....cool!


Stitchin' Therapy


   Today is Cousins Day!  Not really a holiday but special to me.  A drop in visit from a couple of my cousins from Florida is planned.  They made a visit last year when I was in the rehab/therapy hospital unit and have stayed in close touch this year.  They want to view some quilts and see Sir Old Man's wood working projects, along with lunch of course.
  Since the worse heat of the season seems to have decided to stay on, I plan on hiding in the sewing room this weekend.  I have some small projects to take care of and a quilt for Habitat for Humanity that needs quilting......a good way to stay cool!   Enjoy your stitching time.

Sunday, July 9, 2017

On Summer's Wings


I got the small topper completed with borders that I shared earlier.  It was easily pinned and ready to quilt.  I originally thought I would use a basic meandering motif on this.


   Yesterday was a good day to spend at Hot Legs, just quilting away.  But....that's not meandering!  The buttery yellow that I used for the center squares just cried for something other than a meander.   So, the muscle memory took over and the plumify-- originally from LuAnn Kessi's blog--- motif emerged.  I really usually call this "butterfly wings".    It just seemed to fit.


  This motif is denser and a great all over design.  Here is a photo of part of the back that really shows how pretty it stitches up.


   Once all the quilting was finished it was time for binding.  I changed directions on that too.  I had plenty of the yellow and intended to use it for the binding.  But on a quick trip to the J store, Sir Old Man spotted this on the 50% off rack and thought I could use it to fussy cut the butterflies!  Ha!  I cut some up into 2'' squares for Monday's workshop and cut strips for binding, and rolled the rest up for later use.   This is a perfect busy print....lots of color, curved lines, light and dark areas.


 And it worked so well with the small topper.   It picked up the wonderful colors in the floral prints....purple, blues, greens, and then the yellow was a great match.   Just meant to finish off this small project.....and to give it a name.


    I named this, On Summer's Wings.
    Finished small topper is 30'' by 23''.  The pattern used is Crossroads from Connie at Freemotion by the River.     Now if the heat/humidity will hold off, we can enjoy a lunch on the patio and enjoy using the table topper!
 
Tomorrow is the workshop  on watercolor.  Got the bags packed and stuff ready to go.   My chore for today is to order a new/current/usable greeting card program for making my quilt labels.
   Windows in their infinite wisdom did a major update and now my program that I used for making my labels will not open. Grrrrrr!!!!   They deemed it ancient I think and removed whatever linking file that was needed for it to function.  My computer expert tried and tried, but to no avail.   I can not open any of the saved files.....next time I will export the saved labels in PDFs so I can have them as reference.  Technology is great, wonderful time saver and on and on.....  It is the fast forward pace that creates havoc in me.  Just when I get it figured out, the big programmer demons in the silicon valley world want to make things better, bigger, smaller, faster, harder, complicated.....   So once I get a new program, it will take a while to learn its workings.  So, labels will have to wait.
 I will stitch instead.  
Happy stitching.

Wednesday, July 5, 2017

Rail fences for leader and enders!

    I saw that Bonnie Hunter announced her Leader and Ender project of the year today.    No surprise.....she gave huge hints on the last quiltcam that I caught.    She offered up tips, hints, and suggestions for sizes.  
   Guess I was way ahead of her as my floral rail fence is on a hanger waiting for a border and or quilting :)  

   Anyway, I may have to hunt up another variation......I do love Rail Fence quilts.   They are easy stitching, use scraps,  and no sashing needed.


   This one  used a block variation....I called it a 2+4 patch rail fence.    I worked out the block for it using 2" squares and strips for a 6 1/2'' block.

    Today is get B-12 shot day and I need to get  the table topper pinned.   And there is a donation quilt for guild that needs to be quilted.  Well, at least make a start on it.  
  Happy stitching.

Monday, July 3, 2017

July already

  June ended with a couple of finishes, and now they are washed and fluffed.   The classic 9 patch, Timeless, already looks loved and worn.   The 9 patch quilt in contrast with the small wall hanging reveals the variation in neutrals used in the string blocks.


  The raw edge appliques washed up nice on this one.  They fluffed and frayed nicely, which is what this technique is all about.   Lots of dimension  begs to be touched.  The meandering quilting produces a soft crinkly looking background for the forgotten blooms.


For July.....I decided we needed a small table topper to use when we have lunch or snacks on the back patio.  Sir Old Man usually pulls out one of the small folding tables  to use.    Its rectangular  about 20'' by 30'' and all my small  toppers are just that....too small.   I ran across the Crossroads pattern from Connie at Freemotion by the River and tried a few blocks to see if it worked.    Here is her tutorial for a table runner.  

  I used the 9'' block and then added  an inner strip border.  Still not big enough, so I am adding a couple of rounds of florals for the outer border.


  July plans

  • Finish up the small topper--Crossroads in florals
  • Pin and quilt the Rail Fence top 
  • Prepare for the second  water color workshop for the Busy Bee Guild
  • Prepare for the Trunk Show and talk for the Loose Threads Guild in Clinton

 Once again....I am keeping the plans on the light side for this month.  I know the workshop and trunk show will take a lot of strength and I will need recovery time.


    One more thing to share.  I had an email from Nicki, who was my right hand and devoted organizer for the Mrs. Claus project.  She sent me a photo of her recent block made for The Covered in Love project.

This is her Hunter's Star block (gorgeous!) with added flange in red!  Outstanding block!  I think she did a beautiful job---look at those points----and I love the accent flange.   It's a perfect July block.  And before I get those questions......Nicki sent me the link for the Tutorial  by Roolen.     She added the flange and border to achieve a 12'' block.

   I get very inspired and motivated when I see others take on a new technique, venture outside their box, and see things in a new light.  And I love it that they will share those things with others.  Thanks, Nicki, for sharing this and for all those you help!
Happy stitching.
Related Posts Plugin for WordPress, Blogger...