Friday, December 31, 2010

Joining the rows...some hints

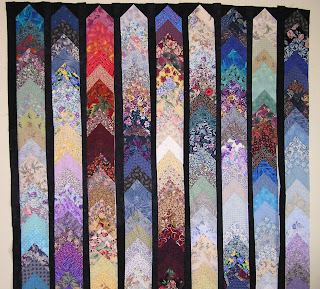
I am joining the rows of the braid and I realized there are a few hints I need to share for those who plan or want to make a braid or french braid quilt.  Here are a few hints....almost rules (heaven forbid!) that  I follow in joining the rows. 
  Take the time to pin....again, take the time to pin.  Save yourself the frustration of using that seam ripper.  Ask me how I know.   I pin about 6 to 8 inches at the top and then move to the bottom of the braid strip and pin about 6 to 8 inches.   Then before I pin any more, I flip open the pinned area and view it from the front.  See the arrows  and the white note card in the top photo---I check to make sure seams are matching  at these points.  They may be off a fraction or so, but you don't want them to be staggered across the quilt top.    (Aren't the arrows cool?  Got them by editing in picnik from Picasa.) 
  OK, got off track.....If the seams are matching,  then I go back and finish pinning the entire length of the strip.  If the braid has stretched---probably there will be some---you need to ease in the fullness to fit to the sashing.   If the seams are off, then you need to shift either up or down  to get them lined up.  
   So how do you ease in fullness?      Remember you have a bias edge that you are joining to a cross width straight cut.  Be sure the straight cut piece--in this case the black-- is on the bottom and the bias edge is on the top.   We know the bias edge will stretch, but so can the straight across the width cut!  It doesn't stretch as much.  If you come to an area of fullness in the bias edge, do not pull on it, but rather use a taut sewing technique for the sashing strip.  Use your right hand to slightly pull the sashing so it is taut--rather than limp--as you sew in the fullness of the bias.  Do this carefully so there are no puckers. 
   Press.  Press the seam from the back....use an up and down motion, instead of pushing the iron.  Then turn it over to the front and press again and check for tuck or puckers.  Don't ignore the pressing. 
   I have 7 rows joined...so far so good.  Two more and then on to the borders at the top and bottom.  More black fabric arrived and needs to be washed before I can finish this one. 

I don't do new years resolutions....I know I won't keep them.  I prefer to reflect on what I've learned and done.  And along the way, I pray I touched someone, and given them inspiration. 
  It's not the breaths you take, but the moments that take your breath away. 

Happy New Year and happy stitching,

Thursday, December 30, 2010

Returning to the blended braid

Let's see....this one has been on the design wall for a while.  For a quick catch up click here for braid posts.  I was working through the process of construction of this quilt in November, so I guess it is time for an update.   I added 4 more braid runs---so I now have 9 blended braids.  I made sure to add more light fabrics in these. 
  The next step is to trim the sides and get rid of the saw toothed edges. 
You have to be brave doing this.....and careful because of the bias.  I used a long ruler and lined up the 2 3/4" mark to pass through the apex (peak) in the center of the braid.  Then trim the right hand side about 12-18" at a time.  Shift the fabric  and re-align the ruler and trim --continue to the end.  Then flip the braid around and trim the left hand side the same way.  The photo shows what you end up with.  I do a trim at the bottom also to square things up.  Because the braid stretches, I know  I may have to lop off some of the bottom at the final stage.  That is just the nature of the beast, as far as I am concerned! 
  Next I need to add the corners to the top of the braid.  From black I cut a strip that is 3 1/2" wide and then sub-cut into 3 1/2" squares.  I need 9 of these--one for each braid.  Each square is cut on the diagonal.  Then add one triangle to one end of the braid, press and add the other triangle to the other side.  In the photo you can see the finished top edge of the braid runs.  Press and square up the top edge. 
  Then prep the sashing strips.  I am using black between everything.  I cut 2" strips for this and join them for the length I need.  My braid run---on average---is 62".  That is the length I cut the black strips.  Also I am using several different blacks because I didn't have enough of just one.  I just mix them up and piece them together for the lengths. 
   Add  a black sashing strip to one side of each braid run.  Press carefully after sewing to avoid stretching the other side.  Here's a peek at what I have so far on the design wall. The runs are not joined at this point.  I need to play with the layout and get the colors spread out a bit better. 
  I think I am liking this one a lot!  Not a watercolor, more of a colorwash....still it is what I love.  From a distance it seems to shimmer. 
Stay tuned for a border idea, too.
Happy stitching in the New Year!


Added note:  Size...I never remember to mention the size of things.  Cheryl asked  about that.  Right now this quilt is about 62 inches long and 56 inches wide before any borders or finishing is done.  It is really larger than I intended and will probably end up a small bed size. 


Wednesday, December 29, 2010

The word for 2010 is Inspiration!

Wow, 2010 is almost gone.  Exactly where did the year go?  I have been looking back over my posts from this past year, kind of just reliving the high points, and especially noting my "insights".  They really give me a focus on things that happened. 
   I think the word for 2010 is Inspiration.    I jumped into the world of art quilts and completed the Art Quilt Workbook---which I loved!  I realized how important inspiration is, that it comes when you least expect it, and it gives me the power boost I need to finish a project.  I am inspired by people I love, places I visit, songs I hear, by just about anything around me really.  I now keep a note book of inspiration ideas  and a file for photos. 
  Alaska was the biggest inspiration this year.  A wonderful trip that was filled with memories and inspired the moose quilt.  It hangs in a special spot where I can view it every day.  I love the colors and all the techniques I tried--even the applique.  I also learned to have a plan B----because I ran out of fabric and was unable to do the original layout.  The solution was to use a blended braid for the border.  
   Drawing all the patterns for the moose quilt gave me a lot of confidence to venture out of my comfort zone.  I created my own patterns for the five thread painted motifs I used on the watercolor backgrounds.....Evening Serenade, Renewal, Persistence, Remembrance, and Hope.

And then I tried landscapes....Accidental Landscapes was the book that hooked me.
So far I've only tried small ones....but I think I will expand and maybe try a larger one this next year. 
What else to remember from 2010?    I've lost count of the quilts/wall hangings I made and gave to others and charities.  I lost a very dear friend, began teaching Emily to sew, taught classes and taken classes and---one of the best  things--- got to visit with Pat and remember our "youth".  And lots of time with Remy, a huge blessing in our lives.  And new friends in blogland...thanks for everyone's encouragement and comments....I really appreciate them.   
  Well, I am full of smiles right now.  I think I will tackle pinning the bow tie top, and make a few plans for 2011.   

Sunday, December 26, 2010

A snowy Christmas evening and Hope


The snow began late in the afternoon, and the family decided to head out early to get home before the heavy fall began.  So after everything was cleaned up, I got some stitching time in.  I was able to finish up my latest wall hanging, Hope, with the thread painted cardinal.   Again it's a
 watercolor.....what else would you expect?  This scene reminds me of the view from my sewing room, too.
  The  process for the border quilting:
I used the border area to practice free motion quilting in the "mctavishing style".   Wendy at Ivory Spring  has a great tutorial on her domesticated  mctavishing that I tried to follow. Follow the link and check out her blog.  She does wonderful quilting and designing too.   My "s" shape is a bit different than hers,  like a signature she explains.  The s shape is stacked and then repeated and filled in to create wonderful texture.  I used Isacord thread for the machine quilting.  Here are a couple of photos to show it close up. 


The watercolor center of this was quilted with a large meandering stitch.
  New year approaching, and that means new projects......first on the list is a quilt for Justin, who will be graduating from Clemson in May.  He brought me a photo of a quilt he wants.  It is just large squares--which will give me lots of room to use different quilting patterns---with a pointed triangle edge.  I am still working out the edge....I think I will have to face it rather than binding it.   More on that later.  Happy stitching.

Sunday, December 19, 2010

Christmas wishes

Merry Christmas.....from The Furkins....my daughter's 3 dogs!
That is Nick--I call him St. Nick--in the Santa hat.  They are quite a trio.
This poinsettia must have 60 blooms on it.  It is just beautiful and full. 
No sewing this weekend, just getting my second wind for this week.  Lots of cooking and baking to do.....so best wishes and blessings to all . 
Merry Christmas.


Thursday, December 16, 2010

Cork Trivet


I have been saving wine corks for  a while because   I love the different designs and graphics on them.  I begged for a trivet to be made using the saved corks, and finally it is done.   Russ  got to use his "gadgets"---power tools, etc.---to create this.  He recessed the wood base and made the molding to go around the corks.  I love it!


No stitching this week, as I have been watching Remy, and he wears me out.  But he is such a joy, and  I need to enjoy him while I can. 

So....happy stitching later!

Monday, December 13, 2010

A box of goodies!

The postman brought a box of goodies from Doreen.  She browses yard sales and discount stores all the time.  You never know what she will find.  A movie, a wine book and recipes, a garden apron and t-shirt, ear rings, and a notepad decorated with birds, and a knitting book and pins for Deana!  A great friend and great gifts.....after 40 years, she still "one ups" me! 


I got the cardinal attached to the watercolor and the border added......but something is not quite right.
I did not add an inset piece before the border because I planned to have the pine boughs fall into the border.  And that bothers me.  So after looking at him for a day or so, I thought I would try some braided cording that I have had for a long time.
I just pinned up some of it to get an idea about how it will look.  The cording is a purplish-brown that is almost the color of the pine branch.  I think I can twist together 2 or 3 strands of it together and zigzag stitch it around the center.....very loose, almost like a twisted vine.  That should create the frame effect I like.  

"Baby, it's cold outside", so I am doing some baking to warm the house!  We had a bit of sleet last night and only a high of 30 today.  Not the kind of temps we like around here.  Must be hot chocolate time....happy stitching.

Thursday, December 9, 2010

Thread painting in the works

I gave a hint that I was working on a cardinal....OK, more than a hint.  I did the sketch a few months ago, and I have been waiting to get it thread painted.  It finally is coming together. 
A Christmas card from my uncle came in the mail  a few  days ago, and it featured a cardinal  sitting on a pine bough.  Perfect inspiration!  So I added some pine needle clusters. 
I  used  2 layers of solvy sandwiched between a layer a tulle for my foundation/base.  I used  3 shades  of red for the body, and a coral for the highlights, and a deep wine color for the shading on the wings.  The stitch is a narrow zig-zag stitch.  The cardinal took about 2 hours to do.
Next step is to cut out the thread painting close to the stitching, rinse out the solvy and let it all dry.


This is what I have in mind to do.  The branch end will  be in the seam when the border is added to the watercolor piece, and the extra pine needle clusters will extent out into the border.  Or that is the plan right now.  Once I get the border added, I will figure out the final placement. 


Tuesday, December 7, 2010

Favorite things

The tree is up and the lights are on.  Last Christmas I shared my love of cardinals and why I use them somewhere on the quilts I do.  Here are a few of my favorites.


We didn't put up the tree last year since we were out of town, so it was wonderful to rediscover these very special ornaments.  Carefully I unwrapped each one, and the special memory associated with each ornament, and then placed them on the tree.  A very special time.

   
Not a lot of stitching this week, as I got hit with the stomach virus Sunday night.  But these ornaments should give you a hint at what I was working on......


Saturday, December 4, 2010

Just in time for the season

A little seasonal landscape....Starry Night, just in time.
I played around with the border idea on this one, by crazy patching the leftovers onto a foundation.  It was too overwhelming to use on all sides, so I split it and tried to place it so the scene extended into the border.  


 I ran across this seasonal "art" and had to grab it to share....
I do love hot chocolate!
Happy stitching.


Wednesday, December 1, 2010

What's a nap mat?

I had never heard of a nap mat, but apparently Remy is in need of one at his pre-school.  So at Jen's request, I spent the day putting one together for him.   I had a couple of yards of the motorcycle fabric and some gold/tan fleece, and pieces of a thick polyester batting....all the ingredients for a nap mat. 
  I personalized the fold over blanket with his name by free hand cutting fused fabric and top stitching it down.  So at nap time there won't be any doubt who this one belongs to.

And when it's time to go home.......


It just rolls up like a duffel with a carrying strap!
With poly batting it is very puffy---but a bear to stitch on.  That poly stuff is not fun to work with....give me cotton any day.  I made this one 20 inches wide and 50 inches long, and the over blanket is 36 inches square.
 I think I need a new blade in the rotary cutter and a new needle.  Come to think of it, I could use a nap myself.
Happy stitching,
Related Posts Plugin for WordPress, Blogger...