The next step is to trim the sides and get rid of the saw toothed edges.
You have to be brave doing this.....and careful because of the bias. I used a long ruler and lined up the 2 3/4" mark to pass through the apex (peak) in the center of the braid. Then trim the right hand side about 12-18" at a time. Shift the fabric and re-align the ruler and trim --continue to the end. Then flip the braid around and trim the left hand side the same way. The photo shows what you end up with. I do a trim at the bottom also to square things up. Because the braid stretches, I know I may have to lop off some of the bottom at the final stage. That is just the nature of the beast, as far as I am concerned!
Next I need to add the corners to the top of the braid. From black I cut a strip that is 3 1/2" wide and then sub-cut into 3 1/2" squares. I need 9 of these--one for each braid. Each square is cut on the diagonal. Then add one triangle to one end of the braid, press and add the other triangle to the other side. In the photo you can see the finished top edge of the braid runs. Press and square up the top edge.
Then prep the sashing strips. I am using black between everything. I cut 2" strips for this and join them for the length I need. My braid run---on average---is 62". That is the length I cut the black strips. Also I am using several different blacks because I didn't have enough of just one. I just mix them up and piece them together for the lengths.
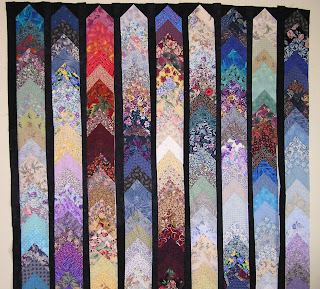
Add a black sashing strip to one side of each braid run. Press carefully after sewing to avoid stretching the other side. Here's a peek at what I have so far on the design wall. The runs are not joined at this point. I need to play with the layout and get the colors spread out a bit better.
I think I am liking this one a lot! Not a watercolor, more of a colorwash....still it is what I love. From a distance it seems to shimmer.
Stay tuned for a border idea, too.
Happy stitching in the New Year!
Added note: Size...I never remember to mention the size of things. Cheryl asked about that. Right now this quilt is about 62 inches long and 56 inches wide before any borders or finishing is done. It is really larger than I intended and will probably end up a small bed size.


1 comment:
As always you do beautiful work , I love how this is turning out! I also like the idea you did about the different shades of black.I can't wait to see it finished and I am wondering what the size of it might be?
Post a Comment