Friday, January 23, 2015

Friday Finds

   From this week's pins. Please visit these blogs to see the complete post and details.  I am sure they would love some company!

IMG_2011
From Chasing Cottons
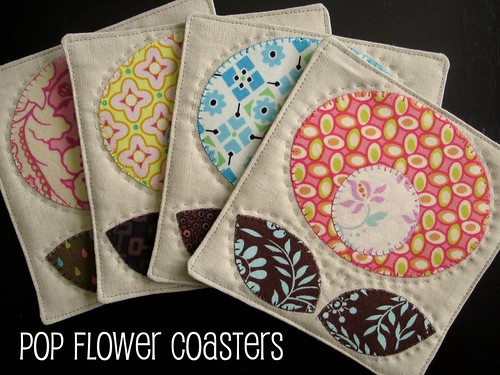
 Pop Flower Coasters......a little smaller version of a mug rug..... I found this at Chasing Cottons blog.  She has a good tutorial for construction and the pattern pieces are there too.   I love the op-art style flowers---they remind me of the 60's style art.  Wouldn't they be cute for a border, on a tote bag, or even for a table runner?


must try this technique: A Guide to Board Basting | RIght Sides Together
From Right Sides Together blog

  I have not tried this yet...but I am thinking I need to find some long boards.  I may need to "shop" for them in the workshop.

Board Basting from Right Sides Together
   This technique allows you to pin baste/spray baste / thread baste your quilt top while comfortably sitting at the kitchen table by using long boards for rolling your quilt.   There is a detailed tutorial on this technique, as well as the original by Sharon Schamber.  I thought this handy guide that she provided was worth a mention.


Quilt labels


  Labels----printable and a tutorial.  I use computer printed labels for my quilts with graphics from a greeting card program.  So when I spotted this freebie, I thought it would be a good idea to share them.   There is a good tutorial on printing them.  You can  edit the pdf  with your personal info for printing, or just print and write on them with a pen.

  If you find a really great "pin", send it to me.  Thanks, and happy stitching.
Tuesday, January 20, 2015

Try a doodle

  I had a little craft project in mind when Sir Old Man said he was hitting the Big Box store.  I asked him to bring me home a few---a handful--- of the paint chip/sample cards.  I had already visited one of the local paint stores and was surprised to end up with not the usual sample cards.  When did the paint companies change to these things?    Wavy edges, cut out holes, short and squat......I will  just have to trim them up.   I really need to get to more places than just fabric stores, don't I!


Here's what I had in mind.....idea stolen from Pinterest....to make some bookmarks.  The ones I saw were done with stamps....but I never got into the paper crafting or scrap booking.  So I resorted to the basic doodling.  I pulled out all my markers and pens to try.  The results....
   Pigma pens do not dry and smear.
Sharpie pens are the same....smear.

  The best was the cheapest $ store variety.  A metallic gel pen that I dug out of the Christmas gift tag box!  And of course the real Sharpie marker with the ultra fine tip worked perfectly.
I spent a pleasant time just doodling and drawing dots and swirls, and a few feathers.   It's a nice way to practice those doodles for free motion quilting, too.


 Once everything was dry, I trimmed the sample cards to 2" wide with a rotary cutter----the oldest one I have that is set aside for cutting/trimming any paper product.

  I used a regular hole punch, then I dug into my bag of saved ribbon and cordings....for the final touch.  A few book marks with that personal statement.  A cute creative expression of what I do!
Now I am set for marking articles and projects for this year's Let's Book It!....or marking recipes, or reading a book, or sharing with a friend.   Take some time and try a doodle.  Then happy stitching.

Monday, January 19, 2015

Joining rows for English Garden


  Joining the rows for the English Garden quilt is a little unnerving for me.   First, almost every row in this quilt is different!  The staggered drop is the villain that causes this to happen.
Second, in the quilt world,  those perfectly matched seams are so prized, and expected of someone with experience.  Ha!  In this quilt layout, I find only a few spots to match a seam with long stretches of nothingness to guide and reassure me.


   I have 3 vertical rows joined here.  Two wide ones and one narrow one on the left side.   I have a few more vertical rows sewn that are just pinned to the wall, too.  The first 2 rows were a breeze.....then the third one came along.
  The top row of the first block in the third row--confused yet?----needs to align with bottom row of the first block in the first row.  Giggle/grin/sigh.....I know, that is exactly how I felt.


  This close up should help you see why I was a bit unnerved.  I got to the third row and found little to match.  The staggered blocks are a blessing---ease of sewing---and a curse---nothing to register with.
   So out came the pins....those long, pointy things with knobs on the top  that leave pricks along the way.  I pinned the places that need to align....and hoped for the best.

  Actually, the rows are going together well....just a bit slower sewing than normal.  Since each one is different, I am slowing down in an attempt to avoid mistakes  in joining pieces.  I sure would hate to have to return to the store and buy more fabric!
  One other little trick I used while piecing the vertical rows for this one.....I used a sticky note on the layout photo in the book to mark which row I was piecing.  Example......when I finished up the third row, I moved the piece on to the fourth row----lining up the edge of the  sticky note with the row in the book.  It helped keep the confusion down.

  I also got one donation quilt pinned.
  This is a guild quilt for Habitat for Humanity that I was volunteered to quilt.  LOL.....wait till I show the backing...it's a doozy.   I am pinning a table topper/runner right now too.  I am just stacking them up for Hot Legs.
Happy stitching.

Saturday, January 17, 2015

Bolts!

  My plan was to just pick up some interfacing and white muslin.  When I returned home I sent Sir Old Man a text that I knew I was in trouble because I bought bolts!  He knew what I meant and replied that was OK, I was just playing catch up!  I am so blessed that he is understanding about my fabric habit.  And I get those coupons that I just hate to waste......


   While I did purchase a bolt of muslin, I also picked up a bolt of light weight interfacing.  It seems that Pellon is no longer producing the 2" gridded interfacing that I extol and use.  Yikes!  I searched the internet sources and found 2 other products at $6/yard!  Yikes, yikes!!   The fabric in the photo purchased with coupons was less than that a yard.   Instead I purchased the plain light weight fusible interfacing--99 cents/yard/ 49 cents with coupon!--- that I will use by simply marking some grid lines myself.
   I updated the Watercolor Tutorial page with the information and suggest using the 1" gold line gridded product instead.....if you don't want to fuss with marking a few lines to use as a guide/reference point.
  Back to the bolts.....this is from an old post and explains my mini-bolt system.

Tip for storing fabric:
  My large collection of floral fabrics are usually folded and stored in bins on  shelves in my stash closet.  Mainly those fabric cuts are small and less than a yard.  But what about the larger yardage cuts for borders and backings especially?   
Mini-bolts!

  About 4 years ago, I began using the mini-bolts for storage.  When I first  began this, I was using a thin plastic insert.  Later I switched  to using  foam core board.  The foam core  can be purchased at the Dollar Store in the 2 foot by 3 foot size usually.  I cut the size-- that works best for me-- 11" to 12" high by 8" wide.    It's easy to cut with a craft knife.  I often end up with smaller sections of the boards and they work great for shorter cuts--- those under a yard. 

  Today, I am even more frugal.....I use old  yard campaign signs or yard signs of any kind that I find....like house for sale, or other advertising.  They get knocked down or the wires rust out.  I collect them, wash them up, and cut  to the size I like.    I'm saving the land fill (if they would ever make it there) and keeping my dollars for fabric and thread.  


 Fabric is folded just like it comes off the bolt.  Then one more fold---bringing the folded side over to match the selvedge edge.  Roll it up and pin the end.  
     The mini-bolts make it easy to see what I have to work with.  I am  known to be pretty messy and scattered, so this really helps me neater.   And what fun to shop your own fabric store in your stash closet.


Happy stitching!

Friday, January 16, 2015

Friday---free finds!

   I usually just "pin" to Pinterest the things I see or run across online----especially the free tutorials or patterns.  I realize not everyone follows Pinterest or checks to see if I found something good.   So in the spirit of share it all, I will try to remember to post some free finds on Fridays this year.
 
Sew Perfect from All People Quilt
It's call SewPerfect and is from All People Quilt.....a small gift or personal project.  And the pattern is available for download as a free PDF. I like the folio style and the side slide in pocket, as well as the pocket slots for accessories that we all use.  While I am not a hand stitcher any longer, there are times I need to grab a few tools for marking diagonals, or applique pieces.  This is great for that, too.
I may make a couple of adjustments to fit my small mat and ruler....and eliminate the ties.  I would use a loop and button if I need a closure.  Grab the pattern for future use!


From Moda Bakeshop

  I thought this was too cute!  A play mat for baby done in cathedral window pattern.  There's a really good free tutorial there on this circle technique.
  You can finish this up by machine instead of hand stitching.   I  have also seen this done with old jeans and scraps....and leave the edges raw even.  That would be perfect for a college student to lug around.


    Check out the new site for Quiltshopgal---formerly SewCalGal.    Creative Goodness is a linky party every Friday.....with the intent to share and inspire.  Old and new posts can be shared, and some weeks there are themes.   Hop on over and give Darlene some company!


 Have fun with these.....happy stitching.

Wednesday, January 14, 2015

Small gifts

  When we went for haircuts last week, the first thing Michelle said to me was that her husband stole her mug rug!  I had to giggle....a husband who purloins mug rugs!  Like me, she has a tile counter top in the kitchen, and it quickly chills your morning coffee.  So it seems the husband figured that out and snitched the small gift.  So I made a couple more rugs to share.....they should cool his jets or sticky fingers.


  And what did I get in the mail this week?  Treasures!
I was so excited when I open a small package from Janet at Rogue Quilter.   She is not only a wonderful quilter of quilts and minis, but she makes soap in her spare time!  The herbal soap smells just divine.....and so pretty.  Maybe luscious is a better word to describe them.   And the little ornament is a very special treasure.  Janet used scraps of her mother's floral fabrics----she did water colors too!----to make this tiny basket block.  I just marvel at the tiny pieces because tiny is not my forte at all.  Thank you, Janet, and I am so glad you kept the bunny!!  I need to add that  I got this little package for having been the first to find the duplicate fabric in one of her minis.  She can be sneaky that way...unannounced giveways and such. 

Tuesday, January 13, 2015

Beginning English Garden quilt --the layout

   Last year Deb at a simple life quilts and I discussed doing a Year of Floral quilts.  Life intervened and we never got to the planning stage.  I am starting my year off with a floral quilt, and have plans for a couple more that I will share with  my variations.

 In my last post I showed the block I was using for the English Garden quilt.  It is a variation of a log cabin.....and you need to pay attention to the assembly and add logs to the proper side.  Ask me how I know.....I had a few that had the light and dark small square switched and they had to be ripped.


   So I teased you with the layout description.   Here's the photo from the book of the layout.    Note: the original pattern was made with 1 1/2" strips....I am using 2".
   The layout for the English garden quilt is a little different than most quilts. The rows need to be assembled vertically since the blocks are staggered.   I had to study the diagram to see that each row lines up differently than the previous one.

   Here's the book photo of the quilt....can you see the twisted ribbon effect?  Again this would be a great two color pattern, or done in batiks.


 After making the blocks, I was overly anxious to see what a few blocks would look like.  So a layout test came next with just a few blocks and a couple of strips that will be part of the vertical sash.    This photo also gives you a chance to see the fabrics I am using.
  I also made an adjustment  to my fabric selection for the background....I'll share that when I get it cut......which is my next step for today.
   There's a forecast for freezing rain tonight....and also in the morning.  I may miss the Bible study group if the forecast is correct----you can't get down our hill or across the bridge safely with that slick stuff around.  Bad weather = more sewing time.
   Before I hit the rotary cutter, I want to say thanks for the support for my change in focus.  I had so many extra emails about it that I was quite surprised.  Many expressed the need for blogs with details and instructions rather than just photos of finishes, which are so great to me for inspiration.  These are young and older quilters that don't have access to a local shop or instructor.  Some are just plugging along, lost in trying to figure things out for themselves.   So sharing the wealth of knowledge and experience in our heads and hands  might be just what they need.   Renew your process pledge and pay it forward!  Happy stitching.   
Related Posts Plugin for WordPress, Blogger...