Wednesday, October 21, 2015

Testing a design pattern

   It's no secret that I prefer simple patterns that allow the fabric to do the heavy work.  When I am bored or need some mindless sewing, I pull together a rail fence quilt or even a simple 4 patch. This time I thought I would begin one I have not done.....ever.   I started collecting ideas and tutorials for an orange peel quilt......often called a pumpkin seed quilt.   And there are a lot of them out there.  Big, small, and in-between.....pick your size.


I decided to do a test version and be sure I liked the size and the technique I chose.
  Size....this block is made of 4 units each 4" square.  The appliqued orange peel is just under 2" wide.

  Technique......I did not want to do Heat and Bond fusible on this one because of the stiffness of the fusible.  So I tried the applique method using fusible interfacing.  More on that later.


  What I determined:   While I like the technique---I have used it before---I did not like it for this size of applique.    This size of orange peel is a little tedious to work with for me and my stiff fingers.  So for a quilt of many pieces, I was going to try it a little bigger one.

The stitching was also tested.  I picked the buttonhole stitch on my Janome and played with the width and length of the stitch to find one that took a large enough bite of the applique without being too big.  I shortened the length some also so it was easy to work around the ends.


I went searching for a larger pattern for the orange peel.....and chose the middle one from   Sewcanshe.     Nice and fat ones....easier on my fingers, too.  The block size only went up 1/2'' to 4 1/2''.     I have been cutting fabric over a few days to get a jump on these.


There is also a good tutorial on using the  fusible interfacing technique there.  Mine in a condensed version......draw pattern for stitching onto the interfacing smooth side.
Place "bumpy" side of interfacing face down onto the right side of fabric.  Stitch.
Slit the interfacing enough on the back to turn right side out.    Finger press and work out the tips before pressing onto the background fabric.  Fuse to fabric and sew.

I only need to make about 160 of these....lol.  Since I have at least that many floral fabrics in my stash, it won't be a problem.  Then I can have a design wall party and see what happens then!
Happy stitching.

Tuesday, October 20, 2015

It was a knot

  When I was quilting the Plume Crazy quilt last week, I hit a section where the quilting went haywire.  But it seemed to improve with cleaning and de-fuzzing everything.  So yesterday, I went to finish up a small project----my test sample of the plumes.  I turned it into a table mat.


  I began to outline the plumes and move on to some McTavishing style texture.   Almost immediately, I hit an area and the stitches went bad again.  I thought it was because I hit a seam or such.  Anyway, I cleaned the bobbin and went to rethread the top.  I made sure to "floss" the thread in the tension disk---that is the term for making sure the thread is seated between the tension disks on top.

  I needed more thread length to reach the needle and used my thumb and forefinger to open the tension disk to pull the thread through.  And out popped a knot of thread!  It was not huge.  It was a small knot of thread with about 1/4'' tail.  Now where did that come from?  I should have grabbed the camera, but I was so surprised to find that extra bit in the tension disk!  That bit of knotted thread caused those poor stitches last week.

  So lesson learned....blow out the upper tension disk on those sit down machines for free motion quilting.   I use Aurifil thread, and never thought to find a pesky knot included!


By the way, my friend loved the quilt, and almost started some teary stuff.  I threatened to take the quilt back if she did!  So extra hugs all around and we were both smiling.


  The design wall is clear....time to move on.   Here's the next test block....I will share my tests, and changes next time.

Happy stitching.


Friday, October 16, 2015

Plume crazy!

A simple setting of scrap pieces got a little dressing with a lot of plume shapes and turned in to Plume Crazy!  

A few weeks ago I shared the progress on this leader/ender project as it became a Let's Book It project.....here.     I knew this needed a border but was quite undecided as to what to do.  So I added a darker frame to anchor the center and ended with a very wide off white border.  It was almost boring at this point.


That is when I added a few plumes to the border and  asked "Is this working"  in this post.    

I received  many comments and ideas, which were greatly appreciated.  Just having another/many sets of eyes on the design pulled it together.


  For the quilting, I used a large meander thru the center....on Dana's  of Stormy Days  suggestion.    The plumes were outlined and some stacked teardrops added to the border before I got to some feathers.


Binding.....I followed the instructions and tutorial from Missouri Star to make a scrappy flange/faux piped binding.    It worked great....I only had a problem in one corner.  It just gave me fits for some reason, but I finally made it behave properly.  The flange is very narrow, but just enough to stitch down on the front of the quilt and give a piped look to the edge.


  The plume shapes.....each one was fused, and stitched down with a zig-zag stitch.  Over 100 of these things....I was plume crazy for sure.  But I love the whimsical effect that they made along the border.

  They may have made me crazy, but I have a feeling I will use this idea again!


And I am glad I got good input from Jasmine at Quilt Kisses and Janet  at Rogue Quilter about the layout.  Thanks!  The asymmetrical  layout was just what I wanted.  Placing plume vines in the opposite corners was much better than all the way around.  That would have been too much.


  Note the "new bench".....Sir Old Man worked his magic on a broken down and worn out park bench that was in pieces. New paint for the ends and supports brought it back to life.  He used cypress for the seat slats with an oil stain.  Each slat had to be "shaved and shaped" for its position.  A beautiful work of restoration, wouldn't you say?


  Plume Crazy just needs a quick wash and fluff before being given to a friend who is facing surgery.  She made sure we were fed when I broke my shoulder, and I want her wrapped in comfort  for the next few months.

   I felt the deadline to get this one finished, but I am almost sorry to see it end.  The creative design  process was motivating and gave me a boost.  Taking the basic pattern and adding elements I love was very satisfying.  It lifted me up even if I went a little crazy with those plumes.  Taking a chance made all the difference in this one for me.

Time for some slicing and dicing....cutting up fabric that is.  A new project or two taking shape because there are more people to cover.  Happy stitching.


Tuesday, October 13, 2015

Been quilting

    I spent a lot of time with Hot Legs over the weekend.  Quilting away on some plumes and border.  I have thread tails to hide.   I am using the "looper" method for this.....see the video on youtube here.   


   I did have one bad episode with tension.....luckily I was paying attention to the sound of the machine and stopped with only about 6 '' of loopy/messy  threads on the back to rip out.   As it happens, I had watched a webinar a few days before on the T word....Tension....from Handi-Quilter.  It is archived here, also on youtube.   It was a good refresher and glad I had seen it.  The problem was the top thread, which had jumped out of the tension disk.  And easy fix, and something that will happen at some point when you do free motion quilting.


  Now I am on to the binding.  I  am attempting to do the flange binding with this pile of scraps.  Crossing my fingers that I got the directions right and that this one will work.

But first thing today is to make lasagna....the freezer is empty.  Then I probably need to spend a couple days of cutting strips and squares for things I am planning.

  And just wondering if anyone has a GO Baby, etc. they want to sell......I am contemplating getting one.   That's what I get for thinking/saying never!  And of course, I don't have room for it.  But that doesn't usually stop us, does it?
Happy stitching.

Friday, October 9, 2015

Friday Finds


  Before I share some finds, here is a peek at where I am with the plumes.   I need to add and fill in a bit on the bottom corner.  The bottom side needs some darker ones added and I think it needs just a little more height.  The upper corner is just about right.  Thanks to everyone for your comments and suggestions......each one helped my direction on this.  I will be quite busy stitching these down, as I got a little plume crazy.  I have a friend who is facing a major health crisis and I think she will need some comfort.


For your weekend fun, here are a few finds.


Another label idea was shared with me from Sylvia..  This is from Sewcanshe blog.  A folded corner label  plus an additional corner label with extra info equals a quick way to hang up with a dowel.  This is especially great for wall hangings.


VROOMANS QUILTS: House Block Tutorial:

  I have been waiting for this tutorial!  From Vrooman's Quilts, Sharon shares her house block in tutorial form.   She has made them in all colorways, and each one is so cute.  A couple of these and those trees from last week would be a great banner.


ban_june_20A

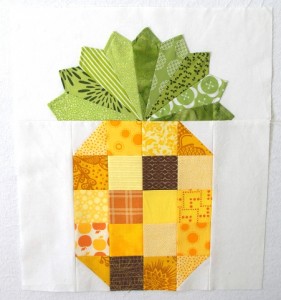
  I love this pineapple block.  I found this at Havelssewing and it is design by Beth Novak.      Four of these blocks make a wall hanging....perfect for the season.  An excellent tutorial for making the block.


Crazy Old Ladies Quilts: Orange You Glad- a tutorial:

   I started a new board just for Orange peel/pumpkin seed quilts.  I am collecting ideas.....and that's enough of a hint.

From Crazy Old Ladies blog.  The quilt is great and so is the tutorial to make the "peels" using fusible interfacing .    I have used this technique before and it works great....especially for larger applique pieces like these.


As always, please visit the links for details and for pinning.
I will be cutting plumes, and stitching away, enjoy your weekend and the sun!
Happy stitching.

Tuesday, October 6, 2015

Is this working?

   I added the two rounds for the border on this vertical strip quilt.  The first one stops the design and the second makes it float.....but seems so boring.  Or it could be that I have just made too many this way.
   So my thought was to add some  applique in the final border.  As I had extra small pieces left over, I applied fusible to them.  I cut different sizes of the plume shape.


  I began to pin them in the lower corner to create a vine type shape.  I cut a few more and moved them all around.


  I had to fold up the lower part of the top to get to the corner without sitting on the floor......that's why you see the fold.
  Anyway, here's what I have pinned on so far.  My question......is this working?  I like that it softens the vertical pattern and is unexpected.   The mixed plumes can move the color and the eye out to the edge instead of staying focused on the center/vertical lines.

 My thought at this point is to create sprays in the four corners leaving some open space on each side.  I am not sure why I am doubting myself on this one.   Maybe I just need some more time in the sun.....the rain has finally stopped.  I think I will just keep playing.
Happy stitching.  

Last doll quilts

Even though the doll quilt project has been placed on hold for now, 2 more boxes of doll quilts came last week.  Mrs. Claus is ageless and tireless.


   A large group came from Mrs. Claus in California.
 Mrs. Claus is Jan and she apparently has a very willing helper....her granddaughter.  Together they made 10 doll quilts, and her granddaughter experimented with machine quilting to finish these up.


  Lots of wonderful color.....and I think the quilting is great!   She will be ready to tackle new patterns soon.


Cute prints for these two.


  More cute prints and a clever idea.  The little quilt on the left that appears to be a striped fabric has vertical rows of  eyelet sewn over the strips.  Very clever and so cute.

Thank you, Mrs. Claus.


   The next duo is from the Southwest.  Mrs. Claus from New Mexico is/are Ellen and Kathy.
  Three little quilts made from "crumbs"......I bet they laughed and giggled their way through a sewing session when making them.


  Isn't this one adorable?  Their note said they were sending southwestern love and it is expressed so well in this little doll of a doll quilt.  It just makes me smile and will surely be enjoyed by a little girl soon.


  The last two are  a pair of cool blue ones with bright yellow flowers appliqued on.
  A wonderful collection from the Southwest.  Thank you, Mrs. Claus, Ellen and Kathy.


    I have so enjoyed showing all the great creations from the Mrs. Claus participants.  I hope you gained some inspiration  along the way.   The woodworkers have made no final decision and are still seeking a volunteer to lead the program for the next year.   I am asking that you hold off making or sending any more quilts at this time, as we are covered for this year and have some for next year.  Instead, please check around your local community for a need and share your love in fabric with them.  That way, Mrs. Claus can keep on stitching.   Big hugs to all....thank you.  
Related Posts Plugin for WordPress, Blogger...